Easy ways to stop atomizer errors on your e-cig so you can get back to vaping

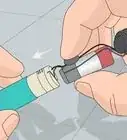
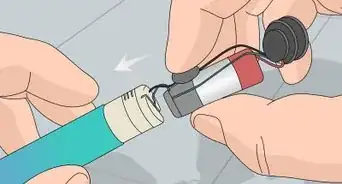
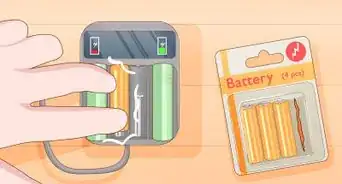
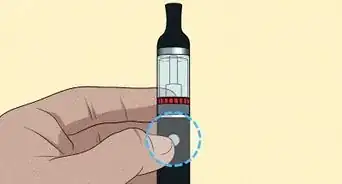
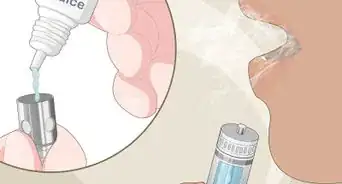
Are you seeing the "No Atomizer" message on your vape mod, RDA, or pod vaporizer? This error means your device isn't detecting the atomizer, also known as the tank—the part of your device that contains the coil, wick, and your e-liquid. There are many reasons why you'd see this frustrating error, even if the atomizer seems to be connected properly. But don't worry—atomizer errors are usually easy to fix. This wikiHow guide will walk you through troubleshooting and fixing "No Atomizer" and "Check Atomizer" on your vape.

Things You Should Know

  • "No Atomizer" or "Check Atomizer" means that something is preventing your mod or battery from detecting the connected tank or pod.
  • The issue may be coil-related. If the coil isn't attached properly, the resistance is too low, or is old or defective, you'll see atomizer errors.
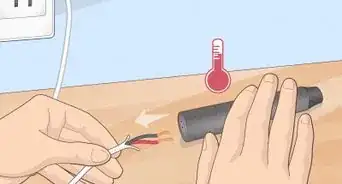
  • Your e-juice may be also leaking onto the connectors. The connectors may also be damaged, faulty, or in need of adjustment.
2

Make sure the connections are secure.

  1. If your tank or pod isn't properly connected to the battery, you'll often see "No Atomizer" or "Check Atomizer." Make sure the tank is screwed in tightly or that the pod is inserted all the way. To check, completely remove the tank or pod from the device, then reconnect it.[2]
    • Be careful not to over-tighten the atomizer, as it can break the 510 connectors.
3

Ensure the coil is inserted correctly.

  1. An improperly seated coil can trigger "No Atomizer" on your vape. Remove the coil from the tank and reconnect it to see if that resolves the error. The coil should sit flush without tilting to either side. It should also not be touching any other tank components, including the cap that covers the tank. If the coil is touching metal it shouldn't be touching (a common problem with rebuildables), you might see a "No Atomizer" or "Short Atomizer" message.
  2. Advertisement
4

Check the coil's type and resistance.

  1. You'll also want to make sure you're using the right coil for your device. If the resistance is too low, especially on a rebuildable sub-ohm RDA device, your vaporizer may give you an atomizer error to prevent damaging the device.
5

Try a new coil.

  1. The coil could be old, flooded, burned, or even flawed. If the coil is brand new and you're suddenly seeing "No Atomizer," the coil might be faulty. If you've been using the coil for a while without problems and now seeing the error, it could just be time to insert a new coil.
    • Vape coils usually last from 1 to 4 weeks. However, certain juices can wear out your coils more quickly.[3]
    • If you're using a vape cartridge or pod that doesn't have a removable coil, it could be clogged. You can try unclogging it by removing it from the device and blowing through the mouthpiece.[4]
  2. Advertisement
6

Clean the connections.

  1. Excess e-juice or dirt on the 510 connectors is often the culprit behind the "No Atomizer" message. Any liquids or grime on the connectors can prevent the tank or pod from properly connecting to the pins. You'll want to clean the connections on both the atomizer and the mod.
    • Use a lint-free cloth or paper towel to clean the connector pins and posts on your atomizer or pod, as well as on your battery or device. Twist the cloth into the hole in the atomizer tank to absorb excess liquids.
    • If you use a paper towel, make sure there's no paper residue on the connectors when you reconnect.
    • For buildup around the 510 connectors, you use a paperclip to gently scrape away the gunk.
7

Adjust the 510 connectors & inspect for damage.

  1. If cleaning didn't help, take a closer look at connectors on your mod and atomizer. These are the metal pins and plates that create the connection between the two parts. Detach the atomizer from the mod and check the metal connectors on both sides.
    • Are the plates damaged on either side? Is the screw threading intact? If you find any damage, you'll need to replace those parts.
    • Is the plate pushed up too far on the atomizer or pod? If it is, gently try to maneuver it back into position.
    • If the pins on your mod are recessed too far, they won't make contact with the atomizer. This can occur from overtightening the tank, dropping your e-cig, and even manufacturing defects. Gently tap the pins with a toothpick to see if they'll spring back into place.
    • If you're unable to get the pin(s) back into place or suspect the pin(s) is/are damaged, you won't be able to get rid of the "No Atomizer" or "Check Atomizer" message until you repair or replace the device.
    • If you have an RDA or RBA with screws securing the pin to the device, you might need to tighten or loosen the screws to get the pin into its proper position.
  2. Advertisement
8

Try a factory reset if there are no mechanical issues.

  1. If your mod has a factory reset feature, restore it to its original factory settings. Not all mods have a reset feature, but many do, including several Smok mods. Check your manufacturer's website for instructions specific to your mod.
    • Depending on your mod, there could be a firmware update that resolves the issue. Many vape manufacturers offer software updates to fix known problems. Check the manufacturer's website for an update.
    • If a reset or firmware update doesn’t get rid of the atomizer errors, it's likely time to replace either the atomizer, the mod, or both. Replacing the atomizer will be the more affordable solution, so try that first. If that doesn't help, replace your mod.

About This Article

Nicole Levine, MFA
Written by:
wikiHow Technology Writer
This article was co-authored by wikiHow staff writer, Nicole Levine, MFA. Nicole Levine is a Technology Writer and Editor for wikiHow. She has more than 20 years of experience creating technical documentation and leading support teams at major web hosting and software companies. Nicole also holds an MFA in Creative Writing from Portland State University and teaches composition, fiction-writing, and zine-making at various institutions. This article has been viewed 2,504 times.
How helpful is this?
Co-authors: 3
Updated: December 19, 2022
Views: 2,504
Categories: Electronic Cigarettes
Article SummaryX

1. Sign in to your router’s admin site.
2. Go to the Firewall page.
3. Locate the Port Forwarding section.
4. Enter or select the port.
5. Enter your computer’s private IP address.
6. Click Save or Apply.
7. Restart the router.

Did this summary help you?
Advertisement