This article was co-authored by wikiHow Staff. Our trained team of editors and researchers validate articles for accuracy and comprehensiveness. wikiHow's Content Management Team carefully monitors the work from our editorial staff to ensure that each article is backed by trusted research and meets our high quality standards.
There are 14 references cited in this article, which can be found at the bottom of the page.
This article has been viewed 21,725 times.
Learn more...
Fishing lures can get expensive, especially if they get lost or damaged. Fortunately, it is easy to make your own lures for significantly less money. The process is simple, and once you get the hang of it, it can be fast as well. Once you know how to tie a basic bucktail jig, you can experiment with all sorts of interesting color combinations!
Steps
Wrapping the Base
-
1Set your jig head into a fly-tying vise. Mount a fly-tying vise onto the edge of your table. Set the hook part of your jig head into the vise clamps, making sure that the hook is facing down.
- You can purchase all of these supplies in a fishing supply shop.
-
2Wrap the thread 3 to 4 times around the jig head's base. To make your job easier, secure a bobbin meant for fly tying to your spool of thread first, then feed the thread through the bobbin. Wrap the thread 3 to 4 times around the narrow base of the jig head. Leave a 4 to 6-inch (10 to 15-cm) tail on the thread.[1]
- You can use any color of thread you want, but a contrasting color will help you figure out what you have and have not wrapped.
Advertisement -
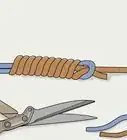
3Pull the tail alongside the jig and wrap the thread around it. Take the 4 to 6-inch (10 to 15-cm) tail and pull it towards the front of the jig, away from the hook. Take the working thread and wrap it along the length of the jig. Start at the hook end of the jig, and stop at the base of the jig's "head," where the it starts to widen.[2]
- Most jigs are shaped like fish, with a narrow body and a bulbous head. Stop wrapping just when you reach that bulbous head.
- Keep your wraps tight and close together. You should not see the jig through the thread.
-
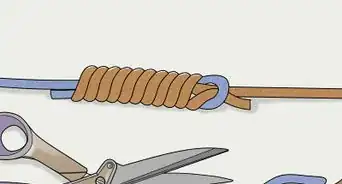
4Pull the tail back to the hook and wrap it once more. Take the tail and pull it back towards the hook end of the jig. Hold it against the area that you already wrapped. Next, take the working thread, and wrap it around the jig. This time, work your way back towards the hook end.[3]
- You are only wrapping over the areas that you already covered.
-
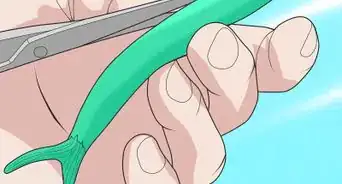
5Cut the tail end, but not the working thread. Use a small pair of scissors to cut the tail end of the thread, as close to the wrapping as you can. Leave the working thread alone. You are now ready to add the fur![4]


Adding the Fur
-
1Cut a small tuft of fur from a buck tail. Pinch a small tuft of fur from the edge of the tail; make sure that you are only pinching the white part and not the brown. Cut the tuft down to the hide with small, pointed scissors. If the fur is too long for your liking, cut it shorter from the end that you already cut.[5]
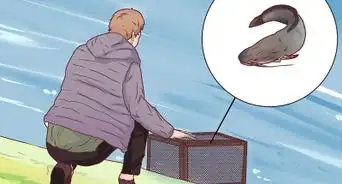
- You can purchase a buck tail from a fishing supply store.
-
2Place the tuft on top of the jig and wrap the thread around it. Take the tuft of fur, and place it on top of the jig. Make sure that the cut end of the tuft aligns with the top edge of the wrapped thread; the rest of the fur should be touching the hook. Wrap the thread 4 to 5 times around the fur and jig to hold it in place.[6]
- Don't worry about being too neat here. You will wrap the thread more tightly around the jig later on.
-
3Cut and tie another piece of fur to the side of the jig. Measure the new tuft against the tuft already tied to the jig, then trim it if needed. Hold it against the side of the jig so that it is aligned with the first tuft. Wrap the thread 4 to 5 times around the jig and both tufts.[7]
- Again, don't worry too much about tying the tufts. You are simply positioning them right now.
-
4Repeat the process for the other side and bottom of the jig. Cut and trim another tuft of fur. Rotate the jig in the vise, and tie it to the side of the jig, using the same technique as before. Repeat the process with a final tuft of fur for the underside of the jig.[8]
-
5Examine the jig and fill in any gaps, if needed. Rotate the jig in the vise and note any gaps that you find. Fill these gaps in with smaller tufts of fur. Remember to wrap the thread a few times around each tuft to hold it in place. It's okay if you still see the hook, but you shouldn't see the base thread from the previous section.[9]


Finishing the Jig
-
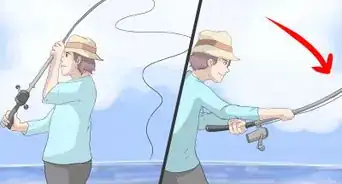
1Wrap the thread tightly up and down the jig. Hold the fur tightly against the jig. Wrap the thread tightly around the fur and jig until you reach past the cut ends of the fur. Next, wrap the thread towards the hook end of the jig.[10]
- Repeat this step 2 to 3 more times, or until you can't see the fur sticking out through the thread.
-
2Whiplash the thread around the hitch a few times. Make a V-shape with your middle and index fingers. Wrap the thread around them once to make a loop. Slide the loop onto the jig and twist your fingers to create a second loop. This completes the first whiplash. Do this 5 more times.[11]
-
3Pull on the working end of the thread, then cut it. Slowly slide your fingers out of the loop. As you are doing so, pull on the working end of the thread to tighten the knot. Once the knot is secure, cut the thread as close as possible to the wrapped thread.
-
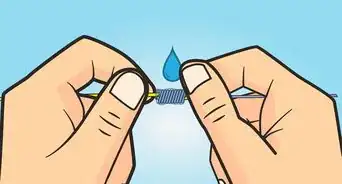
4Brush a waterproof sealer onto the wrapped thread and let it dry. You can use any waterproof sealer or glue you want, but a clear nail polish will work just fine. Use enough sealer to soak through the fibers. If you need to, apply a second coat of sealer once the first coat dries.[12]


Things You'll Need
- Fly tying vise
- Fly tying bobbin
- Jig head
- Bucktail hair
- Thread
- Small scissors
- Clear nail polish or waterproof sealer


References
- ↑ https://www.youtube.com/watch?v=8VG55lUIDDY&feature=youtu.be&t=2m15s
- ↑ https://www.youtube.com/watch?v=8VG55lUIDDY&feature=youtu.be&t=2m32s
- ↑ https://www.youtube.com/watch?v=8VG55lUIDDY&feature=youtu.be&t=2m40s
- ↑ https://www.youtube.com/watch?v=8VG55lUIDDY&feature=youtu.be&t=2m50s
- ↑ https://www.youtube.com/watch?v=8VG55lUIDDY&feature=youtu.be&t=3m9s
- ↑ https://www.youtube.com/watch?v=8VG55lUIDDY&feature=youtu.be&t=3m47s
- ↑ https://www.youtube.com/watch?v=8VG55lUIDDY&feature=youtu.be&t=4m5s
- ↑ https://www.youtube.com/watch?v=8VG55lUIDDY&feature=youtu.be&t=5m
- ↑ https://www.youtube.com/watch?v=8VG55lUIDDY&feature=youtu.be&t=6m45s
- ↑ https://www.youtube.com/watch?v=8VG55lUIDDY&feature=youtu.be&t=7m25s
- ↑ https://www.youtube.com/watch?v=8VG55lUIDDY&feature=youtu.be&t=8m32s
- ↑ https://www.youtube.com/watch?v=8VG55lUIDDY&feature=youtu.be&t=9m25s
- ↑ https://www.youtube.com/watch?v=yRs4VqIeAko&feature=youtu.be&t=3m40s
- ↑ https://www.youtube.com/watch?v=yRs4VqIeAko&feature=youtu.be&t=6m
About This Article