This article was co-authored by wikiHow staff writer, Jessica Gibson. Jessica Gibson is a Writer and Editor who's been with wikiHow since 2014. After completing a year of art studies at the Emily Carr University in Vancouver, she graduated from Columbia College with a BA in History. Jessica also completed an MA in History from The University of Oregon in 2013.
There are 8 references cited in this article, which can be found at the bottom of the page.
The wikiHow Video Team also followed the article's instructions and verified that they work.
This article has been viewed 19,088 times.
Learn more...
European pillows are the big bold statement pieces of a well-made bed. Unlike standard pillow sizes, which are rectangular, European pillows are large squares that usually measure 26 in × 26 in (66 cm × 66 cm) or 28 in × 28 in (71 cm × 71 cm). This means that they're even easier to sew since your measurements are simpler. If you're a beginner sewer, European pillowcases are a great project since your pattern is easy to cut and you're just sewing straight lines. changed
Steps
Cutting the Fabric
-
1Select fabric for your pillowcases. You can use any type of fabric you like to create your custom European pillowcases. If you'd like soft, lightweight pillowcases so you can leave the pillows on the bed while you sleep, choose cotton, linen, or a cotton-synthetic blend. For purely decorative pillowcases, you may want a heavier fabric like tweed, brushed denim, or drapery fabric.[1]
- Buy around 1 yard (0.91 m) of fabric for each pillowcase you're making.
-
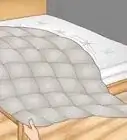
2Cut the fabric into 1 square that matches the size of your pillow. Most standard European pillows are 26 in × 26 in (66 cm × 66 cm) or 28 in × 28 in (71 cm × 71 cm), but you could make a pillowcase for any square-sized pillow. Measure across your pillow to find the measurement. Then, lay your fabric flat and cut a square with the same measurement.[2]
- For example, if you want to make a pillowcase for an 16 inches (41 cm) European pillow, cut the fabric to a 16 in × 16 in (410 mm × 410 mm) square.
Advertisement -
3Make 2 rectangular pieces of fabric for the back of the pillowcase. To find the measurements for the back flaps, divide the size of your pillowcase by 2 and add 2 inches (5.1 cm). Then, cut a rectangle that's this length by the length of your pillow.[3]
- For example, if your pillow is 16 inches (41 cm), divide that by 2 to get 8 inches (20 cm) and add 2 inches (5.1 cm) to get a length of 10 inches (25 cm). Your rectangles should be 16 by 16 inches (41 cm × 41 cm).
-
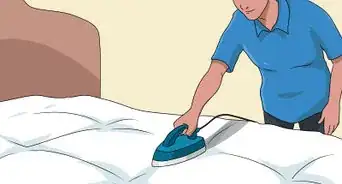
4Fold 1 long side of the rectangles over by 1⁄2 inch (1.3 cm) and iron it. Lay the rectangles so the wrong side faces up and tuck 1 of the long ends over towards the center. Fold it by 1⁄2 inch (1.3 cm) and iron across it to crease the fabric. Then, do this for the other rectangle.[4]
- Don't fold and iron all of the long sides; just 1 on each rectangle since they'll overlap.
-
5Sew straight stitches across the folded sides of the rectangles. Take your fabric to the sewing machine and make a few stitches. Backstitch a few times before you make straight stitches down the folded length of the rectangle. Repeat this for the other rectangle.[5]
- Folding and sewing the edges that will overlap prevents them from fraying.
- Use a thread color that matches your pillowcase fabric.
Assembling and Sewing
-
1Stack the rectangles on the square so they overlap. Place the square of fabric so the pattern faces up. Then, arrange 1 of the rectangles pattern-side down on the square so the long sides line up. Put the other rectangle piece pattern-side down on the other side of the square so it overlaps.[6]
- Remember to put the folded and sewn edge in the center of the pillowcase.
-
2Pin around the outer seams of the pillowcase. Insert sewing pins so they're parallel to the sides of the square and put a pin every 2 inches (5.1 cm) or so. Don't pin across the folds in the center of the pillow since you won't be sewing these closed.[7]
- If you don't want to use sewing pins, use sewing clips instead. These won't leave holes and you won't accidentally poke yourself.
-
3Sew each side of the pillowcase using a straight stitch. Start sewing at 1 corner of the pillow and sew a straight stitch along the side. Leave a 1⁄4 inch (0.64 cm) seam allowance as you go. When you reach a corner, stop sewing and lift your presser foot. Turn your fabric 90-degrees while the sewing needle is still in the fabric. Then, put the foot down and continue to sew.[8]
-
4Turn the pillowcase right side out and stuff the Euro pillow into it. Reach in between the overlapped fabric and pull the pillowcase so the pattern faces out. Take a knitting needle and push it into each corner to push the edge out. Then, open the back flaps of the pillowcase and insert the Euro pillow.[9]
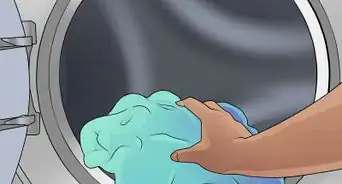
- It's easy to wash the pillowcase. Just remove the pillow and wash the pillowcase according to the fabric's care instructions.
Things You'll Need
- Fabric
- Measuring tape or ruler
- Sewing machine
- European pillow
- Scissors


References
- ↑ https://sewguide.com/fabric-glossary/
- ↑ https://www.u-createcrafts.com/european-pillow-sham-tutorial/
- ↑ https://youtu.be/6-QV3kA8WIM?t=307
- ↑ https://youtu.be/6-QV3kA8WIM?t=327
- ↑ https://youtu.be/6-QV3kA8WIM?t=345
- ↑ https://youtu.be/6-QV3kA8WIM?t=373
- ↑ https://www.u-createcrafts.com/european-pillow-sham-tutorial/
- ↑ https://youtu.be/6-QV3kA8WIM?t=386
- ↑ https://youtu.be/6-QV3kA8WIM?t=393
About This Article