This article was co-authored by wikiHow staff writer, Amber Crain. Amber Crain has been a member of wikiHow’s writing staff for the last six years. She graduated from the University of Houston where she majored in Classical Studies and minored in Painting. Before coming to wikiHow, she worked in a variety of industries including marketing, education, and music journalism. She's been a radio DJ for 10+ years and currently DJs a biweekly music program on the award-winning internet radio station DKFM. Her work at wikiHow supports her lifelong passion for learning and her belief that knowledge belongs to anyone who desires to seek it.
There are 16 references cited in this article, which can be found at the bottom of the page.
This article has been viewed 42,830 times.
Learn more...
You applied your sticker or decal with careful precision, but as you step back to admire your work, you notice it—an air bubble trapped under the surface. Sound familiar? We’ve been there! Luckily, there are a few easy ways to remove those pesky air bubbles without removing the sticker. In a few short minutes, your sticker will look smooth and no one will ever know about that little imperfection.
Steps
Smoothing Bubbles
-
1Press down on small bubbles with your thumb to smooth them. This can work for bubbles that are thumb-sized or smaller, especially if you're dealing with a vinyl sticker or decal (like the large kind made for vehicles). Just press down on the top of the bubble with the pad of your thumb and hold firmly for a few seconds until the air dissipates.[1]
- If you're dealing with a long bubble, try dividing it into smaller sections first. Just press your thumb firmly against the surface and drag it through the center of the sticker to create 2 pockets of air.
-
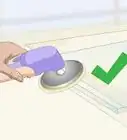
2Use a squeegee to work out air bubbles near the edge of the sticker. If you’re dealing with an air bubble a few inches from the edge of the sticker, you should be able to get rid of it pretty easily! Place the edge of a squeegee or credit card firmly against the edge of the bubble. Use short strokes to slowly push the bubble to the edge of the sticker.[2]
- If you need to, work from a few different angles to coax the bubble along until it reaches the edge.
- A squeegee is safe to use on any hard, flat surface like glass, metal, or plastic. Be gentle on surfaces that can be scratched, like vehicle exteriors.
- It doesn't matter what size or shape the sticker is! You can try this technique.
Advertisement -
3Apply a few seconds of heat to large air bubbles with a hair dryer. Hold a hair dryer a few inches from the surface and turn it on LOW. Wait a few seconds for the bubble to flatten. If it doesn’t flatten out on its own, use a squeegee or the edge of a credit card to gently work the bubble to the edge of the softened decal.[3]
- For paper stickers, heat up the adhesive with a quick blast from your hair dryer first. Then, gently lift the corner of the sticker, smooth out the paper to get rid of the bubble, and reposition it.[4]
-
4Lift the corner of a vinyl decal to get rid of a stubborn bubble or crease. This may not work on all surfaces, but it's worth a try! Lift the corner of the decal closest to the bubble or crease. Peel the vinyl decal away from the surface until you reach the crease/bubble. Then, smooth the decal with your hand and press it back into place.[5]
- If the edge of the decal doesn't lift with gentle pressure, leave it alone.


Puncturing Air Bubbles
-
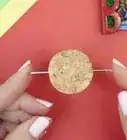
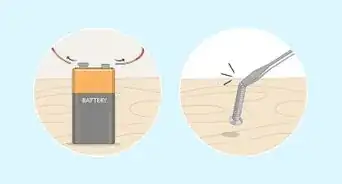
1Stick the tip of a razor blade into the air bubble and push out the air. Press the tip of a sharp razor blade or box cutter into the edge of the bubble to create a tiny hole. Then, use your finger, a squeegee, or the edge of a credit card to push the air out of the hole and smooth out the sticker.[6]
- A straight pin from your sewing kit will also do the trick.
- You can try this on any sticker size or shape.
- Puncture a larger bubble in a few spots along the edge before smoothing it out.
- Be careful so you don't accidentally scratch the surface underneath the sticker.
-
2Slice along the edge of a large bubble with a sharp blade to release air. Larger bubbles tend to have an irregular shape; if you puncture it and try to push it flat, you may end up with a crease. Instead, carefully slice a super thin cut along one of the edges of the bubble with the tip of a razor blade. Push out the air and flatten the sticker with your finger or the edge of a credit card.[7]
- As long as you use a sharp blade, the cut won't be visible when you're done.
- For stubborn bubbles, try a combination approach of puncturing and slicing until the surface smooths out.
- Work slowly and carefully so you don't damage the surface under the sticker.
-
3Use this trick for vinyl stickers only. Most stickers are made of some kind of vinyl material because vinyl is durable and long-lasting.[8] If you're dealing with bubbles in a paper sticker, puncturing probably won't work; try to smooth it out instead. The following stickers are usually made of vinyl:
- Logo stickers
- Signage stickers and lettering
- Die-cut stickers
- Photo stickers
- Bumper stickers
- Vehicle decals
- Contact paper
- Wall decals
- Vehicle wrap
- Holographic and glitter stickers[9]


Preventing Air Bubbles
-
1Wipe the surface with a damp microfiber cloth to remove any dust. Stickers won’t stick well if dirt or dust is in the way. Start by wetting a clean microfiber cloth with water and wringing out the excess. Then, use long, smooth strokes to wipe down the surface with the damp cloth.[10]
- You can also apply water directly to the surface with a spray bottle and wipe it down with a dry microfiber cloth. Either way works perfectly fine!
-
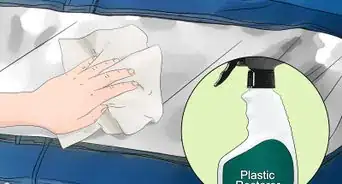
2Dampen a cloth with rubbing alcohol and wipe the surface again. Removing dust with plain water won’t get rid of oil, grease, or other surface gunk. To get the surface completely clean, give it a second swipe with a microfiber cloth dampened with rubbing alcohol.[11]
- This is especially important for vehicles where oil and grease buildup are common.
-
3Peel away the bottom portion of the sticker’s backing. Don’t pull the entire backing off the sticker yet! Instead, lift up the bottom third of the backing and fold it back out of your way.[12]
-
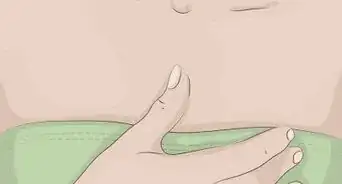
4Place the bottom edge of the sticker on the surface. Hold the sticker over the surface until you figure out exactly where you want it. Once you're happy with the positioning, press down on the bottom edge of the sticker with your fingers so it clings to the surface.[13]
- If your sticker is large, it may be easier to start with one of the bottom corners.
- For a long, narrow sticker, try positioning it first and apply a piece of painter's tape at the center of the sticker to hold it in place. Then, lift one side of the sticker and peel away half of the backing.[14]
-
5Push a squeegee carefully along the sticker’s bottom edge. Place the squeegee or the edge of a credit card flat against the bottom edge of the sticker. Push the squeegee firmly and slowly against the surface, working from the bottom edge of the sticker right up to where the backing is still attached.[15]
- For small stickers, the edge of a credit card might be easier to use.
- If you’re working from one of the bottom corners, press against the sticker diagonally until you reach the edge of the backing.
-
6Peel off the backing and use the squeegee to finish applying the sticker. Grab the backing with your free hand and hold the squeegee with your dominant hand. Push against the sticker firmly with the squeegee to continue applying it to the surface. Slowly and carefully peel away the rest of the backing as you press down on the rest of the sticker.[16]


Things You'll Need
Smoothing Bubbles
- Squeegee or credit card
- Hair dryer
Puncturing Bubbles
- Sharp razor blade, straight pin, or box cutter
Preventing Air Bubbles
- Microfiber cloths
- Water
- Alcohol
- Squeegee or credit card
References
- ↑ https://www.youtube.com/watch?v=8lfZkLCAUrA&t=61s
- ↑ https://www.youtube.com/watch?v=fu1rR6Hj-qk&t=46s
- ↑ https://www.youtube.com/watch?v=8kzmdAEIFAA&t=38s
- ↑ https://www.label.co.nz/2015/09/avoiding-air-bubbles-tips-and-tricks-for-label-application/
- ↑ https://www.youtube.com/watch?v=8kzmdAEIFAA&t=58s
- ↑ https://www.youtube.com/watch?v=k88pIwd4pss&t=73s
- ↑ https://www.youtube.com/watch?v=k88pIwd4pss&t=40s
- ↑ https://www.plctx.com/blog/5-popular-types-of-stickers-explained/
- ↑ https://www.stickeryou.com/blog/post/which-sticker-material
- ↑ https://www.youtube.com/watch?v=U0mFrzBnyyg&t=29s
- ↑ https://www.youtube.com/watch?v=U0mFrzBnyyg&t=67s
- ↑ https://www.youtube.com/watch?v=XGydZQtDhys&t=170s
- ↑ https://www.youtube.com/watch?v=SARVgPq0htg&t=46s
- ↑ https://www.youtube.com/watch?v=U0mFrzBnyyg&t=67s
- ↑ https://www.youtube.com/watch?v=XGydZQtDhys&t=176s
- ↑ https://www.youtube.com/watch?v=XGydZQtDhys&t=187s
- ↑ https://www.youtube.com/watch?v=fu1rR6Hj-qk&t=61s
About This Article