This article was co-authored by wikiHow staff writer, Travis Boylls. Travis Boylls is a Technology Writer and Editor for wikiHow. Travis has experience writing technology-related articles, providing software customer service, and in graphic design. He specializes in Windows, macOS, Android, iOS, and Linux platforms. He studied graphic design at Pikes Peak Community College.
The wikiHow Tech Team also followed the article's instructions and verified that they work.
This article has been viewed 57,569 times.
Learn more...
If Windows is unable to start up properly on your HP computer, you can perform a system recovery using HP Recovery Manager or recovery media. This wikiHow article will show you simple ways to use HP's recovery tools to reset your desktop or laptop computer.
Steps
Without Erasing Your Files
-
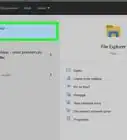
1
-
2Click . The Power icon has a circle with a line through the top. It's in the leftmost column of the Windows Start menu.Advertisement
-
3Click Shut Down. This will turn off your computer.
-
4Disconnect all cables and devices. This includes all USB devices, printers, and external hard drives.
- Don't disconnect the power cable.
-
5Turn on your computer. After you have disconnected all devices, except the power cable, press the power button to reboot your laptop.
-
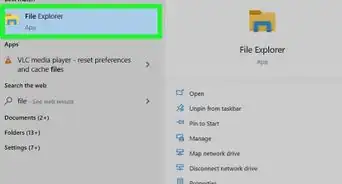
6
-
7Type HP Recovery Manager. This will display a list of applications that match your search.
-
8Click HP Recovery Manager. This will launch the HP Recovery Manager.
- You may be asked to type the administrator's password to continue.
- An user account control window may ask if you want to allow the HP Recovery Manager to make changes to your system. Click "Yes".[1]
-
9Click Windows System Recovery. It's the second option under the 'Help' column on the left. This will launch Windows System Recovery.
-
10Click Keep my files. It will take a few minutes for your computer to get things ready.
-
11Click Next on the list of apps. This is a list of apps that will be removed in the recovery process. Many of these apps can be reinstalled from the Windows Store, some will need to be reinstalled from the internet or installation discs.
-
12Click Next on the warning screen. If you recently upgraded to Windows 10, you will not be able to undo the upgrade and go back to a previous version of Windows.
-
13Click Reset. This will remove all the apps and programs that didn't come pre-installed on your laptop. It will reinstall Windows and restore it to it's default settings. This process may take a few hours.
- Warning: Once the recovery process is finished, it cannot be undone. This will permanently restore Windows to it's default settings.[2]


Full System Recovery
-
1
-
2
-
3Click Shut Down. This will turn off your computer.
-
4Disconnect all cables and devices. This includes all USB devices, printers, and external hard drives.
- Don't disconnect the power cable.
-
5Turn on your computer. After you have disconnected all devices, except the power cable, press the power button to reboot your laptop.
-
6
-
7Type HP Recovery Manager. This will display a list of applications that match your search result.
-
8Click HP Recovery Manager. This will launch the HP Recovery Manager.
- You may be asked to type the administrator's password to continue.
- An user account control window may ask if you want to allow the HP Recovery
-
9Click Windows Recovery Environment. It's the third option under the 'Help' column on the left.
-
10Click Ok. Your computer will restart, and boot up into the Windows Recovery Environment.
-
11Click Troubleshoot. It's the third option after your computer boots up into the WIndows Recover Environment. It's next to the icon of a wrench and screwdriver.
-
12Click Recovery Manager. It's the second option in the Troubleshoot menu. It's next to an icon of a wrench.
-
13Select whether you want to backup your files and click "Next". If you already backed up the files you want to keep, click the radial button next to "Recover without backing up your files". If you have not backed up your files, use the following instructions:
- Click the radial button next to "Back up your files first (recommended)" and click "Next".
- Select "Auto Selection" or "User Selection" and click "Next". Auto Selection will automatically select files to back up by category. User Selection will allow you to manually select the files and folders you want to back up. Click Next when you are finished.
- Select which files and folders, or file categories you want to back up and click "Next"
- Insert a flash drive or external USB drive. This will be the drive you use to backup your files. You can also use a writable CD or DVD.
- Select the drive you just inserted and click "Next".
- Click "Next" to backup your files to the selected drive.
- Remove the USB drive or disc and click "Next". You will return to the recovery manager. You can now click "Recover without backing up your files" and click "Next".
-
14Click Next on the System Recovery screen. The System Recovery screen informs you of the System Recovery process. It will reformat the drive and restore the laptop to its factory settings. You will see a checklist of the System Recovery process. The checkboxes will check automatically as the process completes.
-
15Click Continue. This will install any software that came pre-installed on your system and restart the computer. This process may take a while and your computer will restart a few times. Once your computer fully restarts, you will need to go through the process of setting up Windows again.


Creating a Media Recovery Drive
-
1
-
2
-
3Click Shut Down. This will turn off your computer.
-
4Disconnect all cables and devices. This includes all USB devices, printers, and external hard drives.
- Don't disconnect the power cable.
-
5Turn on your computer. After you have disconnected all devices, except the power cable, press the power button to reboot your laptop.
-
6
-
7Type HP Recovery Manager. This will display a list of applications that match your search result.
-
8Click HP Recovery Manager. This will launch the HP Recovery Manager.
-
9Click Create recovery media. It's the first option in the second column labeled "Precautions".
-
10
-
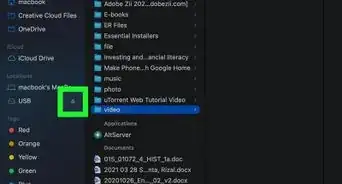
11Insert a writable DVD or flash drive. You will need a flash drive with a minimum of 20 GB, or 5 writable DVDs.
- Extra space on the disc will not be usable after the recovery media is created.
-
12Click USB Flash Drive or DVD. If you are using a USB flash drive, click the box with an image of a flash drive. If you are using writable DVD's, click the box with an image of a disc.
-
13Click Continue. This will create a media recovery disc. Follow any further instructions you see on the screen.


Restoring a Media Recovery Drive
-
1Insert the recovery media disk into the disk drive. The Media recovery disk may have been provided to you by HP, or you can make your own in the Recovery Manager. If the recovery media is a USB drive, plug it into any available USB port. If it is a CD or DVD, place it in the optical disc drive.
-
2Power off your computer. If you are able to boot Windows, you can shut down your computer using the Windows Start menu. If your computer is unresponsive or won't boot Windows, you can shut off your computer by pressing and holding the power button.
-
3Disconnect all cables and devices. This includes all USB devices, printers, and external hard drives.
- Don't disconnect the power cable.
-
4Turn on your computer. After you have disconnected all devices, except the power cable, press the power button to reboot your laptop.
-
5Press Esc repeatedly. Doing this immediately after powering on your computer will open the Startup menu.
-
6Press F9. This will open the Boot Device options menu.
-
7Select the drive with the recovery media. Use the up and down arrows on the keyboard to highlight the drive with the recovery media. Press ↵ Enter to select it.
- If you are using the media recovery disc provided by HP, you will see a black box that says "Press any key to boot from CD or DVD". Press any key to continue. If you do not respond within a few seconds, your computer will reboot as normal, and you will have to start over.
- If more than one bootable drive is available, you may have to guess which drive it is. If the drive you select does not launch recovery, or you get an error message. You may have to restart your computer, re-enter the Startup menu and select a different drive.
-
8Select a language and click Ok. Once the recovery manager launches, you will see a list of languages. Click the radial button next to the language you understand and click "Ok".
-
9Select "Factory Reset" and click Next. This will take you to the welcome page of the Recovery Manager.
-
10Select whether you want to backup your files and click "Next". If you already backed up the files you want to keep, click the radial button next to "Recover without backing up your files". If you have not backed up your files, use the following instructions:
- Click the radial button next to "Back up your files first (recommended) and click "Next".
- Select "Auto Selection" or "User Selection" and click "Next". Auto Selection will automatically select files to back up by category. User Selection will allow you to manually select the files and folders you want to back up. Click Next when you are finished.
- Select which files and folders, or file categories you want to back up and click "Next"
- Insert a flash drive or external USB drive. This will be the drive you use to backup your files. You can also use a writable CD or DVD.
- Select the drive you want to backup your files to on the screen and click "Next".
- Click "Next" to backup your files to the selected drive.
- Remove the USB drive or disc and click "Next". You will return to the recovery manager. You can now click "Recover without backing up your files" and click "Next".
-
11Click Next on the System Recovery screen. The System Recovery screen informs you of the System Recovery process. It will reformat the drive and restore the laptop to its factory settings. You will see a checklist of the System Recovery process. The checkboxes will check automatically as the process completes.
-
12Click Continue. This will install any software that came pre-installed on your system and restart the computer. This process may take a while and your computer will restart a few times. Once your computer fully restarts, you will need to go through the process of setting up Windows again.


Community Q&A
-
QuestionI installed Windows 10 and now it won't boot up. How do I access the recovery system without a recovery disk?
 Community AnswerImmediately after turning on the PC, press F11 repeatedly to access the Automatic Repair option.
 -
QuestionI restored my system and have no backup. How can I get my files back?
 Community AnswerA system restore will wipe out all files. Unless you synced your files to the cloud, the files are irrecoverable.
Warnings
- Backup all files you want to keep before running a system recovery. The Recovery process will reinstall Windows and restore all default settings. Any files that aren't backed up could be permanently lost during this process.⧼thumbs_response⧽


References
About This Article