This article was co-authored by wikiHow staff writer, Nicole Levine, MFA. Nicole Levine is a Technology Writer and Editor for wikiHow. She has more than 20 years of experience creating technical documentation and leading support teams at major web hosting and software companies. Nicole also holds an MFA in Creative Writing from Portland State University and teaches composition, fiction-writing, and zine-making at various institutions.
The wikiHow Tech Team also followed the article's instructions and verified that they work.
This article has been viewed 613,180 times.
Learn more...
This wikiHow teaches you how to record both internal and external sound on your Windows computer. You can use a free app like Audacity to record the audio coming from your computer, such as audio coming from your favorite music and video apps. If you want to record something through your computer's microphone, you can use the Voice Recorder app that comes with all versions of Windows. If you want to do more advanced multi-track recording (such as for your band/music project), see How to Record a Song with Audacity.
Things You Should Know
- Record internal audio using Audacity. Launch the app, Choose Windows WASAPI from the audio host drop-down menu and Speakers (loopback) from the audio input drop-down menu.
- Disable software playthrough, then click the red circle to start recording. Play the audio you want to record. Click "Stop" to end the recording.
- To record external audio, open Windows Voice Recorder and click on the blue-and-white microphone to start recording. Hit the the blue-and-white square to stop.

Steps
Recording Internal Audio with Audacity
-
1Download and install Audacity. Audacity is a free program that record and edit audio on your PC, including the music coming from your favorite movie and video players.[1] To download Audacity, go to https://www.audacityteam.org/download/ in your computer's web browser, and then do the following:
- Click Audacity for Windows.
- Click the Audacity 2.3.2 installer link to download the file.
- Double-click the installer file.
- Follow the on-screen instructions to install Audacity.
-
2Open Audacity. If Audacity doesn't open automatically, open Start , type audacity, and click Audacity in the search results.Advertisement
-
3Click the audio host drop-down menu. It's near the upper-left side of Audacity and usually has MME selected by default. A drop-down menu will appear.
-
4Select Windows WASAPI. This option sets Audacity to record sound from other apps, such as those that play music or videos.
-
5Click the audio input drop-down menu. It's to the right of the microphone icon that's right of the "Windows WASAPI" box.
-
6Click Speakers (loopback). Selecting it ensures that Audacity will capture your computer's internal (on-screen) audio without recording external audio (e.g., your typing).
- If the audio you're listening to is currently coming through headphones, you'll click Headphones (loopback) here instead.
-
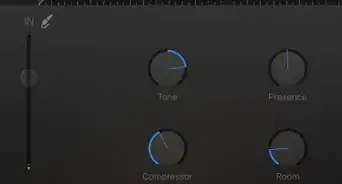
7Disable Software Playthrough. To ensure that your audio is captured without distortions and feedback, follow these steps:[2]
- Click the Transport menu.
- Click Transport Options.
- Remove the check mark from "Software Playthrough" if its present. If there is no check mark, there's no need to make any changes.
-
8Click the red circle to start recording. It's near the top-left corner of Audacity. Audacity will begin recording the audio coming from apps on your computer.
-
9Play the audio you want to record. It's best to do this after beginning your recording—you can always trim down the beginning of the recording to account for dead space as needed.
-
10
-
11Switch the "audio host" menu back to MME. This is the menu near the top-left corner of the app that currently says "Windows WASAPI." This will change back the audio output and input options so that you can play your recorded audio.
-
12
-
13Save your recorded audio. To save your file:
- Click the File menu in the top-left corner of the window.
- Select Export.
- Click Export as MP3 (or your desired format) in the menu.
- Select a save location.
- Enter a file name in the "File name" text box.
- Click Save.
- Click OK when prompted.


Recording External Audio with Windows Voice Recorder
-
1Test your microphone. This method covers making a simple one-track recording using your Microphone and Windows Voice Recorder. If you want to do more advanced multi-track recording (such as for your band/music project), see How to Record a Song Audacity. Since most laptops have an onboard microphone, you shouldn't need to connect an external one to record simple voice audio. Desktop PC users will need an external microphone. Here's how to test whether your microphone is ready to record:
- Click the Start menu and select Settings.
- Click System.
- Click Sound.
- Select your microphone from the "Choose your input device" menu on the right panel.
- Locate the pulsating bar below "Test your microphone" in the right panel.
- Speak into your microphone. If the bar moves as you speak, it is detecting audio through your microphone.
- If the bar doesn't move, click Device properties right above the bar, and try raising the volume. If you're still having issues, see How to Connect a Microphone to a Computer.
-
2
-
3Type voice recorder. This will search your computer for the Voice Recorder app, which is a free app that's included with Windows 10.
-
4Click Voice Recorder in the search results. It's the microphone-shaped app icon at the top of the results. This opens the Voice Recorder app.
-
5Click blue-and-white microphone to start recording. It's at the bottom-left corner of the app. Voice Recorder will begin capturing audio from your microphone.
- If you're recording your voice, speak directly into the microphone to record yourself.
-
6Click the blue-and-white square to stop recording. It's at the center of the window. This saves the recording and returns you to the main Voice Recorder screen.
- Recordings are automatically saved to the Sound Recordings folder inside Documents.
-
7Click the recording date to listen to the recording. Your recordings appear in the left panel with the most recent recording at the top.
- To change the name of your file, right-click its name in the left panel and select Rename.
- To share your recording with others, right-click the file and select Share. This allows you to select an app to share with.


Community Q&A
-
QuestionCan I record music coming from the computer without downloading anything?
 Community AnswerNo. You usually need a program that will enable you to do that. It's very simple. Install Audacity free audio program. Once the interface is open, there are several choices for the procedures you wish to use. Once set, you play your chosen music on your PC and start recording. The help files are really good and easy to follow.
 -
QuestionWill this work for me? I have cassette tapes that I need to convert to text.
 Community AnswerNo. This is about how to record sound (including speech) as an audio file. It is not about "speech recognition" to convert audio speech to text.
 -
QuestionCan I record music from my computer without a microphone?Community AnswerYes, you can record internally using the first method in this article. you can play music from YouTube or your music player and record it with Audacity without catching any residual background noise.


References
About This Article

1. Open Audacity.
2. Select Windows WASAPI from the first drop-down.
3. Select Speakers (loopback) or Headphones (loopback) from the second drop-down.
4. Click the Transport menu.
5. Click Transport Options.
6. Disable "Software Playthrough."
7. Click the record button.
8. Play audio in your favorite app.