This article was medically reviewed by Erik Kramer, DO, MPH and by wikiHow staff writer, Jennifer Mueller, JD. Dr. Erik Kramer is a Board-Certified Primary Care Physician at the University of Colorado. With over 15 years of experience, his clinical interests include obesity and weight management, diabetes care, and preventive care, as well as embracing a holistic approach to primary care. He received his Doctorate in Osteopathic Medicine (D.O.) from the Touro University Nevada College of Osteopathic Medicine and completed his residency at Central Maine Medical Center. Dr. Kramer is a Diplomate of the American Board of Obesity Medicine.
There are 7 references cited in this article, which can be found at the bottom of the page.
This article has been viewed 35,637 times.
If you're having lower back pain, your doctor may order an MRI (magnetic resonance imaging). During an MRI, you lie on a flat bed that slides into a large tube. Then, a powerful magnet and radio waves create detailed images of your spinal column. Your doctor uses those images to figure out what may be causing your back pain so they can recommend treatment. While you can't diagnose your own condition simply by looking at your MRI, if you know how to read it yourself you can explain the issues to others.[1]
Steps
Understanding Lumbar Images
-
1Ask for a copy of your MRI report and images. When you get your MRI done, the radiologist may simply send the report and images to your doctor for review. However, you're entitled to a copy if you ask for one.[2]
- Typically, the radiologist will give you images on a CD-ROM that you can view on a computer. If you don't have a computer with a CD drive, ask the radiologist if they can email you digital files so you can view them.
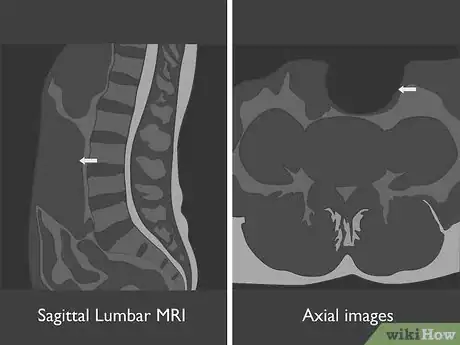
- The report identifies all of the abnormalities the radiologist detected on your images. The radiologist may also have put markers (typically colored arrows) on the images to point out each of these abnormalities.
-
2Identify the type of MRI used in each image. At a minimum, you'll have a sagittal lumbar MRI, which is a vertical image that looks at your spine from the side. You may also have axial images, which look at a cross-section of an individual disc. Think of these as similar to slicing a tree log in sections to look at the rings on the tree. Each of these uses one of two imaging techniques:[3]
- T1-weighted images show greater contrast between tissues, which allows your doctor to more accurately diagnose disc herniation. T1-weighted images are used for sagittal MRIs but not typically for axial MRIs.
- T2-weighted images brighten the cerebrospinal fluid of your spinal canal, making it easier for your doctor to see different types of infection that might be missed by a T1-weighted image. T2-weighted images are used for both sagittal and axial MRIs.
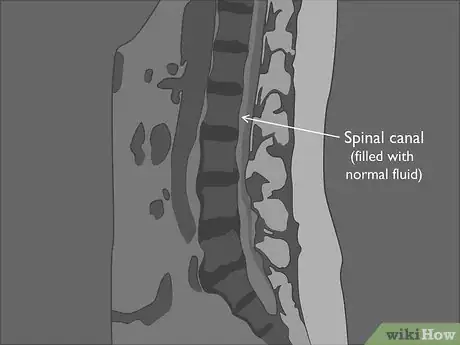
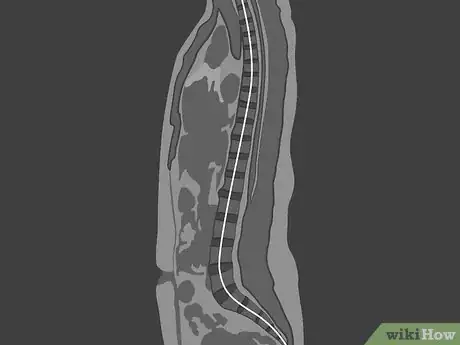
Tip: If you see a bright, white line running down your spine on a sagittal MRI, you're looking at a T2-weighted image. The white line is the cerebrospinal fluid of your spinal canal, which holds your nerves.
Advertisement -
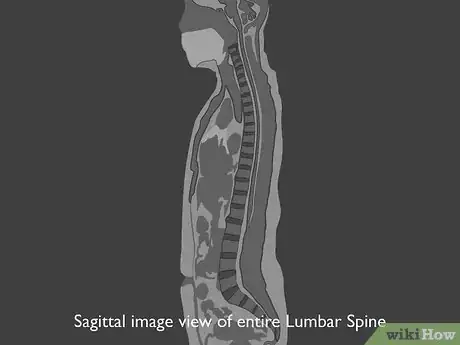
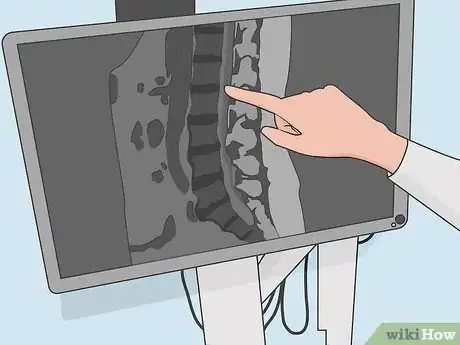
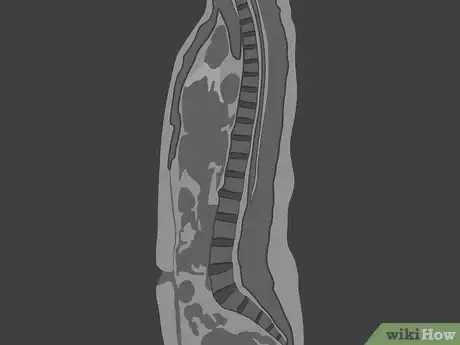
3Use the sagittal image to view your entire lumbar spine. With the sagittal image, you get a better overall picture of your lumbar spine. You can identify vertebrae that are out of alignment or discs that are abnormal.[4]
- The sagittal image is typically the easiest one to understand, and you will likely be able to easily orient the image to your body. If you see an abnormality on the sagittal image, you can easily pinpoint more or less where on your body that abnormality is located.
-
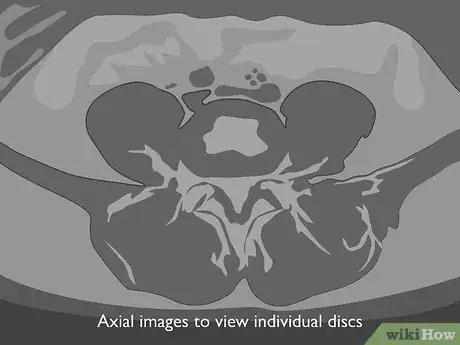
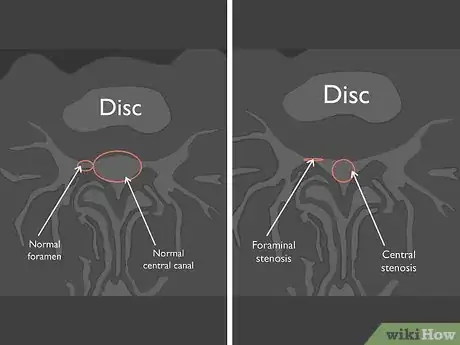
4Look at axial images to view individual discs. If one or more of your discs show an abnormality, you may have axial images that show that disc in greater detail. With an axial image, you're looking at the top of the disc as seen from above.[5]
- You can tell more about the size of the nerve canals by looking at an axial image. Your doctor may use an axial image to get a clearer picture of a herniated disc.
Identifying the Parts of Your Spine
-
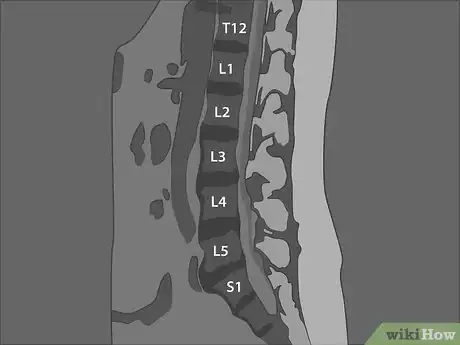
1Count the vertebrae of your lumbar spine. The vertebrae in your spine are divided into 5 regions. The lumbar region, consisting of 5 vertebrae, is the lowest region of your spine with movable vertebrae. In the 2 lower regions, the sacrum and the coccyx, the vertebrae are fused together.[6]
- The 5 vertebrae of your lumbar spine are numbered from 1 to 5, starting at the top and going down. You can count them down on your sagittal MRI.
- Medically, the vertebrae are labeled with an "L" indicating the lumbar region, followed by the number. For example, the second vertebra from the top of your lumbar spine is called "L2."
Tip: A sagittal image may also show the thoracic vertebrae above the lumbar section of your spine. To correctly identify the lumbar vertebrae, it may be easier to count up from the bottom.
-
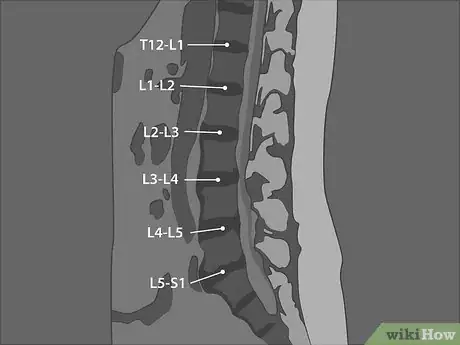
2Label the discs between the vertebrae. Each of the vertebrae of your lumbar spine is separated by a disc that acts as a cushion for the vertebrae. Your discs keep the bones of your spinal column from rubbing against each other when you move. They are labeled using the number of the vertebrae above and below them, separated by a hyphen.[7]
- For example, the disc between the third lumbar vertebra and the fourth lumbar vertebra is referred to as L3-4. Looking at your sagittal image, you should be able to determine the name for each of the discs in the lumbar region of your spine.
- The disc under L5 sits between the last vertebrae of the lumbar region and the first vertebrae of your sacrum, so it is referred to as L5-S1.
-
3Locate the spinal canal that holds nerves and fluid. Behind the column of vertebrae and discs, you'll see a long canal that holds nerves and spinal fluid. It will either be bright white or dull gray depending on whether you have a T1 or T2 image.[8]
- If you have normal alignment, the canal will be solid, as though you could draw a straight line down the vertebrae and discs of your spinal column. The line naturally curves at the lower end of the lumbar region.
- Your spinal cord technically ends before the lumbar region of your spine. However, this canal still contains nerves that continue down into your legs. At each level of the lumbar spine, a nerve splits off from the spine and goes to a specific part of your legs or feet.
-
4Zoom in on the sagittal image to view the nerves. The nerves are likely too small for you to see on the sagittal image, but if you zoom in, you'll see the small, keyhole-shaped canals on both sides of the spinal column. These canals are called "foramen" and allow the nerves to pass out of the spine and down to the legs.[9]
- Each of the foramen should be about the same size. If you have a herniated disc, one may appear smaller than the others in the location of the herniation.
Locating Abnormalities
-
1Ask your doctor to see images of a normal spine. Your doctor likely has years of experience interpreting MRIs. However, it may be easier for you to see abnormalities in your own spine if you can compare your images to the images of a normal spine. Your doctor may have images of a normal spine that they can share with you.[10]
- If your doctor doesn't have any images to share with you, search the internet for "normal lumbar spine MRI." You should be able to find many images that you can compare to yours.
-
2Evaluate the shape of your vertebrae. Each of the 5 vertebral bodies should have a generally square or rectangular shape. They'll also likely be of about the same size and thickness. Any differences could indicate a fracture or loss of bone density.[11]
- For example, if you have a vertebral body that looks more triangular than rectangular, that indicates a fracture.
- If you see a vertebra that has a pointy end that sticks out into the spinal canal, this is likely a bone spur. These form as a relatively normal part of the aging process, but can be painful if they intrude too much into the canal, leaving little space for the nerves.
-
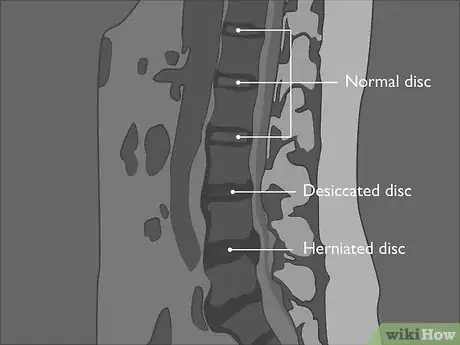
3Compare the thickness of your discs. Normally, your discs will be of more or less uniform size and similar shape. A normal disc wouldn't protrude beyond the edges of the upper or lower vertebrae. You might think of the disc as sandwiched between two vertebrae. If you had a relatively neat sandwich, the food inside wouldn't stick out from the edges of the bread. [12]
- A disc that is thinner than the others is "desiccated." Disc desiccation refers to a loss of height or thickness in the disc and is a natural product of aging (this is why people get shorter as they get older). However, if you have too much desiccation, your vertebrae may grind together when you move.
- A disc that protrudes from the sides of the vertebrae is herniated. If the herniation creates too little space for nerves in the spinal canal, this can lead to pain and discomfort.
Tip: You'll likely see more desiccation at the L4-5 and L5-S1 levels, since these are the most mobile levels of the lumbar region of the spine.
-
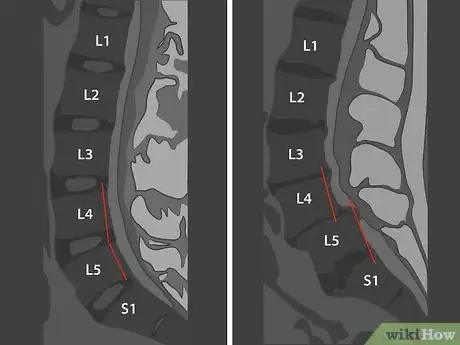
4Draw a line down the vertebrae to check your alignment. Looking at the sagittal image, the edges of your vertebrae flowing down your spine should be even if you have normal alignment. If any of the vertebrae are protruding beyond the others, so that the line isn't smooth, this may be the cause of some of your symptoms.[13]
- Your spine has a natural curve at L4 and L5, so it won't be a straight line all the way down. However, the line you draw (including the curve) should still be smooth and even.
- It's easier to see this if you're looking at a T2 image, in which the spinal canal will be a bright white compared to the rest of the image.
-
5Look at the space available for your nerves. Axial MRIs allow you to see more detail of the nerve canal and nerves traveling down to your legs. If you have a protruding or herniated disc, your nerves may not have enough space. When this happens, your doctor will say that the nerve is "impinged." The nerves at each level of your lumbar spine travel to a different part of your legs. If you have an impinged nerve, you may have pain, weakness, or numbness in the corresponding part of your body:[14]
- L1 and L2 nerves: lower pelvic area, just above the groin and genitals
- L3 nerves: front of your thighs
- L4 nerves: shins and insteps
- L5 nerves: tops of your feet and big toes
- S1 nerves: outsides and bottoms of your feet
- S2-S5 nerves: genitals, buttocks, and rectal area
-
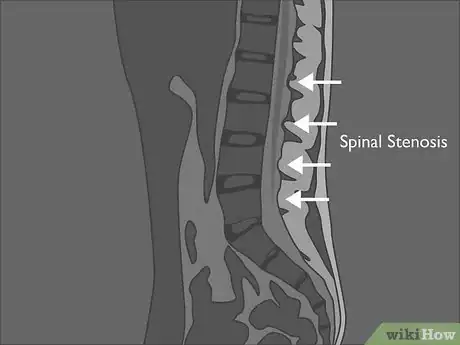
6Check for signs of disks pressing into the spinal canal. Sometimes wear and tear on the lumbar vertebrae can cause spinal disks to bulge into the spinal canal. This condition, called spinal stenosis, causes a narrowing of the space inside your spinal column, which can put pressure on the nerves in your spinal cord.[15] Look for narrow areas in the dural sac, or the tube that surrounds your spinal cord.
- To meet the criteria for spinal stenosis, a sagittal MRI should show a dural sac diameter of less than 10 mm at the point of compression.[16]
- Spinal stenosis is different from foraminal stenosis, which is a narrowing of the holes in the vertebrae that the spinal nerves exit through.
Warnings
- Radiologists are required by law to note all abnormalities in their MRI reports. However, it's possible that none of these abnormalities is the cause of your problems. Some abnormalities are harmless and do not cause medical issues, but the radiologist has to report them anyway. It’s essential to review your results with a medical professional so that they can tell you whether any of the results are cause for concern.⧼thumbs_response⧽
References
- ↑ https://mayfieldclinic.com/pe-mri.htm
- ↑ https://rockymountainbrainandspineinstitute.com/understanding-mri-lumbar-spine/
- ↑ https://www.aafp.org/afp/2002/0601/p2299.html
- ↑ https://healthcareextreme.com/how-to-read-your-spine-mri-study/
- ↑ https://healthcareextreme.com/how-to-read-your-spine-mri-study/
- ↑ https://www.bcchiro.com/what-are-the-5-sections-of-the-spine-spinal-column-anatomy/
- ↑ https://rockymountainbrainandspineinstitute.com/understanding-mri-lumbar-spine/
- ↑ https://rockymountainbrainandspineinstitute.com/understanding-mri-lumbar-spine/
- ↑ https://healthcareextreme.com/how-to-read-your-spine-mri-study/
- ↑ https://rockymountainbrainandspineinstitute.com/understanding-mri-lumbar-spine/
- ↑ https://healthcareextreme.com/how-to-read-your-spine-mri-study/
- ↑ https://rockymountainbrainandspineinstitute.com/understanding-mri-lumbar-spine/
- ↑ https://healthcareextreme.com/how-to-read-your-spine-mri-study/
- ↑ https://rockymountainbrainandspineinstitute.com/understanding-mri-lumbar-spine/
- ↑ https://www.mayoclinic.org/diseases-conditions/spinal-stenosis/symptoms-causes/syc-20352961
- ↑ https://www.appliedradiology.com/articles/imaging-spinal-stenosis

