This article was co-authored by wikiHow staff writer, Nicole Levine, MFA. Nicole Levine is a Technology Writer and Editor for wikiHow. She has more than 20 years of experience creating technical documentation and leading support teams at major web hosting and software companies. Nicole also holds an MFA in Creative Writing from Portland State University and teaches composition, fiction-writing, and zine-making at various institutions.
This article has been viewed 298,818 times.
Learn more...
This wikiHow teaches you how to take a snapshot of what's happening on your laptop's screen and send it to your printer. The latest versions of Windows and macOS come with modern tools that support many different types of screenshots. If you're using an older laptop, you can still easily take screenshots and send them to your printer with a few quick keyboard combinations.
Steps
Windows 10 (Snip & Sketch)
-
1Open Snip & Sketch. As of July 2019, most versions of Windows 10 include Snip & Sketch, a screenshot app designed to replace the old Snipping Tool.[1] To open the app:
- Click the Windows search bar and type snip & sketch.
- Click Snip & Sketch in the search results. If you don't see Snip & Sketch, click Snipping Tool, and then follow the on-screen instructions to update to Snip & Sketch.
- If you are unable to install Snip & Sketch, see the Using the PrtScn Shortcut method.
-
2Click New. It's the button at the top-left corner of the tool. This brings up the on-screen screenshot controls along the top of the screen.Advertisement
-
3Click a screenshot option to capture the screen. Each button on the control bar represents a different type of screenshot. Hover your mouse over each icon to see which type of screenshot each represents. Here's a little cheat sheet:
- Rectangular Snip, the first icon, lets you click and drag a box around the part of the screen you want to capture. As soon as you finish drawing your box, a screenshot of the selected area will appear as a preview.
- Freeform Snip, the second icon, lets you draw any shape (freehand) around the part of the screen you want to capture. As soon as you finish drawing your shape, a screenshot of the selected area will appear as a preview.
- Window Snip, the third icon, lets you capture the contents of a single open window. After clicking this option, click a window to snap a screenshot and display a preview.
- Fullscreen Snip, the fourth icon, takes a full screenshot of the entire desktop and displays a preview.
-
4Click the disk to save the image. It's near the top-right corner of the preview. This brings up the Save As dialog.
-
5Select a saving location and click Save. This saves the screenshot as an image file to your laptop.
-
6Print the screenshot. If you'd like the send the screenshot to your printer, follow these steps:
- Click the ••• menu at the top-right corner of the app.
- Click Print.
- Select your printer if it's not already selected.
- Click Print.


Windows (Using the PrtScn Shortcut)
-
1Press ⊞ Win+PrtScn on the keyboard. The screen will dim for a moment to indicate that a screenshot is being captured. Once the screenshot is ready, it will be saved to your Pictures folder in a sub-folder called Screenshots.[2]
-
2
-
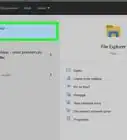
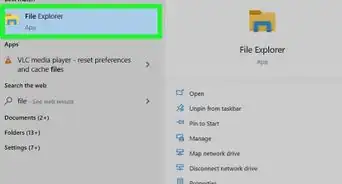
3Open your Pictures folder. You'll usually find it under "This PC" in the left panel of the File Explorer.
-
4Double-click the Screenshots folder. It'll be in the right panel. This displays all of the screenshots you've captured.
-
5Double-click your screenshot. It's the most recent file. This displays your screenshot.
-
6Print the screenshot. If you want to send your screenshot to the printer, follow these steps:
- Press Ctrl+P to open the print dialog.
- Select your printer if it's not already selected.
- Click Print.


macOS
-
1Press ⇧ Shift+⌘ Cmd+5 on your keyboard. This brings up the on-screen screenshot controls at the bottom of the screen.[3]
- If you're using High Sierra (10.13) or earlier, press ⇧ Shift+⌘ Cmd+3 to capture the screen instead.
-
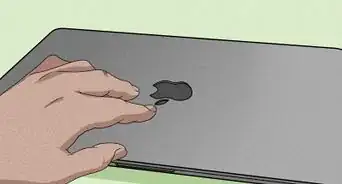
2Click the Capture Entire Screen icon. It's the first button on the on-screen screenshot controls and looks like a macOS desktop. This changes your mouse pointer to a small camera.
- If you want to capture only one portion of the screen, such as a menu or window, you can use one of the other options on the toolbar, such as:
- Capture Selected Window: The second icon, which looks like an application window, allows you to capture a single open window on the screen.
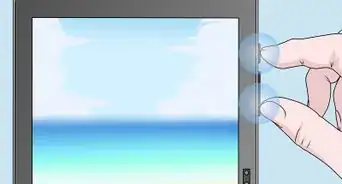
- Capture Selected Portion: It's the third icon, which looks like a square made of a dotted line, allows you to click and drag a square around the part of the screen you want to capture.
- If you want to capture only one portion of the screen, such as a menu or window, you can use one of the other options on the toolbar, such as:
-
3Click the screen to capture the screenshot. You'll see a small thumbnail at the bottom-right corner that confirms the screenshot has been captured. The screenshot is now saved as an image file on your desktop.
- If you choose the Capture Selected Window option, click inside the window you want to capture instead.
- If you chose Capture Selected Portion, click and drag the mouse to draw around the area of the screen you want to capture, and then click Capture in the on-screen screenshot toolbar.
-
4Print the screenshot. If you'd like to send the screenshot to your printer:[4]
- Double-click the screenshot on your desktop to open it. Its name should be something like Screen Shot date at time.png.
- Press ⌘ Cmd+P to open the print dialog box.
- Select your printer from the drop-down menu on the bottom-left corner of the window.
- Click Print.


Windows (Using Microsoft Paint)
-
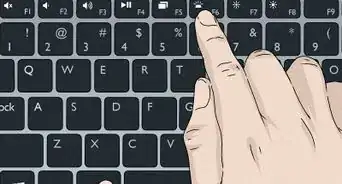
1Press the ⎙ PrtScr key on your keyboard. It's usually in the top row of keys. This takes a snapshot of the entire screen and copies it to the clipboard.
- If you're using Windows XP, see the Using Windows XP method.
- Depending on your laptop, the ⎙ PrtScr key may be shared with another key, such as one of the F keys. If this is the case, you'll usually have to press another button that says Fn as you press ⎙ PrtScr.
-
2Open the Start menu and click All Programs.
-
3Click the Accessories menu and select Paint. This opens Microsoft Paint, an image-editing program from which you can print the screenshot.
-
4Click the Home tab and select Paste. The Paste option is on the "Clipboard" panel in the toolbar along the top. You will now see your screenshot in MS Paint.
-
5Click the File menu and select Save.
-
6Name the file and click Save. The screenshot is now saved as an image file.
-
7Print the screenshot. If you'd like to send a copy of the image to your printer, follow these steps:
- Click the File menu. It's at the top-left corner of the app.
- Click Print.
- Select your printer if it's not already selected.
- Click Print.


Windows XP
-
1Press the ⎙ PrtScr key on your keyboard. It's usually in the top row of keys. This takes a snapshot of the entire screen and copies it to the clipboard.
- Depending on your laptop, the ⎙ PrtScr key may be shared with another key, such as one of the F keys. If this is the case, you'll usually have to press another button that says Fn as you press ⎙ PrtScr.
-
2Click the Start menu and select Accessories.
-
3Click Paint. This opens Paint, which is an image editing application on your laptop. on “Paint,” then click on “Edit” in the Paint window. Microsoft Paint is an image-editing program from which you can print the screenshot.
-
4Click the Edit menu. It's at the top of the screen.
-
5Click Paste. The screenshot will display in the Paint window.
-
6Click the File menu and select Save As.
-
7Name the file and click Save. The screenshot is now saved to your laptop.
-
8Print the screenshot. If you'd like to send a copy of the image to your printer, follow these steps:
- Press Ctrl+P to bring up the printer dialog.
- Select your printer if it's not already selected.
- Click Print.


Community Q&A
-
QuestionWhat if I'm using a Windows laptop that doesn't have the "Print screen" button?
 Community AnswerIf you have a snipping tool, you can use that for screenshots and printing. Most up-to-date Windows systems have this tool, but if yours doesn't, you can download one.
 -
QuestionMy Print Screen its not working, I'm on windows 7. What should I do?
 Isaac TagCommunity AnswerOn Windows 7, when you Ctrl + PrtScrn, it saves it to your clipboard. You can then copy it into Paint and save it.
 -
QuestionWill the screenshot appear when I paste it from the clipboard?
 Community AnswerYes. If you press, "Print Screen," and then paste or hit Ctrl+V onto a Word or Paint document, you should be able to paste the screenshot you took.

References
About This Article

1. Open Snip & Sketch.
2. Click a screenshot type.
3. Draw a shape around the area (optional).
\
4. Save the screenshot.
5. Press Ctrl + P to print.