This article was co-authored by wikiHow staff writer, Eric McClure. Eric McClure is an editing fellow at wikiHow where he has been editing, researching, and creating content since 2019. A former educator and poet, his work has appeared in Carcinogenic Poetry, Shot Glass Journal, Prairie Margins, and The Rusty Nail. His digital chapbook, The Internet, was also published in TL;DR Magazine. He was the winner of the Paul Carroll award for outstanding achievement in creative writing in 2014, and he was a featured reader at the Poetry Foundation’s Open Door Reading Series in 2015. Eric holds a BA in English from the University of Illinois at Chicago, and an MEd in secondary education from DePaul University.
There are 13 references cited in this article, which can be found at the bottom of the page.
The wikiHow Video Team also followed the article's instructions and verified that they work.
This article has been viewed 40,214 times.
Learn more...
Polishing a foil ball typically refers to the process of compacting and sanding a roll of aluminum foil to create a shiny, metal ball. If you’ve got 4-5 hours on your hands to pound, buff, and polish the ball, the result will be incredibly mesmerizing. While balling up and polishing your ball takes quite a bit of time, you can pick it up or put it down at any point to do this in multiple sittings. You’re sure to impress your friends and family by turning a regular old roll of aluminum foil into a reflective, smooth sphere!
Steps
Creating the Sphere
-
1Find the softest, nicest aluminum foil that you can find. You can do this with the cheap stuff, but higher-end aluminum foil is usually heat treated which really makes this process easier. Go online or stop in your local grocery store and pick up a roll of nicer aluminum foil. Look for food-service grade stuff if you can. Otherwise, pick out a standard roll of foil.[1]
- Anything marketed as “thin” will usually be really good for this.
- Avoid the thicker or heavy-duty versions. This stuff isn’t particularly easy to work with for this.
- Get a 15–20 ft (4.6–6.1 m) roll if possible. More than that will require a lot more work. Less than that will result in a really small ball.
-
2Crumple and ball up the entire roll as you pull it out of the package. Open the aluminum foil package and pull out the first 1–2 feet (0.30–0.61 m) or so. Crumple and compress the aluminum foil into a ball shape and pull more of the foil out to repeat the process. Try to avoid breaking the foil and don’t worry too much about the shape—it’s got a long way to go before it’s a ball![2]
- If you break the roll, try to put the broken piece in the center of the ball and surround it with the unbroken piece. You can also simply toss the broken piece out or start over if you prefer.
Advertisement -
3Compress the foil by hand to shape it into a sphere. Pick the foil up in your hands and compress it together like you’re trying to squeeze a basketball from both sides. Turn the foil around and continue pressing it. The closer you can get to a solid circle, the easier the next set of steps will be. Do this for 5-10 minutes until you’ve got a clean ball.[3]
-
4Rotate the ball while tapping it with a mallet to compress it even further. Set the ball down on a table and grab a rubber mallet. The wider the mallet, the better. Brace the ball with your nondominant hand and gently rotate the ball while tapping it with the mallet. This will remove all of the air bubbles inside and compact your ball. Do this for 15-20 minutes until you have a compact sphere.[4]
- You can tell when you’re done by squeezing the ball. If there isn’t a ton of give, you can move on to the next step.
- Be sure to hit the ball from every angle to keep the density of the sphere uniform.
-
5Repeat this process with a hammer to compress the ball. Swap the mallet out for a hammer. Repeat this process by striking the sphere while rotating it. Be extremely careful when doing this to avoid hitting your hand or striking the table. Do this for 15-20 minutes until your sphere is so compact that there’s no give when you squeeze it.[5]
- At this point, it should be kind of difficult to ruin the shape of the ball. If you do end up warping it, simply strike the area that’s sticking out of the sphere until the shape returns.
Tip: If you aren’t confident in your ability to keep your hand safe, grab a pair of tongs and do this outside on the sidewalk. Hold and rotate the ball with the tongs to avoid hurting your hand. It’s always better to be safe than sorry!
Sanding the Foil
-
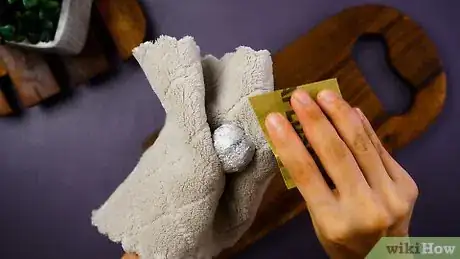
1Sand the surface of the ball with a sheet of 100-grit sandpaper. Grab a sheet of sandpaper or a sanding brick with 100-grit. Put a cloth in your nondominant hand and use it to hold the ball in the air from underneath. Then, gently brush the surface of the sphere while rotating the ball in your hand. Use a combination of single-direction strokes and circular buffing motions to remove the exterior layer of the sphere. Do this for 10-15 minutes.[6]
- You’re probably going to knock off some aluminum dust. The cloth will keep it from covering your table.
Warning: Throw on some sunglasses or protective eyewear. It's unlikely that you’ll knock anything up into your eyes, but it's better to be safe just in case.
-
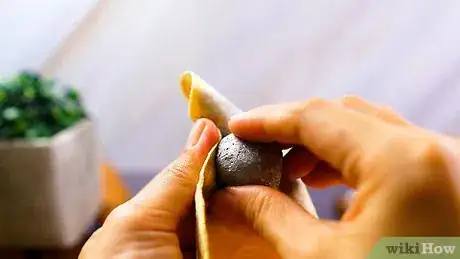
2Continue sanding the ball using increasingly finer grits. This may take some time, but it’s the most important part of the process if you want a clean sphere. Repeat the sanding process using 120-, 320-, 400-, 600-, and 800-grit sandpaper (in that order). Wrap a cloth underneath the ball to catch any residue and scrub the ball using back-and-forth strokes. Spend 15-30 minutes using each grit to thoroughly smooth the surface out.[7]
- This should take a few hours if you’re aiming for a really beautiful sphere. You don’t need to do it all in one sitting if you have other things to do or get tired of sanding.
- By the time you’re done, you should have a really impressive ball. It should look like one piece of foil and you shouldn’t see any ridges or edges in the material.
-
3Perform the final sanding with 1000-grit sandpaper under cold water. Turn your sink on and grab a sheet of 1000-grit sandpaper. Hold the ball under the water and give it one more thorough sanding. Do this for at least 15-20 minutes. The fine sandpaper will smooth out any microscopic grooves while the water will wash any blemishes or foil dust away.[8]
- You can do this in a bucket filled with water if you prefer.
Polishing the Ball
-
1Grab some polishing cream and a chamois cloth. There are a few ways to get the lustrous shine you’re looking for. Without a doubt, the easiest way to do this is with a metal polishing cream. Pick up a small container of metal polish from your local hardware or big box store. You’ll also need a chamois cloth to buff the sphere and work the polish into the foil, so pick one of these up as well.[9]
- You can use a microfiber cloth if you don’t have access to a chamois cloth, but the chamois will make it a bit easier to buff the ball.
Variation: The other way to get the shine you’re looking for is to use a liquid abrasive to wear away the surface of the ball. The abrasive can irritate your skin and this involves wearing a layer of aluminum away, though. You could also theoretically use a blowtorch, but there’s no need to break out any dangerous equipment if you can avoid it.
-
2Dip the cloth into the polishing cream and rub it into the ball. Take your chamois cloth and dip it into the container to pull up a thick glob of polishing cream. You can always scoop up more cream, so the amount doesn’t necessarily matter. Gently rub the ball with your chamois cloth to cover the surface of the aluminum foil with your polishing cream.[10]
-
3Work the cream into the surface using your cloth. Rub the cloth firmly in the ball while rotating it in your hand. Scoop up more polishing cream if you feel the ball drying out. Use a combination of back-and-forth strokes and circular motions to work the cream into the ball. Keep doing this until the ball starts reflecting light and shining.[11]
- You can use a drill with a fabric attachment to make this process easier if you’d like.
-
4Re-sand the ball with your polishing cream if it isn’t starting to shine. If the ball still isn’t reflecting light, you may need to sand it a little further. Grab a 1000- to 2000-grit sanding block and pour a bead of polish directly into the sandpaper. Then, sand the ball with the polish-loaded sanding brick the same way you polished it before. Do this until the ball begins to shine.[12]
- Don’t forget to rotate the ball by turning it in your hand to sand every side! The goal at this point is to spread the polish out evenly into your aluminum foil.
-
5Wipe the excess polishing cream away with a dry cloth. Grab a clean, dry cloth and wrap it around the ball. Massage the ball thoroughly with the cloth to wipe away the excess polish. Now you have a lustrous ball![13]
Warnings
- Do not microwave the foil. There are a lot of joke videos out there about microwaving foil, but they’re just poking fun at the process. Microwaving foil will blow the microwave up and you may start a fire so just don’t do it![15]⧼thumbs_response⧽
Things You’ll Need
- Aluminum foil
- Mallet
- Hammer
- Towel
- Protective eyewear
- Sandpaper
- Water
- Polishing cream
- Chamois cloth
- Dry cloth
References
- ↑ https://www.livescience.com/62388-foil-ball-challenge.html
- ↑ https://youtu.be/WKz5lCGMf5Q?t=56
- ↑ https://youtu.be/mDJdlYIz6Lo?t=78
- ↑ https://youtu.be/WKz5lCGMf5Q?t=77
- ↑ https://youtu.be/1m-Wx3KrmkU?t=94
- ↑ https://youtu.be/mDJdlYIz6Lo?t=210
- ↑ https://youtu.be/WKz5lCGMf5Q?t=147
- ↑ https://youtu.be/WKz5lCGMf5Q?t=170
- ↑ https://mymodernmet.com/aluminum-foil-ball-trend/

