X
This article was co-authored by wikiHow Staff. Our trained team of editors and researchers validate articles for accuracy and comprehensiveness. wikiHow's Content Management Team carefully monitors the work from our editorial staff to ensure that each article is backed by trusted research and meets our high quality standards.
This article has been viewed 40,423 times.
Learn more...
The mattress stitch is a method of joining knit pieces together to form one solid piece with a hidden seam. The seam is on the wrong side (the back or hidden side) of your work, so it will not be visible. You can easily learn how to use the mattress stitch and use it to join knit pieces as needed.
Steps
Method 1
Method 1 of 2:
Joining Knit Pieces With the Mattress Stitch
-
1Thread a yarn or tapestry needle. You will need to use a special kind of needle to join knit pieces with the mattress stitch. A yarn needle or tapestry needle works best. Thread the yarn through the needle.[1]
-
2Lay out your pieces right side up. You will need to sew your pieces with the right side facing you. This will ensure that the seam is on the wrong side of the work.[2]Advertisement
-
3Insert the needle through the bar between the end stitches. It is best to go through the bar (also known as the ladder) between the last two stitches on the edge of your work. Otherwise, the seam may be too bulky.[3] Insert the needle through the bar on the first side, going from the bottom of the work and moving towards the top of the work.[4]
- Only work the needle through one bar at a time. Going through two bars at once may cause puckering.
-
4Insert the needle in the same spot on the opposite side. After you make the first stitch, repeat the same thing on the other side. Insert the needle through the bar between the last two stitches. Make sure to insert the needle from below the bar and move it towards the top of the work.[5]
-
5Go back and forth moving upwards. Continue to go back and forth between your two pieces of knit work to connect them. Keep going until you reach the top of the work.[6]
- You may also be able to go through the bar on every other stitch moving upwards if you are working with a bulky yarn. However, this is based on your preference.[7]
-
6Pull on the yarn after every few rows to pull the sides together. To tighten the seam between the two pieces, tug on the yarn after ever few rows. However, do not pull too tight or the yarn may pucker. Pull the yarn just enough to bring the sides together.[8]
- If you notice any puckering, loosen the seam stitching to eliminate the puckering.
-
7Tie the yarn through the last stitch to secure it. When you reach the top of your work and you are happy with the appearance of the seam, tie a knot to secure the last two sides together. Then, you can either cut the excess yarn or use your tapestry or yarn needle to weave the end into the edge of your work.


Advertisement
Method 2
Method 2 of 2:
Getting the Best Results
-
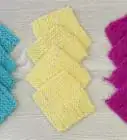
1Join stockinette stitch work. The mattress stitch seam is perfect for joining knit work that is in the stockinette knit stitch. This means that the work uses a basic knit stitch on one side and a purl stitch on the other side. With this type of knit, you can easily insert the needle through the bar between the last two stitches in the work and get a clean, hidden seam as your final result.[9]
- Keep in mind that you may not get the same results with other types of knits.
-
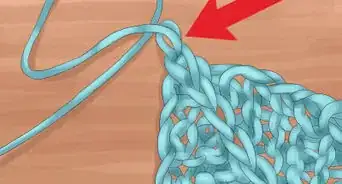
2Leave a long tail for weaving. Instead of tying a piece of yarn to the corner of a piece of your work to begin sewing two pieces together, leave a long tail on one of them. This will ensure that you have plenty of yarn to work with. To leave a long tail, pull out the last loop from your knit work after you finish casting off and then cut it when it is several inches long.
- Aim for a tail that is twice as long as the area you will be seaming with the mattress stitch.
-
3Use the same color yarn as your knit pieces. Even though the yarn will be mostly hidden on the wrong side of your work, it is a good idea to use the same color yarn as your other knit pieces use. This will help to ensure that you will get a seamless finish after stitching the sides together.[10]

Advertisement
Community Q&A
-
QuestionDoes this stitch work for crochet also?
 T. ChinsenTop AnswererThe stitch will also work for crocheted items. The stitches will be longer if the crochet stitches are taller than the size of the hook used.
Advertisement


References
- ↑ http://www.knitty.com/ISSUEspring04/mattress.html
- ↑ http://www.knitty.com/ISSUEspring04/mattress.html
- ↑ https://www.purlsoho.com/create/mattress-stitch/
- ↑ http://www.knitty.com/ISSUEspring04/mattress.html
- ↑ http://www.knitty.com/ISSUEspring04/mattress.html
- ↑ http://www.knitty.com/ISSUEspring04/mattress.html
- ↑ https://www.purlsoho.com/create/mattress-stitch/
- ↑ http://www.knitty.com/ISSUEspring04/mattress.html
- ↑ https://www.purlsoho.com/create/mattress-stitch/
About This Article

wikiHow Staff
wikiHow Staff Writer
This article was co-authored by wikiHow Staff. Our trained team of editors and researchers validate articles for accuracy and comprehensiveness. wikiHow's Content Management Team carefully monitors the work from our editorial staff to ensure that each article is backed by trusted research and meets our high quality standards. This article has been viewed 40,423 times.
Co-authors: 4
Updated: March 9, 2023
Views: 40,423
Categories: Knitting
Advertisement