X
This article was co-authored by wikiHow Staff. Our trained team of editors and researchers validate articles for accuracy and comprehensiveness. wikiHow's Content Management Team carefully monitors the work from our editorial staff to ensure that each article is backed by trusted research and meets our high quality standards.
This article has been viewed 99,375 times.
Learn more...
For Halloween, or any occasion that calls for a costume, a sailor costume can be a simple but stylish option. You may be able to create the look from materials you already have, or you could purchase them cheaply at a used clothing store. The basic look requires white or blue pants and shirt. You can also make a sailor collar and a simple cap.
Steps
Part 1
Part 1 of 3:
Cutting Out the Collar
-
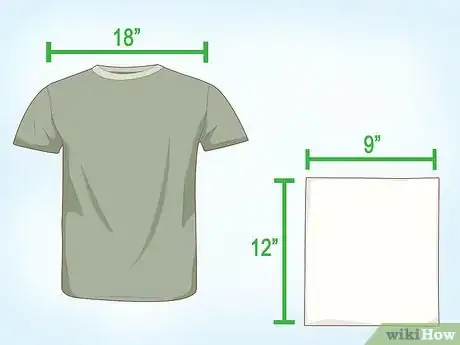
1Use a piece of paper to make a pattern. Cut out a rectangle of paper that is 12 inches long and about half as wide as the shirt (or your shoulders). Use a ruler to make sure all of the edges are straight.
- For example, if your shoulder width is 18 inches, the paper should be 12 inches by 9 inches.
- Tissue paper is good to use for this because it usually comes in large sheets and it is easy to fold and cut. Be gentle with it so you don’t rip it.
-
2Fold the paper in half lengthwise. Fold it so that the 12 inch side is still 12 inches and the other side is now half as wide. Make sure the corners are lined up straight so the fold is perfectly symmetrical.Advertisement
-
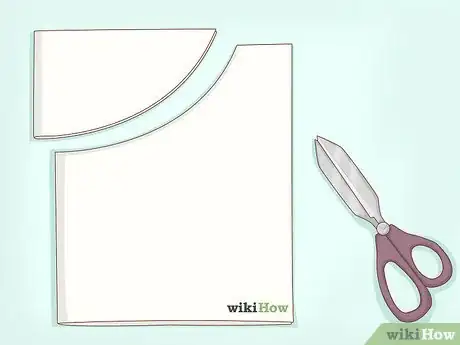
3Draw a curved line from the short side to the folded side. Make a dot ½ inch from the uncreased edge of the short side. Make another dot 4 inches from the top the creased edge of the paper. Connect these two dots with a curved line.
-
4Cut out the curved section. Using sharp scissors, carefully cut along the line you have drawn. This will create the section that will go around your neck. You can throw away the small portion that you have cut out. Unfold the paper pattern before you to trace it on the fabric.
-
5Trace the pattern onto a piece of fabric. Lay the fabric flat on a table or counter and lay the pattern on top of the fabric. Make sure both are smooth. Using a pencil or pen, trace around the entire pattern.
- An old cotton t-shirt that you don’t mind cutting up would be ideal for making a collar. Use a part of the shirt that has no pictures or stitching on it.
-
6Cut the fabric along the traced pattern. Using sharp scissors, slowly cut out the pattern. Try to make all of the lines as straight as possible. You don’t want the collar to appear crooked or wavy. You could also lay the fabric on a large piece of cardboard and cut it out with a box cutter.
-
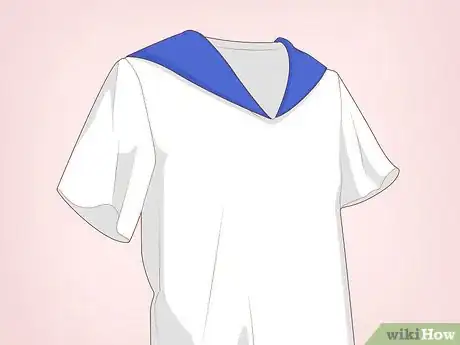
7Attach the collar to the shirt. Once you choose a shirt, carefully sew the collar to the shirt. Hang the flaps over the front of the shirt, with the square part of the collar hanging down the back. For a more temporary option, you can use safety pins to attach the collar. You can also sew a ribbon around the outer edge for added flare.
Advertisement
Part 2
Part 2 of 3:
Choosing the Main Elements
-
1Select a shirt. You have some freedom with this, as there’s a variety of ways sailors can look. Your basic option is a long-sleeve, white v-neck shirt. You could also go with a dark blue look. A baggy white shirt that has a wide neck that ties closed is also an option. This look is a little more pirate than sailor, but there’s a close connection.
- A short sleeve shirt is also an option if you want a more casual or less hot costume.
- You can consider sewing two blue stripes around the cuff of the shirt.
- Depending on what kind of sailor look you want, a white shirt with blue or black horizontal stripes is also a good choice. You can draw the stripes on with a marker if you don’t have a striped shirt. The stripes should be about ½ inch (1.27 centimeters) thick and 1 inch (2.54 cm) apart.
-
2Pick your pants. Your sailor outfit can either be solid white, solid blue, or can be half and half. So choose your pants according to how you want the overall outfit to look. Your best bet is probably slacks. You can iron them to give them a sharp crease in the front. You could also go with looser cotton pants that don’t have a crease.
-
3Choose your shoes. You have some flexibility in shoes. You probably want either white or black, depending on the colors of your shirt and pants. Loafers or boat shoes are a good option, but you could also wear shiny black lace up shoes or even military style boots.
- If you have multiple pairs of shoes already, or you want to buy some anyway, try out different options and decide which style you like best.
-
4Tie a scarf around your neck. Choose a thin scarf that is approximately 2 feet long. Wrap it around the back of your neck, going under the collar, and tie it loosely in front. The knot should hang somewhere around your sternum.
- A basic overhand knot like you would tie in a rope is sufficient, but you can make it look fancier if you want.
- If your outfit is all white, a royal blue or navy blue scarf is a good accent. If you chose a darker outfit, consider a white scarf.
Advertisement
Part 3
Part 3 of 3:
Creating a Homemade Cap
-
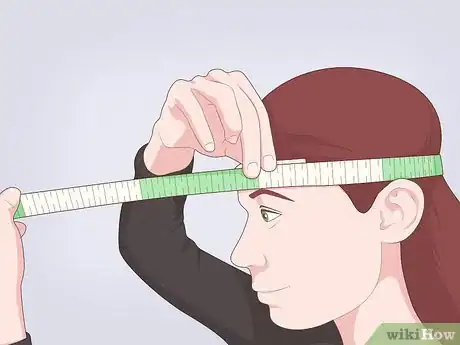
1Measure your head’s circumference. With a flexible measuring tape, like one you would find in sewing kit, take a measurement around your head. If you don’t have this kind of measuring tape, a piece of string will work. Write down the number of inches your head measured. If you used string, make a mark on it noting the measurement.
- You’ll use this measurement to create the band of the cap. If you want to make sure the cap isn’t too tight, you may want to add a little extra length.
-
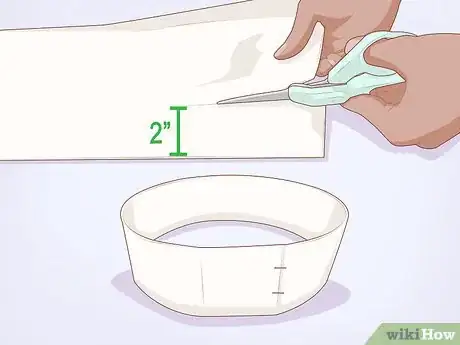
2Cut a strip of thin, flexible cardboard. Cut the strip to your head measurement length and about 2 inches wide. After you cut it, circle it around your head to make sure it’s the right size. Trim it down or cut a longer strip as needed. Staple the strip into a circle.
- A cereal box is a good option for this step.
-
3Attach a coffee filter to the cardboard circle. With the cardboard circle sitting on the table, or counter, place a coffee filter inside it with open end up. Place 4 to 5 staples around the edge securing the filter to the cardboard circle.[1]
-
4Wrap white fabric or paper around the cardboard. This wrap should extend about ½ inch past each side of the cardboard. Fold the extra down over the rim of the cardboard on the top and bottom. Then glue it in place to make sure it stays folded.
- You want the hat to appear all white, so try to make sure the cardboard is not visible. To do this, either use thick enough paper or fabric, or considering making it double thick with two layers. If you used a white shirt to cut out the collar, you could use more fabric from this same shirt.
-
5Push the coffee filter through so the bottom becomes the top. The portion of the coffee filter that you stapled to the cardboard will be the top of the hat so the staples don’t rest on your head. Allow all of the glue to dry before placing the hat on your head.
Advertisement
Community Q&A
-
QuestionIs this outfit suitable for girls?
 Community AnswerYes. You can always modify it to suit your style and needs.
 -
QuestionIs this suitable for kids?
 Community AnswerYes. If they have a dress up day in school, they can go as sailors.
 -
QuestionWould it be OK if I wore my glittery rain boots with the outfit?
 HumanBeingTop AnswererRain boots are worn by sailors and fishermen, so you can certainly wear your glittery rain boots. You'll be a sparkly sailor who likes dry feet!
Advertisement
Things You’ll Need
- Tissue paper
- Ruler
- Scissors
- Pencil or dark pen
- White fabric (or old shirt to cut)
- Sewing machine (or needle and thread or safety pins
- White (or dark blue) long-sleeved shirt (to wear)
- Black or dark blue marker
- Pants
- Shoes
- Scarf (ascot)
- Flexible tape measure (or piece of string)
- Thin cardboard (cereal box)
- Stapler
- Coffee filter
- Glue
About This Article
Advertisement
