This article was co-authored by Bess Ruff, MA. Bess Ruff is a Geography PhD student at Florida State University. She received her MA in Environmental Science and Management from the University of California, Santa Barbara in 2016. She has conducted survey work for marine spatial planning projects in the Caribbean and provided research support as a graduate fellow for the Sustainable Fisheries Group.
This article has been viewed 162,906 times.
It takes the moon roughly 29.5 days to orbit the earth. During its orbit, different portions of the moon are visible. These portions are referred to as “moon phases.” Since the moon’s orbit is a predictable pattern, it is possible to chart the phases of the moon. This can be a great way to study the moon in depth or to introduce children to the cycles of the moon.
Steps
Creating Your Chart
-
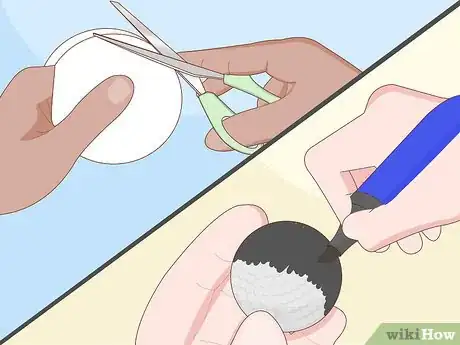
1Make a 2D chart or a 3D chart. Use white construction paper cut in circles and color in the moon phases with markers or use halves of styrofoam balls glued to posterboard to make a 3D representation. Color in the foam balls with a black marker to show the waxing and waning of the moon phases.
-
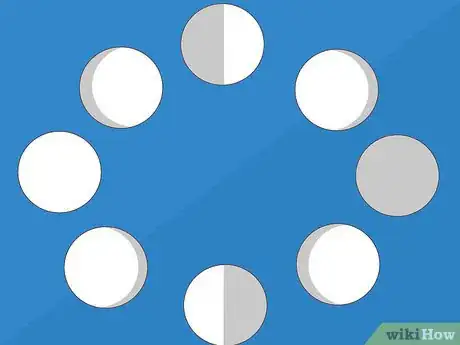
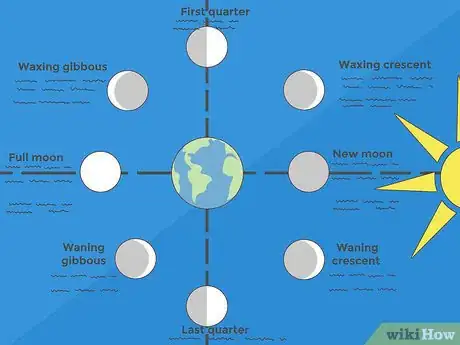
2Know the phases of the moon. This is vital to being able to create an accurate chart. There are eight main phases of the moon, each lasting roughly 3.5 days. The phase of the moon depends upon the way in which the moon is positioned in relation to the sun and earth at any given time. The eight phases are:[1]
- New moon
- Waxing crescent
- First quarter
- Waxing gibbous
- Full moon
- Waning gibbous
- Last quarter
- Waning crescent
Advertisement -
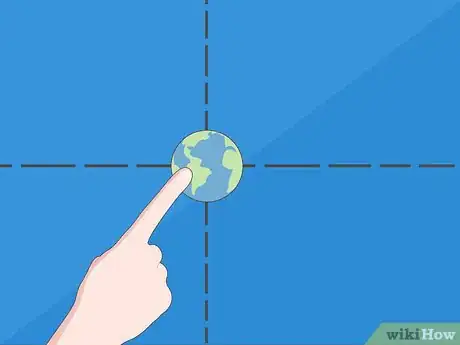
3Place Earth in the center of your chart. Different positions of the moon relative to the earth and sun produce the visible phases of the moon. The moon phases chart is designed to describe the visibility of the moon at different points as it orbits the earth. By placing Earth in the center of your chart, you keep this concept in perspective.[2]
-
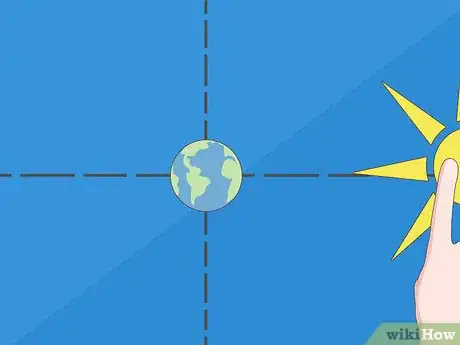
4Place the sun on your chart. The sun is typically placed on the right side of the chart. This is important, because the moon phase depends upon the moon’s relation to both the earth and the sun. If you place the sun to the left of the earth, you would have to move all of the moon phases to match this new position.[3]
- The relationship of these three bodies is important, but the actual determination of right or left side is arbitrary. The earth orbits the sun and the sun is never at a stationary “left or right” in relation to the earth.
Adding the Waxing Phases
-
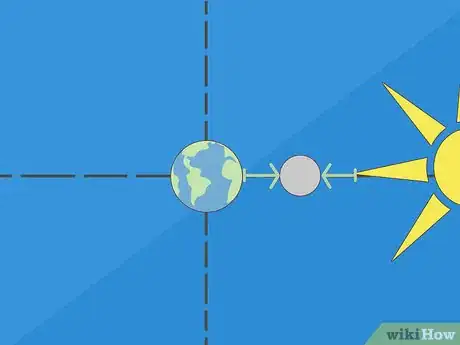
1Start with the new moon. The new moon occurs when the moon is directly between the earth and the sun. Draw or fasten a new moon (all dark/shadowed) directly between the earth and sun.[4]
- In astrology, the new moon symbolizes birth or new beginnings. It is thought to be a good time to start a new project.[5]
-
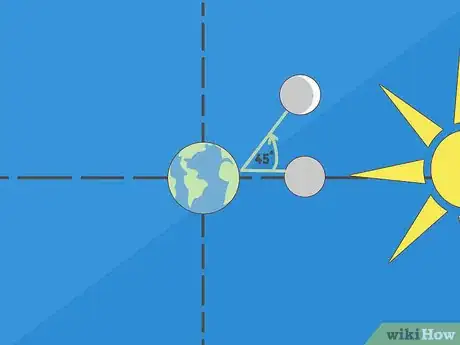
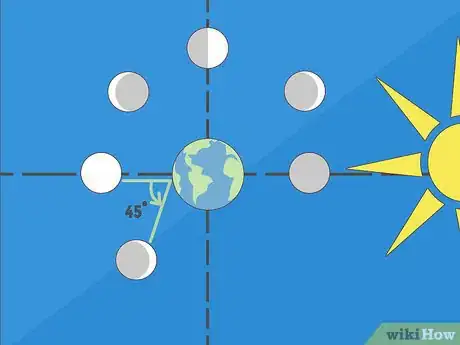
2Place the waxing crescent. From the point of the new moon, move counterclockwise by 45 degrees to draw or place the waxing crescent. This moon phase occurs when the moon has moved through roughly ⅛ of its orbit (less than three days after the new moon). At this point in the orbit, there is a sliver of the moon that is lit by the sun’s light, and visible to the side of the earth experiencing night (pointing away from the sun).[6]
- The crescent phase is often associated with struggle and growth in astrology. It is thought to be a good time to take opportunities.[7]
-
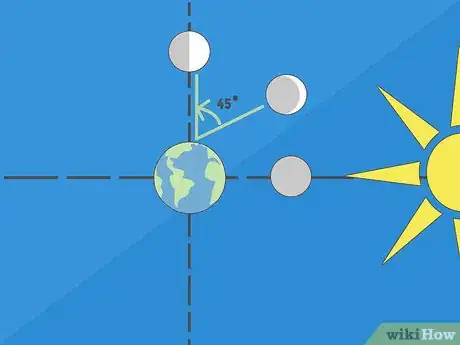
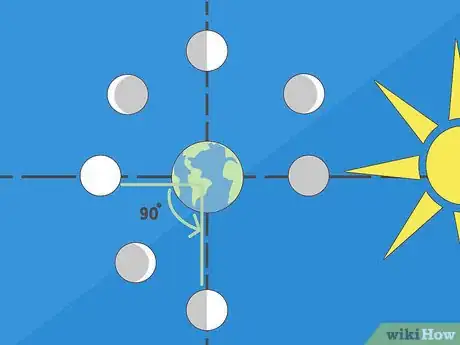
3Attach the first quarter. Move counterclockwise 90 degrees from the new moon (or 45 degrees from the waxing crescent) to place or draw the first quarter moon. When the moon appears as a half circle in the sky, this is known as a quarter moon because the moon has moved through ¼ of its orbit. This moon phase can be observed around seven to ten days into the moon’s cycle.[8]
- Astrological themes surrounding the first quarter phase are action and expression. It is considered a good time to take the first steps to communicate your goals and achieve them.[9]
-
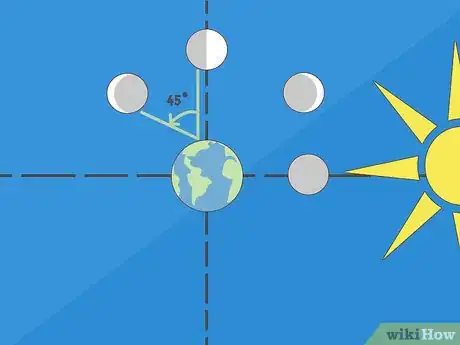
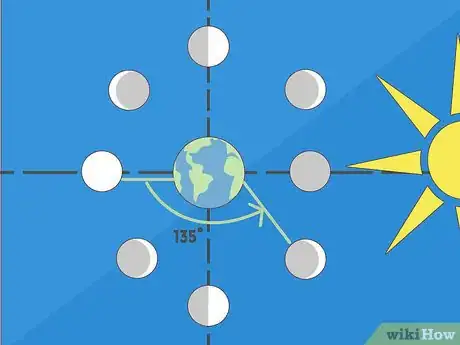
4Pin the waxing gibbous. Move another 45 degrees counterclockwise (135 degrees from the new moon) to place the waxing gibbous. During this phase, the moon moves closer and closer to being a full circle in the sky. The waxing gibbous is observed from roughly eleven to fourteen days into the moon cycle.[10]
- During the waxing gibbous phase, astrologists suggest that you focus on analyzing the results of the actions that you initiated in the first quarter phase.
Adding the Waning Phases
-
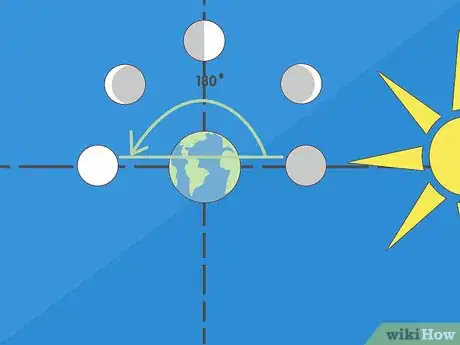
1Start with a full moon. The full moon is the climax of the waxing phases. It is also the beginning of the waning phases. As the moon continues its orbit, it will become less and less visible. The placement of the full moon on your chart should be 180 degrees from the new moon (straight across from the new moon on the other side of the earth).[11]
- Astrologically, the full moon represents illumination. During this phase, it is thought that one will have a clear view of their previous actions so that they can make appropriate adjustments.[12]
-
2Attach the waning gibbous. The waning gibbous should be placed 45 degrees counterclockwise with respect to the full moon. Stages of the waning gibbous appear to be inverted from stages of the waxing gibbous. The parts of the moon that were dark at a given phase of the waxing gibbous will be light at a similar phase of the waning gibbous and vice versa.[13]
- In astrology, the waning gibbous is also referred to as the disseminating moon. It is considered a time to reflect upon any changes made during the full moon phase.[14]
-
3Place the third quarter moon. The third quarter moon should be placed 90 degrees counterclockwise from the full moon. The third quarter moon appears as the inverse of the first quarter moon. This phase marks the point at which the moon has traveled through ¾ of its orbit.[15]
- The third quarter moon, or last quarter moon, is considered a time for revising and cleansing by astrologists. It is thought to be the time to bring closure to projects started during the new moon phase.[16]
-
4Pin the waning crescent. The waning crescent is the last moon phase in the cycle. It should be placed on the chart 135 degrees counterclockwise from the full moon (45 degrees counterclockwise from the waning gibbous). This will complete a circle around the earth with eight different points representing the eight moon phases.[17]
- In astrology, the waning crescent is also known as the balsamic moon. This is considered a time to let go and release any things that do not pertain to the next moon cycle.
-
5Provide explanations below the chart. Explain each moon phase in a caption. This way, anyone reading the chart can immediately work out which phase of the moon they are looking at and why it is named that. For example:
- New moon: This is the beginning of the moon phases when the moon is hidden from sight.
- Waxing crescent: This is the sliver of a crescent when the moon begins to be visible.
- First quarter: Appears as a half circle in the sky.
- Waxing gibbous: More than half of a circle is illuminated as the moon moves toward a full moon.
- Full moon: The entire moon appears lit up by the sun, so you can see a whole circle.
- Waxing gibbous: The illumination of the moon starts to shrink again.
- Last quarter: Appears as a half circle in the sky.
- Waning crescent: The last phase of the moon as it becomes less and less visible.
Community Q&A
-
QuestionWhat phase was the moon at when the first people landed on it?
 Community AnswerThe moon was in the first quarter phase.
Warnings
- There is little to no scientific backing of astrology.⧼thumbs_response⧽
Things You'll Need
- Suitable paper or cardstock
- Graphics or image making ability
References
- ↑ http://zodiacarts.com/moon-phase-calendars/
- ↑ http://www.happinessishomemade.net/moon-phases-chart/
- ↑ http://www.webexhibits.org/calendars/moon-diy.html
- ↑ http://www.webexhibits.org/calendars/moon-diy.html
- ↑ http://zodiacarts.com/moon-phase-calendars/
- ↑ http://www.webexhibits.org/calendars/moon-diy.html
- ↑ http://zodiacarts.com/moon-phase-calendars/
- ↑ http://www.webexhibits.org/calendars/moon-diy.html
- ↑ http://zodiacarts.com/moon-phase-calendars/
- ↑ http://www.webexhibits.org/calendars/moon-diy.html
- ↑ http://www.webexhibits.org/calendars/moon-diy.html
- ↑ http://zodiacarts.com/moon-phase-calendars/
- ↑ http://www.webexhibits.org/calendars/moon-diy.html
- ↑ http://zodiacarts.com/moon-phase-calendars/
- ↑ http://www.webexhibits.org/calendars/moon-diy.html
- ↑ http://zodiacarts.com/moon-phase-calendars/
- ↑ http://www.webexhibits.org/calendars/moon-diy.html
