This article was co-authored by wikiHow Staff. Our trained team of editors and researchers validate articles for accuracy and comprehensiveness. wikiHow's Content Management Team carefully monitors the work from our editorial staff to ensure that each article is backed by trusted research and meets our high quality standards.
There are 20 references cited in this article, which can be found at the bottom of the page.
The wikiHow Video Team also followed the article's instructions and verified that they work.
This article has been viewed 40,195 times.
Learn more...
JoJo bows were first popularized by a teenage dancer named JoJo Siwa. They are big, bright, and sparkly. Store-bought bows start at $12.99, which can be expensive, especially if you like to collect the bows. Fortunately, they are easy to make by hand or with a special kit. All you need to get started is a length of wide ribbon, some matching shorter ribbon, a hair clip, and basic craft supplies, like scissors and hot glue.
Steps
Making a JoJo Bow by Hand
-
1Cut a long strip of wide ribbon, with the ends slanting in the same direction. Choose a 2 1⁄4 in (5.7 cm) wide ribbon in a color that you like, then cut it down to 36 to 40 in (91 to 102 cm). Trim the ends so that they both go in the same direction: // or \\.[1]
- Grosgrain ribbon works great for this, but you can use satin ribbon too. Chiffon ribbon would give you a nice, delicate look.
- If the ribbon is wired, scrunch the end down to expose the wires, then pull the wires out—just like you would a straw.
- For a nicer finish, ask an adult to help you singe the cut ends of the ribbon with a lighter or candle flame.[2]
-
2Bend the ribbon in half, then fold and crease the ends by 3 in (7.6 cm). Fold the ribbon in half first, so that the cut ends match up and make a V-shape. Next, fold the ends over at the same time by about 3 in (7.6 cm). Run your fingernail across the folded edge to create a crease.[3]
- This crease is important because it will help you figure out where to overlap the ribbon later on.
- If you can't crease the ribbon, don't worry about it. You'll just have to eyeball the placement instead.
Advertisement -
3Fold the ribbon in half again, crease the ends, then unfold it. Bring the bottom folded edge up to the top folded edge. Run your fingernail across all folded ends to sharpen the creases, then unfold the ribbon completely.[4]
- When you unfold the ribbon, you'll have 5 evenly-spaced creases, starting and ending 3 in (7.6 cm) from the cut ends.
-
4Overlap the first 2 creases on the right, angling them down. Orient the ribbon horizontally. Take the first crease on the right and place it on top of the second crease. Angle the end down so that it sticks out over the bottom edge of the ribbon.[5]
- Keep the angle at about 45 degrees.[6]
- If you couldn’t crease the ribbon, bring the last 3 in (7.6 cm) of the ribbon over by about 4 in (10 cm).
- You can start from the left side of the ribbon if that's more comfortable for you, but you'll have to reverse everything in this method.
-
5Bring the third crease from the right back over to the second crease. Take the next crease over, and pull it back towards the previous (second) crease. Set it down on top of the already stacked layers of ribbon. Make sure that the rest of the ribbon is hanging down over the bottom edge of the stacked layers.[7]
- The 2 ends of the ribbon should overlap one another, like an X, and pointing downward.
-
6Rotate the ribbon bundle so that it's vertical. Hold the bundle in your left hand and rotate it so that the tails are sticking out to the right. If you started out on the left side of the ribbon, then hold it in your right hand and rotate it so that the tails are on the left side.[8]
-
7Tuck the second-to-last crease into the stacked layers of ribbon. Take the ribbon tail and slide it into the stacked layers of ribbon. Stop pulling when the second-to-last crease is right inside the stack, sandwiched between the top and bottom layers of ribbon.[9]
-
8Bring the final crease to the top of the stack. Take the last crease appearing on your ribbon. Pull it upward and set it down on top of the stacked ribbon layers to create a 4-looped bow. Do not tuck the end of the ribbon into the stack.[10]
-
9Scrunch the middle of the bow, like a fan or accordion. Fold the middle of the ribbon by pinching the edges together. Next, fold the top edges down to meet the bottom edge so that you have 2 folded edges in the front of the ribbon and 1 in the back.[11]
- You can also just scrunch the middle of the ribbon up randomly, but doing an accordion fold will look much neater.
-
10Tie a piece of thin ribbon, wire, or thread around the middle. You can also use a zip tie, but be sure the cut off the excess. Don't worry about how the thin ribbon, wire, or thread look like; this is just to hold the bow together as you finish it.[12]
- If you’re using thin ribbon, make sure that it's no wider than 1⁄8 in (0.32 cm).
- Zip ties can be difficult to cut. If you used a zip tie, ask an adult to help you cut it.
-
11Wrap a piece of narrow ribbon around the middle to hide the thread. Cut a 3 to 4 in (7.6 to 10.2 cm) piece of 5⁄8 in (1.6 cm) wide ribbon. Tie a loose knot in the middle, then hot glue the knot to the center of the bow. Wrap the ends to the back, then overlap them and hot glue them together.[13]
- Alternatively, skip the knot, and hot glue the ribbon to the bow. Next, hot glue a large, fancy rhinestone to the middle of the ribbon.
- Rather than gluing the ends of the ribbon directly to the back of the bow, glue them to each other instead. This will allow you to slide the clip under them.
-
12Hot glue an alligator clip to the back of the bow. For a nicer finish, open up the alligator clip, and slide it under the 1⁄8 in (0.32 cm) ribbon that you wrapped around the bow.[14]


Using a JoJo Bow Maker
-
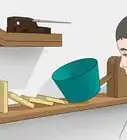
1Purchase and assemble a JoJo bow maker. Set the rectangular base on a flat surface. Place 4 rods into the 4 holes that are grouped together like a box in the center. Next, insert 2 rods into 2 of the holes on the left side of the base, and 2 more rods on the right side of the base.[15]
- The left and right sides of the base both have 3 holes each, but you only need to insert rods into 2 of them.
- Place the side rods next to each other to make a small bow, or further apart to make a big bow.
-
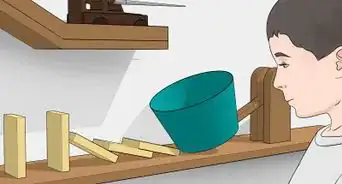
2Place a piece of string between the rods in the middle of the board. Orient the board horizontally, with 1 of the long edges facing you. Drape the string vertically across the board, placing it right into the square formed by the 4 central rods.[16]
- Cut the string about 6 to 8 in (15 to 20 cm) long so that it's long enough to wrap and tie around the ribbon.
- Baker's twine words great for this, but you can also use yarn or thin ribbon. If you choose to use ribbon, pick something that's no more than 1⁄8 in (0.32 cm) wide.
-
3Weave the ribbon across the left half of the board. Place the end of the ribbon behind the bottom-right rod in your square, with the back facing you. Pull it in front of the bottom-left rod in your square. Finally, wrap it behind the rod in the bottom-left corner of your board.[17]
- The front of the ribbon is shiny, the back of the ribbon is not shiny. Keep in mind that grosgrain ribbon is the same on both sides.
- The ribbon in your kit should already be cut to the right length. If you lost the ribbon, cut a 40 to 36 in (102 to 91 cm) long piece of 2 1⁄4 in (5.7 cm) wide ribbon.
-
4Pull the ribbon back towards the end and secure it with a clip. Wrap the ribbon across the front of the bottom-left rod on your board. Pull it across the front of the bottom edge of the square and towards the rod in the bottom-right corner of the square. Hold it against the end of the ribbon, and clip them together.[18]
- Use a hair clip, bobby pin, or a clothespin to clip the ribbons together.
- If the end of the ribbon is too short, pull on it to make it longer. Don’t worry, you'll still have plenty of ribbon to work with.
-
5Wind the ribbon around the bottom-right rod and behind the top-left rod. Pull the ribbon in front of the bottom-right rod. Pull it upward, the drag it to the left, going across the top edge of the square. Continue pulling the ribbon towards the top-left rod, then stop when you’re behind it.[19]
-
6Wrap it around the top-left rod and pull it back towards the right side. Pull the ribbon across the front of the top-left rod. Bring it right through the middle of the square, and land it between the top-right and bottom-right rods on the side of the board.[20]
- Make the ribbon run horizontally through the middle of the square, between the top and bottom set of rods.
-
7Thread the ribbon under the already-wrapped ribbon on the right side. By now, there are 2 rows of ribbon wrapped around the rods. Take the top layer of ribbon, thread it under the bottom layer of ribbon, and pull it to the right again.[21]
- Don't pull the ribbon off the rods. Just thread it under the bottom layer of ribbon.
- Make sure that the ribbon is between the top-right and bottom-right rods on the edge of the board.
-
8Bring the ribbon around the top-right rod, then pull it to the left side of the board. Pull the ribbon up and wrap it around the top-right rod. Bring it towards the left side of the board, placing it right between the top-left and top-right set of rods.[22]
- Don’t thread this ribbon under the already-wrapped ribbon. Pull it across the top of the already-wrapped ribbon.
-
9Tie the string around the bow, then pull the bow off the rods. Use another clip to hold the ribbon in place first, if necessary. Next, take the ends of the string from the very beginning, and tie them into a tight, double-knot in the center of the ribbon bundle. Carefully slide the bow off the rods.[23]
- Be sure to remove the clips before you pull the bow off the rods!
- When you’re done, flip the bow over, wrap the string to the back, and tie it into another double knot.
-
10Adjust the bow's loops, then trim off any excess ribbon or string. Gently pull the loops apart to create a boxy-bow shape. Cut the string down as close as possible to the knot. If you have any ribbon hanging off the side of your bow, cut it down so that it’s flush with the edge of the bow.[24]
- If the cut ribbon is fraying, ask an adult to singe it with a flame, or seal it yourself with some super glue or fray check.
-
11Tie a thin ribbon around the middle, then glue the ends to the back. Cut a 3 to 4 in (7.6 to 10.2 cm) length of 5⁄8 in (1.6 cm) wide ribbon. Tie a knot in the middle, then hot glue it to the front of the bow. Wrap the ends to the back, overlap them, then hot glue them to each other to form a loop.[25]
- Be careful not to actually glue the ribbons to the back of the bow. Gluing them together instead creates a tight loop for you to slide the clip into.
-
12Open up an alligator clip, then slide it under the loop. If you accidentally glued the ribbons to the back of the bow, or if you're having trouble sliding the clip through, just hot glue it to the back of the bow instead.[26]

Community Q&A
-
QuestionWhere can I get the JoJo bow kit at?
 Community AnswerYou can get it most places online for $10 - 15, but Walmart also offers it.
Warnings
- Use a low-temperature hot glue gun. It is less likely to burn or hurt you.⧼thumbs_response⧽
Things You'll Need
Making a JoJo Bow by Hand
- 2 1⁄4 in (5.7 cm) wide ribbon
- 5⁄8 in (1.6 cm) wide ribbon
- Thread, wire, skinny ribbon, cording, or zip tie
- Scissors
- Lighter or candle
- Hot glue
- Alligator hair clip
Using a JoJo Bow Maker
- JoJo bow maker kit
- 2 1⁄4 in (5.7 cm) wide ribbon
- 5⁄8 in (1.6 cm) wide ribbon
- Thread
- Scissors
- Hot glue
- Alligator hair clip


References
- ↑ https://www.youtube.com/watch?v=-27roxSmnCg&t=25s
- ↑ https://www.youtube.com/watch?v=-27roxSmnCg&t=45s
- ↑ https://www.youtube.com/watch?v=-27roxSmnCg&t=1m10s
- ↑ https://www.youtube.com/watch?v=-27roxSmnCg&t=1m30s
- ↑ https://www.youtube.com/watch?v=-27roxSmnCg&t=1m55s
- ↑ https://www.kidspot.com.au/parenting/things-to-do/how-to-make-a-hair-clip-bow/news-story/efa3772ee884f427ecf4720033cd80b6
- ↑ https://www.youtube.com/watch?v=-27roxSmnCg&t=2m20s
- ↑ https://www.youtube.com/watch?v=-27roxSmnCg&t=2m30s
- ↑ https://www.youtube.com/watch?v=-27roxSmnCg&t=2m45s
- ↑ https://www.youtube.com/watch?v=-27roxSmnCg&t=3m
- ↑ https://www.youtube.com/watch?v=-27roxSmnCg&t=3m20s
- ↑ https://www.youtube.com/watch?v=-27roxSmnCg&t=3m35s
- ↑ https://www.youtube.com/watch?v=aVT2Kw9v3eo&t=5m40s
- ↑ https://www.kidspot.com.au/parenting/things-to-do/how-to-make-a-hair-clip-bow/news-story/efa3772ee884f427ecf4720033cd80b6
- ↑ https://www.bluebearwood.co.uk/jojo-bows-deluxe-bow-maker/
- ↑ https://www.bluebearwood.co.uk/jojo-bows-deluxe-bow-maker/
- ↑ https://www.youtube.com/watch?v=2L1hQv_QCDc&t=35s
- ↑ https://www.youtube.com/watch?v=2L1hQv_QCDc&t=40s
- ↑ https://www.youtube.com/watch?v=2L1hQv_QCDc&t=45s
- ↑ https://www.youtube.com/watch?v=2L1hQv_QCDc&t=50s
- ↑ https://www.youtube.com/watch?v=2L1hQv_QCDc&t=1m
- ↑ https://www.youtube.com/watch?v=2L1hQv_QCDc&t=1m15s
- ↑ https://www.bluebearwood.co.uk/jojo-bows-deluxe-bow-maker/
- ↑ https://www.bluebearwood.co.uk/jojo-bows-deluxe-bow-maker/
- ↑ https://www.bluebearwood.co.uk/jojo-bows-deluxe-bow-maker/
- ↑ https://www.bluebearwood.co.uk/jojo-bows-deluxe-bow-maker/
About This Article

If you want to make a JoJo bow by hand, start by cutting a long strip of wide ribbon. Bend the ribbon in half, fold it, and crease the ends. Next, fold the ribbon in half again, crease the ends, and unfold it to create 5 evenly-spaced creases. Overlap the first 2 creases on the right, angling them down, and bring the third crease from the right back over to the second crease. Then, rotate the ribbon bundle so that it's vertical and tuck the second-to-last crease into the stacked layers of ribbon. Bring the final crease to the top of the stack to create a 4-looped bow. Finally, scrunch the middle of the bow like a fan or accordion and tie a piece of thin ribbon or thread around the middle to secure it. For tips on using a JoJo bow maker, read on!