This article was co-authored by wikiHow Staff. Our trained team of editors and researchers validate articles for accuracy and comprehensiveness. wikiHow's Content Management Team carefully monitors the work from our editorial staff to ensure that each article is backed by trusted research and meets our high quality standards.
There are 13 references cited in this article, which can be found at the bottom of the page.
The wikiHow Video Team also followed the article's instructions and verified that they work.
This article has been viewed 88,667 times.
Learn more...
Glitter makes just about everything better, from mason jars to phone cases. You can create a painting with glitter, too! Your painting can be a simple silhouette, or you can try something with more detail, like a glittered rendition of your favorite cartoon character. Once you know how to do a basic glitter painting, you can move on to more complex projects and surfaces.
Steps
Creating the Outline
-
1Find a simple image online that you want to use. Silhouettes and cartoon-style images with bold outlines work great. Pictures with shading and lots of intricate designs are not recommended for this type of project.[1]
- You can draw your own image. In this case, draw the image directly on the canvas with a pencil, then click here to continue.
-
2Reverse the image using an image editing program. Download the image into an image editing program, such as Paint or Photoshop. Use the rotate option to flip the image so that it is reversed. This will ensure that the image comes out the right way once you transfer it to the canvas.
- Most computers come with a free image editing program (i.e. Windows computers come with Paint).
Advertisement -
3Edit the size of the image, if needed, then print it out. The image needs to fit on your printer paper without being cropped off. Use the preview option to see how it will print out. If the image is being cropped in the preview, you may have to rotate it horizontally or vertically. You may also have to shrink it.[2]
- You can print the image out in black-and-white, as long as you can see the outlines clearly.
-
4Trace the image onto parchment paper. Tape your image down onto a table first, then tape a sheet of parchment paper over it. Trace over the image using a graphite pencil. Make the lines thick and dark.[3]
- You can use tracing paper instead of parchment paper.
- Use a low-tack tape, such as masking tape or painter's tape. It will be easier to remove.
-
5Flip the parchment paper over, then trace the image onto your canvas. Remove the parchment table from your printed image. Flip the parchment paper over, then place it onto a painting canvas, traced-side down. Go over the lines once again with pencil, then pull the paper away to reveal the traced image.
- You can use a thin or thick canvas meant for acrylic or oil painting. If you don't want to use a canvas, use a thick sheet of paper, such as cardstock or illustration board.


Painting the Canvas
-
1Trace over your outlines with a waterproof marker. Refer to your original image to find out which color is the best to use. If you used a cartoon image, black might work the best.[4] If your original image was a silhouette and all one color, match the marker to that color.[5]
- The marker must be waterproof, otherwise, it will bleed when you add the paint and glue. Permanent markers, such as Sharpies and Microns work great.
-
2Fill the image in using acrylic paint. Refer to the original image to find out what colors to use. Paint the image using one color at a time, rinsing the brushes between each color. Use small, pointy brushes for small areas and large, flat brushes for larger areas. Don't worry if the paint has visible brushstrokes; it will be covered up by glitter.[6]
- If you added black outlines, try hard not to paint over them. Don't worry if you do, however; you can touch them up later.
- If your canvas is a thick, stretched canvas, be sure to paint the sides as well. This will give you a nicer finish.
-
3Allow the paint to dry. Luckily, acrylic paint typically takes less than an hour to dry. If the paint is not drying fast enough for you, you can speed up the process with a hairdryer or by leaving the painting out under the hot sun.
-
4Touch up any outlines that got covered up by paint. If you added black outlines to your image, you might have accidentally painted over them. If you wish to keep them in the final image, go over them using the same black marker from before.[7]
- Skip this step if you matched the paint color to the outlines.

Applying the Glitter
-
1Set up an easy-to-clean work surface. Find some place that is easy to clean, preferably with a hard floor as opposed to a carpeted one. Fold a sheet of paper in half to create a crease, then unfold it. Keep it under your canvas. This way, you can funnel the glitter back into its jar when you are done.[8]
- The paper doesn't have to be the same size as the canvas. A sheet of printer paper or binder paper will be big enough to catch the glitter.
-
2Brush white glue onto the smallest shape closest to the top of the canvas. Pour some glue into a disposable container. Dip a paintbrush into the glue, then brush a thick coat onto your first color. Use a small paintbrush for small areas, and a large paintbrush for larger areas. The glue layer should be thick enough so that you don't see the paint through it.[9]
- If you are painting a silhouette, work in small patches instead.
- You can use white school glue or white tacky glue. If the glue is too thick and doesn't spread easily, thin it down with a few drops of water first.
-
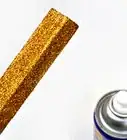
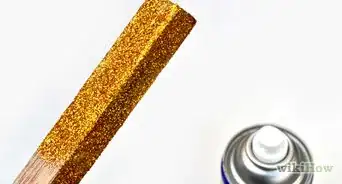
3Shake a matching glitter color onto the glue before it dries. Find a glitter color that closely matches your paint, then shake it onto the glue. You want the glitter layer to be thick enough so that it extends past the edges of the glue. You should not be able to see the paint or glue through the glitter.
-
4Wait 1 minute, then shake the glitter off. Let the glitter sit on the canvas for about 1 minute. Next, pick the canvas up and gently shake it side-to-side to help spread the glitter around. Finally, stand the canvas up vertically so that the glitter slides off right onto the folded paper.[10]
- If you got glitter outside the glued area, wipe it off with a stiff, dry paintbrush.
- The glitter and glue will be gel-like at this stage, like toothpaste. You can use the end of your paintbrush to nudge it into place, especially around sharp corners.
-
5Use the creased paper to funnel the glitter back into its jar. Set the canvas aside. Pick the paper up and fold it into a narrow V. Fit the bottom of the V into the neck of the glitter bottle, then tilt it so that the glitter slides inside. Once you have all of the glitter back in the bottle, unfold the paper and place it back under your canvas.
- At this point, you can let the glue dry before moving onto the next color. If you used enough glitter, however, the next color should not stick to the previous one.
-
6Repeat the process, working one color at a time. Work your way from top-to-bottom so that the glitter doesn't accidentally mix into the areas that have already been painted. Start with the smallest shapes first, then move onto the larger ones. You can leave the background blank or you can glitter it as well.[11]
- If you are working on an image that is all one color, continue working in small patches.
- Be sure to funnel each color back into its jar after you are done using it to avoid mixing.
- If you are using a wrapped canvas, add glitter to the sides for a more professional-looking finish.
-
7Fill in your outlines with black glitter, if desired. Use a small, pointed brush to apply glue to your outlines, then sprinkle black glitter over the glue. Shake the glitter off using the same technique as before.[12]
- Skip this step if you did not add any black outlines or if you simply do not want to use them.
-
8Let your canvas dry, then make any touch-ups, if needed. How long your canvas takes to dry depends on the type of glue you used. Expect to wait at least 1 hour. Once the canvas dries, the image will turn more translucent and sparkly. Any bare or sparse patches will also show up. If you notice any, fill them in using a small paintbrush and glue, then sprinkle glitter on top. Shake the glitter off.[13]


Things You'll Need
- Graphite pencil
- Parchment paper or tracing paper
- Canvas
- Thin and thick paintbrushes
- White glue (school or tacky)
- Plastic, disposable container
- Acrylic paint
- Glitter that matches the paint

References
- ↑ https://www.youtube.com/watch?v=YG_MWMExvvE&feature=youtu.be&t=1m
- ↑ https://www.youtube.com/watch?v=YG_MWMExvvE&feature=youtu.be&t=1m45s
- ↑ https://www.youtube.com/watch?v=YG_MWMExvvE&feature=youtu.be&t=2m50s
- ↑ https://www.youtube.com/watch?v=YG_MWMExvvE&feature=youtu.be&t=4m
- ↑ http://heylaurenrene.com/diy/diy-glitter-deer-head/
- ↑ https://www.youtube.com/watch?v=YG_MWMExvvE&feature=youtu.be&t=4m45s
- ↑ https://www.youtube.com/watch?v=YG_MWMExvvE&feature=youtu.be&t=6m25s
- ↑ http://rosyscription.com/2014/02/my-essential-tips-for-crafting-with.html
- ↑ https://www.youtube.com/watch?v=YG_MWMExvvE&feature=youtu.be&t=6m40s
- ↑ https://www.youtube.com/watch?v=YG_MWMExvvE&feature=youtu.be&t=7m6s
- ↑ https://www.youtube.com/watch?v=YG_MWMExvvE&feature=youtu.be&t=7m38s
- ↑ https://www.youtube.com/watch?v=YG_MWMExvvE&feature=youtu.be&t=9m
- ↑ https://www.youtube.com/watch?v=YG_MWMExvvE&feature=youtu.be&t=10m40s
- ↑ http://rosyscription.com/2014/02/my-essential-tips-for-crafting-with.html
About This Article