This article was co-authored by wikiHow staff writer, Travis Boylls. Travis Boylls is a Technology Writer and Editor for wikiHow. Travis has experience writing technology-related articles, providing software customer service, and in graphic design. He specializes in Windows, macOS, Android, iOS, and Linux platforms. He studied graphic design at Pikes Peak Community College.
Learn more...
Do you want to make a circle in Minecraft? The world of Minecraft is made out of square blocks. This can make it challenging to create round objects and curves. In fact, it's impossible to create a true circle in Minecraft. However, you can use square blocks to approximate the shape of a circle or curve. This is an important skill you need to learn to become a good builder in Minecraft. This wikiHow article teaches you how to make a circle in Minecraft.
Things You Should Know
- Draw a plus (+) sign as large as you'd like your circle to be.
- Add blocks around the radius connecting the points in your plus sign.
- The larger your circle is, the more it will look like a true circle.
Steps
-
1Decide on the size of your circle. Think about the height and width of the circle in terms of blocks placed horizontally and vertically. For example, 10 blocks by 10 blocks. The larger the diameter, the more it will look like a true circle.
- Make sure your circle is at least 4 blocks by 4 blocks (a size 4 circle). Any smaller, and your circle won't look like a circle.
- Because you're working with blocks, your circle won't be perfectly smooth at close inspection.[1]
-
2Place the center block. Decide where you want the center of your circle to be, then place a block to mark the center. If you want your circle to be an odd number of blocks wide, you only need to place a single block. If it is an even number of blocks wide, you will need to place 4 blocks in a 2x2 square.
- You can make a circle out of any material you want. If you are playing in Creative Mode, you only need to open the menu and select a material.
- If you are playing in Survival mode, you will need to gather your materials from the world around you.
Advertisement -
3Make a plus (+) sign with blocks. Start from the center block(s) and create a plus sign that is the diameter of your circle. If the diameter of your circle is an odd number of blocks, you can make the plus sign 1 block wide. If it is an even number of blocks, the plus sign will need to be 2 blocks wide.
- For example, if you are making a circle that is 15 blocks wide, start at the center block and add a row of 7 blocks to all sides of the center block to make a plus sign that is 15 blocks wide.
-
4Add a row of blocks at the top of each point of the plus sign. Add a small row of blocks to the left and right side of the last block at the points of the plus (+) to create the top row. The number of blocks wide the top row should be equal on all sides of the circle and symmetrical on both sides of the center row of the plus (+) sign.
- The number of blocks to place on the top row will depend on how wide your circle is.
- For smaller circles under 8 blocks wide, the top row will be between 3 and 4 blocks wide.
- For medium-sized circles between 8 and 13 blocks wide, the top row will be between 4 and 5 blocks wide.
- For larger circles between 14 and 19 blocks wide, the top row will be between 5 and 6 blocks wide.
- For circles, 19 to 25 blocks wide, the top row will be between 6 and 7 blocks wide, and so on.
- If the diameter of your circle is an even number of blocks wide, then your top row should also be an even number of pixels wide.
- If the diameter of your circle is an odd number of blocks wide, the top row should also be an odd number of blocks wide.
- The number of blocks to place on the top row will depend on how wide your circle is.
-
5Add a second row of blocks catercorner to the top row on all sides. This second row should be the same number of blocks on all sides on the inside of the circle.
- For smaller circles under 11 blocks wide, this second row may only need to be 1 block wide. For circles 11 to 22 blocks wide, the second row may be between 2 and 3 blocks wide.
-
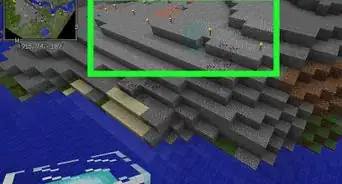
6Add more rows to connect all sides of the circle. Each new row should be placed catercorner to the previous row and gradually sloping inwards. Each row should gradually get smaller until the rows meet in each corner of the circle. Make sure the block placement is symmetrical on all sides of the circle.
- Larger circles over 12 blocks in diameter may need another row of two blocks under the second row of blocks. Smaller circles may only need single blocks arranged in a stair-shaped pattern to complete the circle.
- If you're not sure if you have the block placement right, you can use this pixel circle generator as a reference.


About This Article

1. Decide on the diameter of your circle.
2. Create a plus (+) sign that is the diameter of your circle.
3. Place a row of blocks at the top of each point of the plus, and equal on all sides.
4. Add subsequent rows of blocks that get thinner until they each side meets in the corner.