This article was co-authored by wikiHow Staff. Our trained team of editors and researchers validate articles for accuracy and comprehensiveness. wikiHow's Content Management Team carefully monitors the work from our editorial staff to ensure that each article is backed by trusted research and meets our high quality standards.
wikiHow marks an article as reader-approved once it receives enough positive feedback. In this case, 85% of readers who voted found the article helpful, earning it our reader-approved status.
This article has been viewed 333,420 times.
Learn more...
Does your kitty keep sleeping on your sweater? If so, why not turn that sweater into a new bed for her? If you don't want to cut and sew the sweater, you could always use an old one, or buy one from the thrift store instead. If you have a whole stash of sweaters, then why not turn them into a patchwork cat pillow instead?
Steps
Making a Simple Cat Bed
-
1Find a soft sweater. A sweater that your cat already loves to sleep on would be a great choice for this. You can also use any old sweater, or even a brand-new one, as long as you don't mind cutting and sewing it back up. )
- You can sew this sweater using a sewing machine and matching thread, or by hand using a yarn and a yarn needle.
- If the sweater has a turtleneck, cut it off first.
-
2Sew up the neckline. For a nicer finish, turn the sweater inside-out first, then sew straight across the top of the sweater, just below the neckline. Turn the sweater right-side-out when you are done.[1]Advertisement
-
3Sew across the sweater from one armpit to the other. Use a ruler and a tailor's chalk to draw a horizontal line across the front of your sweater. Make sure that the line is level with the bottom of each armhole.[2]
-
4Stuff the arms of the sweater with polyester fiberfill. Make sure that the stuffing meets the body of the sweater, where the neckline used to be. Use enough stuffing to fill the arms, but not so much that they stretch out and become bulky.[3]
- Fill one arm all the way to the cuff, and the other just below.
- You can also roll up a baby blanket or quilt batting, and use that instead.[4]
-
5Tuck one cuff inside the other. Take the arm that you filled all the way to the edge, and tuck it inside the other arm. You want the cuffs to overlap each other.[5]
-
6Sew the arms together using a whipstitch. Thread a yarn needle with a piece of yarn. Sew the arms together along the edge of the visible cuff. You can use a matching yarn color for this, or a contrasting one.[6]
-
7Cut the excess material off of the bottom of the sweater, if needed. Spread the sweater onto a flat surface. Set the looped arms on top, so that the cuff is facing the bottom. Trace around the outer edge of the looped arms with tailor's chalk. Cut along the line that you drew.[7]
- Make sure that you cut through both layers.
-
8Consider stuffing the body of the sweater. You don't have to do this, but it will make the bed more comfortable for your cat. You can use more polyester stuffing/fiberfill, or you can use a pillow. If you are using a pillow, make sure that it is the same dimensions as the sweater's body.[8]
-
9Sew the sweater to the arms using a whipstitch. Flip the sweater over. Sew the body of the sweater to the looped arms using a yarn needle, yarn, and a whipstitch. Start at one armpit and end at the other.[9]
- You can use a matching yarn color for this, or a contrasting one.


Making a Felted Patchwork Pillow
-
1Find some sweaters that are at least 50% animal fiber. This is very important, otherwise the sweaters will not felt. Animal fiber includes alpaca, cashmere, and wool.[10]
- Choose colors and patterns that go well together.
-
2Cut the sweaters apart into flat sheets. Begin by cutting the arms off of each sweater. Next, cut along the side seams on the sweater bodies. Finally, cut along the arm seams as well. You should get four, flat pieces from each sweater.[11]
-
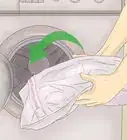
3Felt the sweaters using a hot cycle on your washing machine. Wash the sweaters in a washing machine using hot water and a little bit of detergent. The combination of heat, agitation, and detergent will cause the fibers to felt together.[12]
- Try to wash like colors with like colors to prevent bleeding and staining.
-
4Dry the sweaters in the dryer. Use a hot temperature for this as well. This will help further felt and shrink the fibers. If the sweaters did not felt at all, they likely did not contain enough animal fiber; check the label again.[13]
-
5Cut your sweaters into squares and rectangles. Cut them in different sizes, about ½ inch (1.27 centimeters) larger than you want them to be; this will allow for seam allowances. You need to cut enough squares and rectangles to cover the front and back of your pillow.
- If you want just the front of your pillow to be patchwork, then cut a larger, solid square for the back.
- If you don't have a pillow to use as a base, then make a template that's about 25½ inches (65 centimeters) and 33½ (85 centimeters) square.
-
6Pin the pieces together using ½-inch (1.27 -centimeter) seam allowances. Test your design against your pillow to make sure that you get the shape and dimensions correct; it needs to be about 1 inch (2.54 centimeters) bigger on all sides. If anything sticks out, trim it off.
-
7Sew the pieces together to make your front and back panels. Make sure that you are sewing them right-sides together, and that you are using a ½-inch (1.27-centimeter) seam allowances. Work one section at a time, removing the pins as you sew. Do not sew the front and back panels together just yet, however.[14]
- Iron the panels, if needed using the wool setting on your iron.
-
8Sew the panels together. Pin the panels together with the right sides facing in. Sew around them using a 1-inch (2.54-centimeter) seam allowance. Back stitch at the start and end of your sewing.[15]
- If you want to stuff the pillow with fiberfill, leave a small gap in one of the sides.
- If you want to use a pillow, do not sew one side. Instead, sew a zipper to that side.
-
9Turn the pillowcase right-side-out. Reach through the gap you left in the side of the pillow and grab one of the corners. Pull the pillowcase out through the gap. If you need to, use a pen, pencil, or knitting needle to push out the corners.
-
10Insert the stuffing, then close the pillow. If you used polyester fiberfill, sew the gap shut using a yarn needle and a piece of yarn. If you used a pillow, then zip the pillow shut.


Community Q&A
-
QuestionDo I stuff the neck inside, or cut it off?
 Community AnswerYou may do either, but stuffing it in would make it more comfortable for your cat.
 -
QuestionWhy no mention of when or how you stuff it?
 Community AnswerYou should stuff it before you sew the sleeves together. Stuff the sleeves and if you want, stuff the body of the sweater for it will become the bottom of the bed.
 -
QuestionCan I do this without sewing?Community AnswerHot glue is a good option if you don't sew, just make sure the bed gets fully sealed.
Warnings
- Most shelters do not allow kittens to come into contact with items used by adult cats. If you plan on donating the bed to such a shelter, use a new sweater.⧼thumbs_response⧽
- Don't force your cat to use the bed if she doesn't want to. The more you force her to use it, the more she'll hate it.⧼thumbs_response⧽
- Don't be disappointed if your cat ignores the bed you made for her. Not all cats like fancy beds.⧼thumbs_response⧽
Things You'll Need
Making a Simple Cat Bed
- Sweater
- Scissors
- Polyester stuffing or fiberfill
- Sewing machine and thread or yarn and yarn needle
- Tailor's chalk
Making a Felted Patchwork Pillow
- Sweaters (at least 50% natural animal fiber)
- Scissors
- Ruler
- Pillow form or polyester stuffing
- Sewing pins
- Sewing machine
- Thread
- Zipper (optional)
- Washer and dryer access


References
- ↑ https://www.youtube.com/watch?v=6Wa2D6QaYEg
- ↑ https://www.youtube.com/watch?v=6Wa2D6QaYEg
- ↑ https://www.youtube.com/watch?v=6Wa2D6QaYEg
- ↑ https://empressofdirt.net/diy-sweater-pet-bed/
- ↑ https://www.youtube.com/watch?v=6Wa2D6QaYEg
- ↑ https://www.youtube.com/watch?v=6Wa2D6QaYEg
- ↑ https://www.youtube.com/watch?v=6Wa2D6QaYEg
- ↑ http://www.onegoodthingbyjillee.com/2015/02/turn-old-sweater-new-bed-pet.html
- ↑ https://www.youtube.com/watch?v=6Wa2D6QaYEg
- ↑ http://www.apartmenttherapy.com/how-to-make-a-patchwork-pet-be-80294
- ↑ http://www.apartmenttherapy.com/how-to-make-a-patchwork-pet-be-80294
- ↑ http://www.apartmenttherapy.com/how-to-make-a-patchwork-pet-be-80294
- ↑ http://www.apartmenttherapy.com/how-to-make-a-patchwork-pet-be-80294
- ↑ http://www.apartmenttherapy.com/how-to-make-a-patchwork-pet-be-80294
- ↑ http://www.apartmenttherapy.com/how-to-make-a-patchwork-pet-be-80294
- ↑ http://www.auntpeaches.com/2012/02/cashmere-cat-bed-for-3-in-ten-minutes.html
- ↑ https://www.youtube.com/watch?v=6Wa2D6QaYEg
About This Article

To make a cat bed from an old sweater, start by turning the sweater inside out and sewing up the neckline. Then, turn the sweater right-side out again, and sew a horizontal line from the bottom of one armpit to the bottom of the other. Next, stuff the arms of the sweater with polyester fiberfill, and then tuck one cuff inside of the other before sewing the arms together. Finally, cut off the excess material at the bottom of the sweater, and sew the sweater to the arms. To learn how to make a felted patchwork pillow using a sweater, scroll down!