This article was co-authored by wikiHow Staff. Our trained team of editors and researchers validate articles for accuracy and comprehensiveness. wikiHow's Content Management Team carefully monitors the work from our editorial staff to ensure that each article is backed by trusted research and meets our high quality standards.
This article has been viewed 54,255 times.
Learn more...
Whether you need bunny ears for a costume or your child wants a pair to wear for fun, a bunny ear headband can be a fun craft project. It doesn't require any sewing, which means even beginner DIY-ers can give it a try. All you need is an old headband, some felt, wire, and glue, and you can create a custom bunny ears headband that is sure to get noticed.
Steps
Creating the Ear Shapes
-
1Choose a headband. To make a bunny ears headband, you need to start with the right headband. A plastic style will work fine, but a metal band is sturdier so you don’t have to worry about it breaking. Look for a headband that’s approximately 1- to 2-inches wide (2.5- to 5-cm).[1]
- It doesn’t matter what color the headband that you use is. You’re going to cover it with fabric later.
-
2Draw ear shapes on the darker felt. For the ears, you’ll need felt in two colors, one darker and one lighter. Using your headband as a guide to help you determine the width, use a marker to freehand draw two rabbit’s ear shapes on the darker felt. The ears should be approximately 7-inches (18-cm) long.[2]
- For a simple looking pair of bunny ears, draw long oval shape ears.
- If you aren’t comfortable freehand drawing the ears, you can find a variety templates online at craft websites, such as Kidspot [1].
- Keep in mind that you’re going to fold the edge of the ear over to conceal the wire later, so make the ears slightly wider than you want them to be.
- When it comes to felt colors, you might use gray, black, or brown for the darker portion of the ear and white or pink for the smaller, interior portion. You can go also go monochromatic, such as using a dark gray with a light gray.
- You don’t necessarily have to use felt. Any fabric in two colors will work. If you want more realistic looking bunny ears, consider using faux fur.
Advertisement -
3Cut the ears from the felt. Once you’ve traced the ears shapes on your felt, use a pair of fabric scissors to cut the shape out. Set the ears aside for a moment.[3]
-
4Trace a small ear shape on light colored felt. After you’ve cut out the larger ear shapes from the dark felt, repeat the process with the light colored felt. The ear shape should be the same as the first set, but the lighter colored ears should be slightly narrower.[4]
- You don’t need to make the light colored ears as long as the darker ears either. There should be approximately 2- to 3-inches (5- to 8-cm) of dark felt below the light felt so you can wrap it around the headband to hide the wire.
- When you lay the lighter colored ear shape on the darker colored ears, there should be enough space to place the wire that maintains the ear shape and fold over the darker colored felt to hide it.
-
5Glue the smaller ear onto the center of the dark felt. When you’ve cut out the smaller, lighter colored pieces of felt, position them in the center of the darker felt ears so there is a border around the top, sides, and bottom. Use a hot glue gun to adhere the light felt to the dark felt.[5]
- You can use your favorite type of craft glue that works on fabric in place of the hot glue if you prefer.

Adding the Wire
-
1Cut two pieces of wire. To keep the bunny ears standing up, you need to add wire support. Use a pair of wire cutters to cut two pieces of 20 gauge hobby wire. Each piece should be long enough to form into an outline of the bunny ears with at least 5 inches (13-cm) of excess on either side of the bottom.[6]
- You can find 20 gauge hobby wire at most craft stores.
- You can substitute floral wire if you prefer.
-
2Bend the wire into the same shape as the felt. Once you’ve cut the pieces of wire to the proper length, use your hands to carefully bend it into roughly the same shape as each bunny ear. The wire forms should be slightly smaller than the darker felt ears.[7]
-
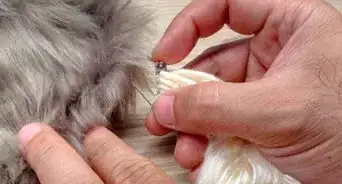
3Secure the wire onto the ears with excess at the bottom. After you’ve shaped the wire, place it on felt ears. Set it so it’s resting on the dark felt just outside the light colored felt and there is excess wire beneath the end of the dark felt. Next, use hot glue to adhere the wire to the felt.[8]
- While you can use other craft glue to adhere the fabric pieces together, it’s best to use hot glue to secure the wire in place to ensure a strong bond.
-
4Fold the edge of the dark felt over the wire and glue. While the glue around the wire is set warm, fold the edge of the dark ear shape over the wire all around the top and sides of the ears. You should also hide the edge of the light color felt for a seamless look.[9]
- After you’ve hot glued the wire and edge of the ears, allow them to cool for 5 to 10 minutes so you know the glue has set before assembling the headband.


Putting the Headband Together
-
1Wrap the ends of the wire on each ear around the headband. When the glue has set, decide where you want to position the ears on the headband. Wrap the excess wire at the bottom of the ears around the headband to set them in place.[10]
- Make sure that the light centers of the ears are facing forward when you wrap the wire around the headband.
-
2Secure the wire and felt with glue and allow it to cool. To make sure that the ears are secure, add several dollops of hot glue around the wire on headband. If there is an excess felt at the bottom of the ears, wrap that around the headband and secure with glue as well.[11]
- Don’t worry if there isn’t excess material at the end of the ears to hide the wire. You can cover the wire with felt scraps in the next steps.
-
3Cut other pieces of felt to cover the headband. You can leave the headband as is if you like. However, if you want it to have a more finished look, take more of the dark colored felt and cut out several longer strips that you can wrap around the exposed headband.[12]
- You don’t necessarily have to use the same felt that you used for the ears to cover the headband. For example, you might want to use satin ribbon to cover the headband.
-
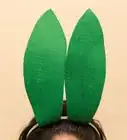
4Glue the felt in place on the headband. When you’ve cut the felt into strips that fit the headband, wrap them around the headband. Use hot glue as needed to secure the felt in place. Allow the glue to set for at least 10 to 15 minutes before wearing the headband.[13]

Community Q&A
-
QuestionI want to transform it into a unibunny hairband. Can I add a horn ?
 Community AnswerFor sure! Once you do the basic steps, it's a template for your imagination to run wild.
 -
QuestionWhat does it look like entirely finished?
 Community AnswerLike bunny ears. It is almost finished in the last picture of the article.
Things You'll Need
- Plastic or metal headband
- Gray, black, or brown felt
- White or pink felt
- Hot glue gun
- Fabric scissors
- 20 gauge wire

References
- ↑ http://www.kidspot.com.au/things-to-do/activities/diy-easter-bunny-ears
- ↑ http://www.momsandcrafters.com/diy-bunny-ears-headband-craft/
- ↑ http://www.momsandcrafters.com/diy-bunny-ears-headband-craft/
- ↑ https://laurenconrad.com/blog/2015/10/hocus-pocus-my-halloween-costume-party-animal/
- ↑ https://laurenconrad.com/blog/2015/10/hocus-pocus-my-halloween-costume-party-animal/
- ↑ https://laurenconrad.com/blog/2015/10/hocus-pocus-my-halloween-costume-party-animal/
- ↑ https://laurenconrad.com/blog/2015/10/hocus-pocus-my-halloween-costume-party-animal/
- ↑ https://laurenconrad.com/blog/2015/10/hocus-pocus-my-halloween-costume-party-animal/
- ↑ https://laurenconrad.com/blog/2015/10/hocus-pocus-my-halloween-costume-party-animal/
- ↑ http://www.momsandcrafters.com/diy-bunny-ears-headband-craft/
- ↑ https://laurenconrad.com/blog/2015/10/hocus-pocus-my-halloween-costume-party-animal/
- ↑ https://laurenconrad.com/blog/2015/10/hocus-pocus-my-halloween-costume-party-animal/
- ↑ https://laurenconrad.com/blog/2015/10/hocus-pocus-my-halloween-costume-party-animal/
About This Article