This article was co-authored by wikiHow Staff. Our trained team of editors and researchers validate articles for accuracy and comprehensiveness. wikiHow's Content Management Team carefully monitors the work from our editorial staff to ensure that each article is backed by trusted research and meets our high quality standards.
The wikiHow Video Team also followed the article's instructions and verified that they work.
This article has been viewed 75,488 times.
Learn more...
Making a headband is a quick and easy project that you can do whether you are a beginner or an experienced crocheter. You can make a headband by crocheting in the round or you can make a headband by crocheting in rows. After you have finished your headband, you can wear it as is or you can embellish it. Try making a headband for yourself or as a gift for someone special.
Steps
Crocheting a Simple Headband in the Round
-
1Chain enough stitches to wrap around your head. Start by making a chain. Chain enough stitches so that the chain will wrap around your head where you would wear a headband. It should feel snug, but not too tight.
- To make a chain, you first need to make a slipknot. To do this, loop the yarn around your index and middle finger twice and then pull the first loop over the second loop. Slide the new loop onto the hook and tighten it by tugging on the tail.[1]
- The number of stitches you need to chain will depend on your hook size and yarn type. For example, if you are using a bulky yarn with a size J hook, then you would need to chain about 44 stitches.[2]
-
2Secure the ends of the chain with a slipstitch. Insert your hook into the first stitch in your chain and loop the yarn over the hook. Then, pull the yarn through to secure the slipstitch.
- Be careful not to twist your stitches as you connect the ends. Make sure they are straight before doing the slipstitch.[3]
Advertisement -
3Crochet until the headband is the width you want it to be. Crochet around the circumference of the headband. You can use any stitch you like to crochet your headband, but you might want to do your first one using the single crochet stitch. To single crochet, insert the hook into the stitch, then loop the yarn over and pull through the stitch. Then, loop the yarn over again and pull through both stitches.[4]
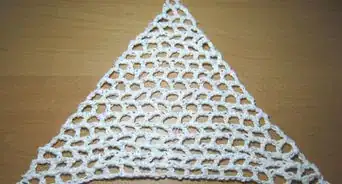
- You can use a single, double, or other crochet stitch depending on your intentions for the headband. If you want the headband to be something you can wear in the winter to keep your ears warm, then a tight stitch like single crochet might be best. However, if you want the headband to have some gaps and look a little fancier, then you could use the shell stitch or box stitch.
- When you insert the hook to make your stitches, insert it under both the front and back loops of each stitch. This will help to ensure that your headband lays flat.
-
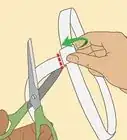
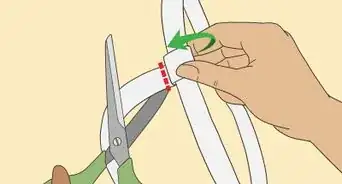
4Finish the headband. To complete your crochet project, you will need to cut the yarn, fasten the end, and weave in the tail. Use the crochet hook to widen your last loop by at least a few inches and then cut it in the center. Pull the unattached free end of the yarn out of the loop, and then tug on the tail to tighten the knot. Then, use a darning or wide eyed tapestry needle to weave the tail into the edges of the headband.

Crocheting a Simple Headband in Rows
-
1Chain your foundation stitches. Start by making a slipknot and then make a chain of six or more stitches for your foundation.[5] Six stitches might work well if you are using a bulky or super bulky yarn. If you are using a medium worsted weight yarn, then 10 stitches might be a good width. Experiment to find the ideal width for your headband.
-
2Skip a stitch and single crochet. Skip over the first stitch next to your hook and single crochet into the second stitch. Single crochet to the end of the chain. This will complete your first row. You can work your rows in a stitch other than single crochet if desired. Single crochet is a good practice stitch if this is your first headband. Some other stitches you can try include:
- Popcorn stitch
- Shell stitch
- Box stitch
-
3Turn and chain one. When you reach the end of your first row, you will need to turn your work over to work the second row. Chain one stitch. This will be your turning chain. A turning chain provides some slack to prevent the stitches from bunching up or puckering.
-
4Keep crocheting. You will need to keep crocheting your rows in the stitch of your choice until the headband is long enough to fit snugly around your head.[6] Check now and then when the headband starts to get close to this length.
- Cut the free end of the yarn and tie it to secure it when you are finished. You can leave the tail a few inches long and then weave in the end, or trim off the excess.
-
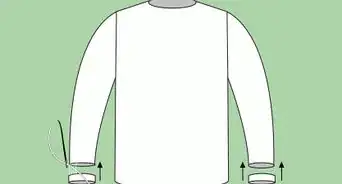
5Attach the ends or use something to fasten them. When your headband is the length that you want it to be, you can attach the ends or fasten them. You can either use a darning needle and some extra yarn to sew the ends together or you can hold them together with a safety pin or broach.
- Another option is to leave a longer tail and use this to attach the ends. Thread the yarn through a darning needle or large eye tapestry needle and sew the ends together. Then, tie the end to the seam to secure it and trim off the excess.
Embellishing Your Headband
-
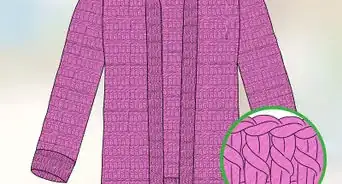
1Add ribbon. Ribbon is an easy way to embellish your headband. You can use ribbon to accent one part of your headband or thread ribbon through the entire headband. Choose a ribbon that complements your yarn color and attach or thread it through the headband where you want it.
- You can even use the ribbon to hide your seam if you created a strip headband and sewed the ends together. Loop the ribbon around the seam a few times and tie it in a knot or bow.
-
2Sew on a button. Adding a decorative button is a cute way to embellish a headband. You can even use a button to attach the ends of a headband if you have used a stitch with some gaps in it.[7] Sew the button onto the headband with a needle and thread.
-
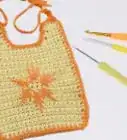
3Attach a flower.[8] You can either crochet a flower to add to your headband or you can attach a silk flower to your headband. Choose a yarn or silk flower color that complements your headband and attach it with a needle and thread or just use a safety pin to secure it temporarily.
-
4Loop a chain around one portion of the headband. If you want to give your headband a bow-like appearance without actually adding a bow, then you can use a chain of stitches to create this effect.[9]
- Make a chain of about 10 to 15 stitches.
- Then, loop the chain around one part of the headband a few times. Make sure to wrap the chain around the headband tightly.
- Use a slipstitch to secure both ends of the chain.
- Pull the free end of the yarn through, cut the end, and tie off the end.
Things You'll Need
- Yarn in the color and type of your choice
- Crochet hook that is appropriate for your yarn (check the label)
- Darning needle and thread (optional, for embellishing)
- Embellishments (silk flowers, buttons, ribbon, etc.)
References
- ↑ http://newstitchaday.com/crochet-101-how-to-make-a-slip-knot-for-beginners/
- ↑ http://rescuedpawdesigns.com/2015/02/27/chained-crochet-headband-pattern/
- ↑ http://rescuedpawdesigns.com/2015/02/27/chained-crochet-headband-pattern/
- ↑ http://www.craftyarncouncil.com/instructions_cr.php3
- ↑ http://crochetncrafts.com/ribbed-headband/
- ↑ http://crochetncrafts.com/ribbed-headband/
- ↑ http://www.bhookedcrochet.com/2014/10/08/crochet-headband-pattern/
- ↑ https://feltmagnet.com/textiles-sewing/crochet-headband-2
- ↑ http://rescuedpawdesigns.com/2015/02/27/chained-crochet-headband-pattern/
About This Article

To crochet a headband, start by chaining enough stitches to fit around your head. Next, connect the ends of your row with a slip stitch, but be careful you don't twist the stitches. To complete the headband, crochet in the round using any stitch you like until it's the width you want before cutting the end and fastening the yarn. If you'd like to give your headband some extra flare, attach a ribbon to it or sow on a button. Alternatively, make a chain of stitches and wrap it around part of the headband for a bow-like look. To learn how to crochet a headband in rows, read on!