wikiHow is a “wiki,” similar to Wikipedia, which means that many of our articles are co-written by multiple authors. To create this article, 68 people, some anonymous, worked to edit and improve it over time.
The wikiHow Video Team also followed the article's instructions and verified that they work.
This article has been viewed 701,036 times.
Learn more...
For a long time, "skinnies" have been out of fashion and hardly seen. However, a new style seems to be sweeping in. Looking for the right pair of skinny jeans can be time-wasting, frustrating, and usually quite expensive. If you're impatient, irritated and absolutely broke, don't give up. You can still get your dream jeans-- with your own flair! You can easily save time and money by sewing your flares yourself and transforming them into a pair of skinny jeans.
Things You Should Know
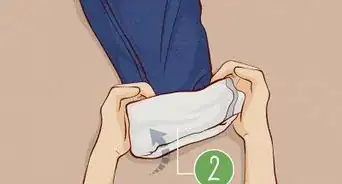
- Wear your jeans inside out and draw a line down your leg to show where to cut off excess denim. Loosely stitch over the line and wear them again to check the fit.
- Go over the line again with a short, tight stitch if they fit correctly and cut off the excess fabric. When you turn your pants right side out, you have skinny jeans!
- Use the excess fabric to create new, even cuffs at the bottom of each leg.
Steps
Creating New Seams
-
1Put on your jeans to get an idea of the shape you want. It's best to go with a pair that fits you snugly around the hips. Stretchy denim works well.
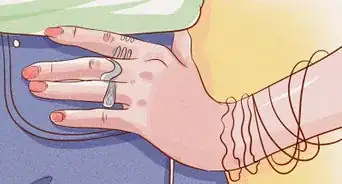
- Wear them inside-out. Take a crayon or marker, and draw a line on both legs to show how tight you want them to be. Remember to make the line on the inside so when you wear them you can't see the seams on the outside of the leg. Make sure you draw the line on the opposite side of the manufacturer's original seam.
- You can use pins to tack, but you might end up poking yourself or the pins might end up coming out when you take the jeans off.
- As an alternative, take a pair of skinny jeans you already own as a guide. Spread out the pair you want to reconstruct inside-out and lay the skinny jeans on top (lining up the crotch). Make sure the seam is evenly on the edge (of both pairs) and take your chalk down the side of your pants, starting about mid-thigh, mirroring the line of the skinnies.
- Iron your jeans first to make everything easier. Flat, unwrinkled jeans are easier to work with.
-
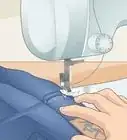
2Grab a needle and thread. Choose a thread that is preferably dark and blends in with the color of your jeans. Jean thread is best as it can withstand the wear and tear your jeans will go through. Thread your needle after slipping off your jeans, and begin to sew. Trace over the line you drew with the running stitch.
- Start on the seam that is already there, backstitch a few times, and carefully follow your line all the way down making sure the edge of the denim remains flat. (Pins work for that.)[1] If you're using a sewing machine and concerned the first go-round may not be ideal, set your machine to the loosest stitch in case you have to take it out.
Advertisement -
3Try on your jeans to see if they fit. Walk around in them to see that the legs fit well, or you may want to jog a little -- sometimes jeans can come loose if you start moving around, in which case you'll need to tighten them.
- If you're unhappy, remove the stitches. But if they're tight, short, and spaced closely so that there are no bumps in your jeans and the stitches won't be pulled out in the wash, you're good to go. Work over each stitch as perfectly and as carefully as you can -- there's nothing worse than having a brand new pair of skinny jeans for one day and then having the stitches all pulled out the next. This will be hard work, but it is essential.
-
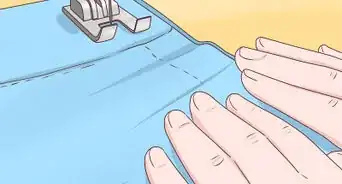
4Go over the seam again with a much shorter stitch. Cut any excess fabric if necessary (use a zigzag stitch beforehand) or go over it with a serger, which will seal off the edge and cut off the fabric at the same time.
- However, you might want to wear and wash your jeans at least once before you start cutting them up, in case you want to go back and fix something later on.


Making Cuffs
-
1Use the fabric you cut off (if applicable) to form new cuffs for your skinnies. You probably already sewed a rough seam matching the width of your new pants. Mark the seam on the inside and then use a seam ripper to tear off the rough seam.
- While you have your seam ripper handy, rip apart the jean thread that's about one inch on the outside of the seam markings and everything in between those two. This will take a minute to do well.
-
2Fold up the cuffs so the two new marks line up. Put in pins at the bottom of the cuff. The bottom two edges must line up or your cuffs will be shorter in the front or back!
- Then put pins going up the seam and remove the bottom pin. Unfold the entire cuff so you're able to pin it together, top to bottom.
-
3Sew a straight line at the top of the markings all the way down. Follow the pins, taking them out as you go.
- Cut off the excess fabric and fold the cuff back up. As you fold it back up, make sure the raw edges of the seam are opened--if they're closed, they'll get bulky and bumpy.
- Pin the cuff to the pant leg. Adjust your sewing machine so the needle leans to the left and use the zipper foot instead. You want to get as close as possible to the seam.
- Hold open the inner seam and sew all the way around the pant leg as close as possible to the original seam. Try them on after this step -- you may find that they're too long or too short and you can go back to adjust.
- If there's too much fabric on the end, zigzag stitch and cut off the excess or use a serger.
- Iron the leg of your jeans. Use a high heat setting and flip the pants so that the inside excess fabric is pointing upwards (toward the crotch). Go over this area several times.
-
4Sew a little bit above the seam that you just made. Hold the pants as flat as possible. Repeat this for both sides, constantly making sure each leg lines up with the other.

Community Q&A
-
QuestionHow can I learn to cut clothes?
 Community AnswerFirst, with a chalk, mark the areas where you want to cut. You have to be really precise. Use a ruler or a measuring tape to help you. Then you can cut.
 -
QuestionDoes this really work? I have never sewn by hand or used a sewing machine.
 Community AnswerI would recommend you practice sewing on another project before you start this. It does work (I tried it!), but if you don't have experience sewing, it might be too difficult.
Warnings
- Don't make your jeans so skinny that you won't be able to fit in them!⧼thumbs_response⧽
- If you have stained jeans that you want to "skinny", be aware that the stained parts might look weird and out of order if you don't think well of which side you are going to sew of the jeans. Try to even out fabric on both sides. Watch out for decorated seams. The decoration may be on the inside part of the jeans' legs.⧼thumbs_response⧽
Things You'll Need
- Jeans
- Crayon or marker
- Needle and thread
- Sewing machine
- Iron


References
- ↑ www.lovecharlesvintage.blogspot.com/2012/01/diy-tutorial-how-to-make-skinny-jeans.html
About This Article
To make skinny jeans, start by picking a pair of jeans that fit snugly in the hips, put them on inside out, and use a marker to draw a line on the inside of both legs to show how tight you want them. Next backstitch the seam that’s already there, and then restitch on your line. Once you have a loose stitch in, try the jeans on to see if they fit. If not, simply take the stitch out and start again. If they work, go over the seam again with a shorter stitch, cut any excess fabric off, and enjoy your new skinny jeans. If you want to learn how to make the cuffs on your jeans tighter, keep reading the article!