This article was co-authored by wikiHow Staff. Our trained team of editors and researchers validate articles for accuracy and comprehensiveness. wikiHow's Content Management Team carefully monitors the work from our editorial staff to ensure that each article is backed by trusted research and meets our high quality standards.
The wikiHow Video Team also followed the article's instructions and verified that they work.
This article has been viewed 22,640 times.
Learn more...
Felt balls are a fun crafting project that can be used for all kinds of decorative purposes. They’re also super soft and bouncy to play with! Making felt balls is easy to do. Start by forming the shape of the ball using wool felt. Then, soak the ball in hot, soapy water and roll it in your hands as it shrinks. You can even add a few decorations as you’re rolling the ball. Once you’re happy with the size and look of the felt ball, rinse it off in cool water and let it air dry.
Steps
Forming the Felt Ball
-
1Make a small, round wad of wool with your fingers. To start making the felt ball, pull off a small chunk of wool felt about 2–3 inches (5.1–7.6 cm) big and form it into a roundish shape. It won’t be a perfect ball, but will roughly resemble a large puffball.[1]
- Stretch out the piece of felt so there aren’t any large clumps or pockets of material, then form it into a round wad of wool.
-
2Wrap a length of wool tightly around it. Take another strip of wool felt about 5–6 inches (13–15 cm) long and wrap the entire length of it around the small ball wad of wool. Wrap it tightly around the wad to form a solid core for your felt ball.[2]
- The wool should start to adhere to itself as you wind it around the wad in the center.
- Don’t worry about adding different color wool at this point because you won’t be able to see it when the felt ball is finished.
Advertisement -
3Add layers of wool until the ball is twice the size that you want it to be. The felt ball will shrink to almost half of its original size when it’s finished. Keep adding layers until your fluffy felt ball is about twice as large as you want it to be when it’s done.[3]
- Try to keep the ball as round as possible while you’re adding layers of wool felt to it.
Tip: Add the layers evenly so the finished ball won’t be misshapen or lumpy.
Wetting and Rolling the Felt
-
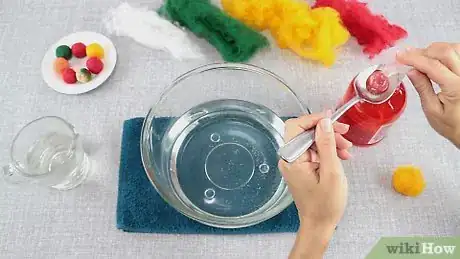
1Mix 4 tablespoons (59 mL) of liquid dish soap and 6 cups (1.4 L) of hot water. The key to getting the wool felt to turn into a dense little ball is using hot water and soap to shrink and compact the material. Fill a bowl with hot water and mix in the dish soap. Stir the bowl to form a soapy mixture.[4]
- The water doesn’t need to be so hot that it can burn you, but it does need to be very warm in order to shrink the wool.
-
2Submerge the ball of wool into the soap solution to fully saturate it. You don’t need to hold the ball under the water for a long time, just dip it in long enough to soak the ball completely. Hold the felt ball under the water for about 2-3 seconds.[5]
- Gently shake the ball to remove the excess water from it.
-
3Hold the ball in between your palms and rub them in a circular motion. Gently roll the ball of wool in the palms of your hands to form it into a perfectly round sphere. Pass the ball of wool back and forth from hand to hand for 10 minutes.[6]
Tip: Do not squeeze the water out of the material or apply pressure to the felt ball. It will lose its shape and consistency.
-
4Dip the felt ball into the water when it cools down. As you’re rolling the ball of wool back and forth between your hands, submerge it back into the hot water whenever it cools down. Keeping the wool felt drenched in hot, soapy water is the key to forming the perfect felt ball.[7]
- Submerge the felt ball in hot water every 2-3 minutes or whenever it starts to feel cold.
Adding Designs
-
1Insert strips of colored wool into the ball the make stripes. Take a strip of differently colored wool felt and work it into the wet felt ball with your fingertips. Soak the ball in the hot, soapy water and roll it in your hands. The stripe will start to smooth out and become a part of the felt ball![8]
- Try using multiple colors of wool felt to form different stripes.
- Form a zigzag pattern by inserting the wool strip with your fingertips and creating a “staircase” pattern across the ball.
-
2Wind bits of wool into a circle to add dots to the ball. To add different colored dots to your felt ball, pull off a small piece of wool felt and roll it into a small ball. Flatten the ball with your fingertips and stick it into you felt ball. Then soak the ball in the hot water and roll it around in your hands until it’s smooth.[9]
- Use multiple colors to make a wacky polka-dot felt ball!
-
3Stop when the felt ball shrinks to the size that you want. Once the ball reaches the size you want it to be, immediately stop rolling it or it will continue to shrink. Do not submerge it back into the hot water or it will take longer to dry and will shrink even more.[10]
Tip: If the felt ball forms any cracks, take a heavy object like a book and lightly hit the felt ball to reshape it. Dip it back into the hot water and roll it back into a round shape.
-
4Rinse the ball with cool water and allow it to air dry. After you’ve stopped rolling the felt ball, rinse it under cool water in the sink to remove the hot water and soap. Then, place it on a plate and allow it to dry for about 1-2 hours, or until it’s dry to the touch.[11]
- Don’t let the felt ball dry in the sunlight or near something hot or it will shrink even further as it dries.
-
5Add glitter to your felt ball to make it sparkle. After your felt ball is dry, add some craft glue to the ball and sprinkle on some glitter to add a little bit of sparkly flair. Use your fingertips to work the glitter into the wool felt.[12]
- Some glitter may come off, but most of it will adhere to the craft glue on the wool.
Things You’ll Need
- Wool felt of different colors
- Liquid dish soap
- Large bowl
- Craft glue (optional)
- Glitter (optional)
References
- ↑ https://youtu.be/qfNYw9JqPWg?t=193
- ↑ https://www.marthastewart.com/266261/felt-balls
- ↑ https://www.marthastewart.com/266261/felt-balls
- ↑ https://www.lilblueboo.com/2012/02/how-to-make-felt-balls-wet-felting-101.html
- ↑ https://www.marthastewart.com/266261/felt-balls
- ↑ https://www.marthastewart.com/266261/felt-balls
- ↑ https://diyprojects.com/make-felt-balls/
- ↑ https://www.marthastewart.com/266261/felt-balls
- ↑ https://www.marthastewart.com/266261/felt-balls

