wikiHow is a “wiki,” similar to Wikipedia, which means that many of our articles are co-written by multiple authors. To create this article, 9 people, some anonymous, worked to edit and improve it over time.
There are 7 references cited in this article, which can be found at the bottom of the page.
wikiHow marks an article as reader-approved once it receives enough positive feedback. In this case, 83% of readers who voted found the article helpful, earning it our reader-approved status.
This article has been viewed 116,906 times.
Learn more...
Modern black powder revolvers are loaded in the same basic way as their historical counterparts. Before loading the firearm, you need to make sure that the gun is clean and in proper working order. If everything checks out, it should be safe to load and fire.
Steps
Preparing the Revolver
-
1Disassemble the revolver. Before loading the revolver, you must remove the manufacturer's preservative and/or any built-up grime. To do so thoroughly, you'll need to disassemble the gun.[1]
- The exact disassembly process will vary by manufacturer, so check on the procedure before continuing.
-
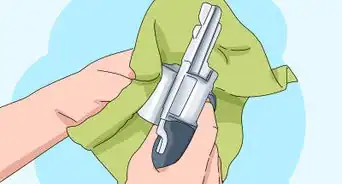
2Clean it thoroughly. Scrub all parts of the disassembled gun with a cotton swab to strip the grease away. Dip the swab in a cleaning solvent or hot, soapy water.[2]
- Scrub the interior of all cylinder chambers with the cotton swab.
- Set the cylinder down so that all of the chambers face downward. This will allow the water or solvent to drain.
- Pass a cleaning patch soaked with solvent or hot, soapy water through the barrel.
- Pass clean, dry swabs or patches through each chamber and through the barrel to finish the cleaning process.
Advertisement -
3Lightly oil the gun as you reassemble it. As you reassemble the revolver, you should oil all moving parts and grease the grooves of the cylinder pin.[3]
- Note that reassembly will vary by gun manufacturer. As with disassembly, you should check on the exact procedure before continuing.
- Use a natural lubricant instead of a petroleum-based one.
- Apply a light coating of your chosen lubricant to all moving parts of the gun. Do not oil the gun heavily since doing so can cause fouling.
- You should also lightly grease each ball you'll be firing and the opening of each chamber.
-
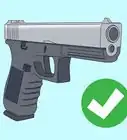
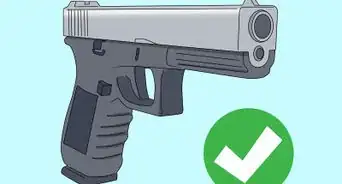
4Verify that the gun is unloaded. Even if you just reassembled the revolver, it's a good idea to verify that the gun is currently unloaded before continuing.[4]
- At this time, you should also put on your safety goggles and hearing protection.
-
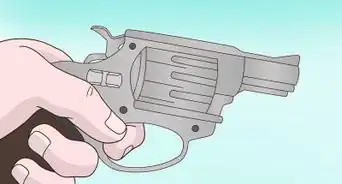
5Check the half cock position. Set the hammer in its half cocked position. Aim the gun at a safe target and squeeze the trigger.[5]
- The hammer should not move. If you can squeeze the trigger and the hammer falls, the revolver is broken and unsafe. Do not load it. Instead, you must have the gun repaired.
- The half cocked position acts as the revolver's "safety" position.
-
6Insert a cleaning rod down the barrel. Slide a cleaning rod or wooden dowel down the barrel and mark rod at the muzzle. You need to make sure that the chamber is aligned with the barrel.[6]
- Remove the rod and lay it along the outside of the barrel, lining it up with the mark at the muzzle. The opposite end should end at the nipple, which is where the chamber ends.
- Repeat this step with each chamber.
- If the rod does not line up correctly for any chamber, there is an obstruction. Do not load it. You must clear the obstruction before continuing.


Firing a Percussion Cap
-
1Half cock the hammer. If the hammer is not currently half-cocked, then put it into that position now.
- Point the gun in a safe direction. Do not point it at yourself or at anyone else. Ideally, you should point it down range.
-
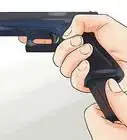
2Place a cap on each nipple. Snap a cap on each nipple with the gun still pointed down range.[7]
- Note that you may need to pinch the cap to ensure a secure fit.
-
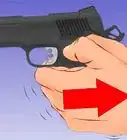
3Fully cock the hammer. Switch the hammer of the gun to its fully cocked position.
- At this point, the gun is live. You will be able to pull the trigger and fire it.
-
4Fire each cap. Point the gun at an appropriate target and fire off each cap.[8]
- For percussion caps, an appropriate target would be a leaf, blade of grass, or sheet of paper positioned roughly 1 foot (30.5 cm) away. The target should move. If it doesn't, there might be an obstruction in the barrel. Do not load the gun until the obstruction is cleared.
- Firing off percussion caps will further clear and dry each chamber.
-
5Check the gun. Make sure that there are no unfired caps left on any of the nipples before continuing.[9]
- You also need to remove any busted or fragmented caps at this time.


Loading the Revolver
-
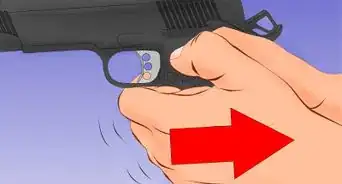
1Half cock the hammer. Switch the hammer of the revolver into its half cocked position again.[10]
- Note that the cylinder should be able to rotate freely at this point.
-
2Hold the muzzle up. Point the barrel of the gun toward the sky, keeping the entire gun in an upright position.[11]
- Keep the right side of the gun facing toward you.
- Do not position any part of your body over the revolver.
-
3Pour a measured charge into the chamber. Carefully pour a properly measured charge of black powder into the chamber closest to the loading cutout. Repeat for each chamber.
- Use an individual powder measure. Do not pour powder from a large powder flask or can.
- The exact amount of powder will vary depending on the type of gun.
- For a .36, use 12 grains of powder. Never exceed 20 grains.
- For a .44, use 20 to 28 grains of powder. Never exceed 35 to 40 grains.
-
4Place the ball over a chamber opening. Set a proper size ball or bullet over the opening of the chamber nearest the loading cutout.
- The ball should be oversized so that it only rests on top and does not enter.
- Make sure that the ball or bullet has been lightly greased before you load it.
-
5Rotate the cylinder. Rotate the cylinder of the revolver until the ball sits under the plunger of the loading lever.
-
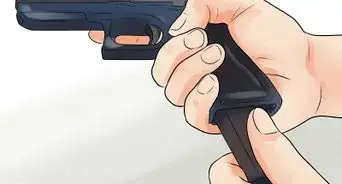
6Seat the bowl using the loading lever. Unlatch the loading lever and use it to firmly press the ball down until it sits securely and firmly on the powder.
- Apply smooth, even pressure as you do this.
- There should be no air in between the powder and ball, but you should not crush the powder as you seat the ball.
- Also note that a thin outline of lead will be shaved off the ball as you do this. It should be visible at the opening of the chamber. This is a good sign and an indication that the ball is properly fitted.
-
7Repeat with the remaining chambers. Follow the same steps to load the remaining chambers with a ball or bullet.
- It is recommended that you only load five chambers of a six-chamber revolver. Keep the hammer rested on the nipple of the unloaded chamber to reduce the risk of an accidental firing.
-
8Apply additional grease. Fill the space above the ball in each cylinder with vegetable grease or bullet lubricant.[12]
- The use of grease can prevent "chain firing," or accidental secondary discharges.
-
9Place a percussion cap on each loaded chamber. Point the gun down range and place a percussion cap on each loaded chamber. With the completion of this step, the revolver is fully loaded.
- Make sure that the hammer is still in a half cocked position before doing this.


Firing the Revolver
-
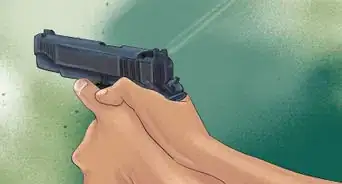
1Fully cock the hammer. Only switch the hammer to a full cock position when you are ready to fire.
- If you do not plan to fire the revolver immediately, then you should rest it over the empty chamber of the gun. If no chamber has been left empty, then rest it on a safety notch in between two nipples or on a safety pin.
- Note that it is not safe to carry the revolver with the hammer in its half cocked position over a loaded chamber.
-
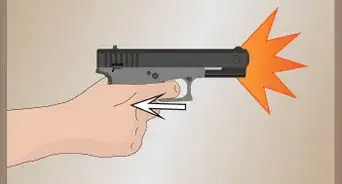
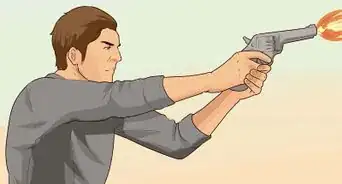
2Aim and fire. Aim the gun down range at a safe target. Pull the trigger to fire the revolver.
- You should be able to continue firing until all of the chambers have been emptied.
- Keep count of your shots as you fire. Make sure that all of your shots have fired before you set the gun down or reload it.
-
3Wait one minute before reloading. Wait at least one minute before reloading the revolver. Doing so allows any remaining sparks to burn out.
- When the revolver is ready to reload, you can reload it by following the same procedure outlined in the "Loading the Revolver" section.


Community Q&A
-
QuestionWhy did my revolver come with a package of wads?
 Community AnswerThe wads can be used between powder and ball to help prevent chain-firing. You can use these instead of grease over the ball. The lubed wads also help keep fouling softer for easier cleaning.
 -
QuestionWhy do the caps fragment and get stuck in the cylinder jamming the action?
 James CutshallCommunity AnswerThey need to "splatter" so you are able to remove them from the nipple easily. So they are designed to be pretty brittle, but if they get stuck in the action, I'm guessing it could be the brand and substance of the cap; the metal used may be too brittle. If changing the brand doesn't help, I suggest taking a careful look over your pistol and seeing if anything is off, like something up with the action itself. Some cap and ball pistols have enough room for the cap to fall off between shots by having the weapon being tilted up before the next round, the used cap falling out before being caught in the action.
 -
QuestionI have small, round pads that are to be loaded in my revolver. Where do they fit in?James CutshallCommunity AnswerI've never owned a black powder revolver that used pads; those are for rifles. When using a rifle, you would place the patch between the powder and the ball. On a revolver, you don't use a patch. You place your powder (30-40 grains of parade loose black powder if you're rocking a .44, 40-45 for a .45) and then add a tightly fitting round ball. You then add some grease to keep more than one chamber from going off at a time due to a rouge spark of powder poured out. After that, you place caps on the cylinder nipples, and you're ready to go.
Warnings
- Always handle a gun as though it were loaded, even when you know it isn't. This is one of the most important rules of basic gun safety and should be followed regardless of the type of gun you're using.⧼thumbs_response⧽
- Do not point the revolver at yourself or anyone else and make sure that all bystanders are standing behind you when you plan to fire.⧼thumbs_response⧽
- Only use black powder for your black powder revolver. Never use smokeless powders since doing so can cause the firearm to explode.⧼thumbs_response⧽
- Never handle black powder near an open flame.⧼thumbs_response⧽
- Always wear shatter-proof glasses and hearing protection when firing your gun.⧼thumbs_response⧽
- Never fire into water or any hard, flat surface. Doing so can cause the bullet to ricochet.⧼thumbs_response⧽
Things You'll Need
- Revolver
- Black powder
- Individual powder source
- Bullets or balls
- Caps
- Safety goggles
- Ear plugs or similar hearing protection
- Non-petroleum grease or lubricant
- Cleaning solvent
- Cotton swabs and pads


-Step-18-Version-3.webp)

-Step-6.webp)
References
- ↑ https://www.americanrifleman.org/articles/2017/10/10/rifleman-qa-well-kempt-secrets-cleaning-blackpowder-revolvers/
- ↑ https://www.americanrifleman.org/articles/2017/10/10/rifleman-qa-well-kempt-secrets-cleaning-blackpowder-revolvers/
- ↑ https://www.americanrifleman.org/articles/2017/10/10/rifleman-qa-well-kempt-secrets-cleaning-blackpowder-revolvers/
- ↑ https://www.remington.com/support/safety-center/safety-and-shooting-tips/muzzleloader-safety-rules
- ↑ https://cva.com/wp-content/uploads/2017/08/RevolverWarrBook.pdf
- ↑ https://www.cimarron-firearms.com/Manuals-Forms/PDFs/Ub-BlkPwdrInst8pg.pdf
- ↑ https://cva.com/wp-content/uploads/2017/08/RevolverWarrBook.pdf
- ↑ https://www.uberti-usa.com/sites/default/files/originals/product-manuals/black_powder_revolvers.pdf
- ↑ https://cva.com/wp-content/uploads/2017/08/RevolverWarrBook.pdf