X
wikiHow is a “wiki,” similar to Wikipedia, which means that many of our articles are co-written by multiple authors. To create this article, 11 people, some anonymous, worked to edit and improve it over time.
This article has been viewed 59,020 times.
Learn more...
Windows Server 2012 R2 operating system has features that support domain enterprise networks of varying sizes, but to realize the benefits of these features, you must first install, configure, and test it.
Steps
Part 1
Part 1 of 3:
Installing Windows Server 2012 R2
-
1Create the operating system media.
- Create the operating system media, if you do not already have a DVD with Windows Server 2012 R2; however, if you download it, be sure to copy the product key, because you will need it for the installation.
- Download Windows Server 2012 R2 from Microsoft and save it onto your hard drive.
- Make a backup copy of the .iso file by copying it onto a DVD from the hard disk.
-
2Start operating system installation.
- Place the Windows Server 2012 R2 DVD in the CD/DVD drive.
- Power on the machine to boot the operating system from the DVD.
- Watch the screen as the system boots from the Windows Server 2012 R2 DVD. After booting begins, you will see the display Loading files… followed by the Windows Server 2012 R2 Setup screen.
- Expand the drop down and review optional preferences; they include the language you can select for the installation.
- Click Next to display the options, Install now or Repair your computer.
Advertisement -
3Install or Upgrade.
- Observe that with these Windows Setup options, you choose either first time install or repair an existing operating system.
- Click Install now to display the product key request.
-
4Type OS installation key.
- Take note that if you are using a DVD from a textbook, you may not need a key.
- Type the installation key.
- Click Next so you can choose the operating system version to install.
-
5Select the OS version to install.
- Notice that depending on the DVD you are using, you may see a slightly different set of options. However, regardless of which DVD, Windows Server 2012 R2 Server Cores is the default.
- Select Windows Server 2012 R2 Standard (GUI installation), with the arrow key or mouse.
- Click Next to display the license agreement.
-
6Select license terms.
- Review the Microsoft license agreement.
- Click the checkbox next to I accept the license terms.
- Click Next to display options, upgrade or custom install.
-
7Configure upgrade or custom install.
- Review the notes for these options because they are very different; upgrade lets you upgrade a qualified Windows OS. Whereas with custom, you can install the OS on a newly created space.
- Click Custom to manage disk space and display the disk configuration.
- Highlight where you would like to install the operating system; you can use the arrow key, or mouse.
- Click Next to display Installing Windows screen followed by password Settings.
-
8Create password.
- Create Administrator password at Windows Setup Settings prompt..
- Type the password, such as Passworda10.
- Click Finish to display the Sign in screen.
-
9Log on to the server.
- Note that this action, display the password prompt, will depend on the installed environment, real or virtual.
- Click Ctrl+Alt+Delete to display the password prompt.
- Observe that this is the password you created earlier.
- Type the password for Administrator.
- Click the arrow to display Networks so you can tell setup how to configure network parameters.
-
10Configure Network Settings.
- Configure network visibility is needed even if you plan to isolate the server; your intentions must be know to network settings.
- Click Yes so your computer is visible to other network devices.
-
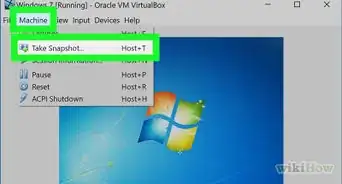
11Verify Installation complete.
- Verify the display of Server Manager indicating the installation is complete.
- Continue to learn more.


Advertisement
Part 2
Part 2 of 3:
Configuring Network Parameters
- These steps demonstrate how to configure TCP/IP settings, which are needed to verify network connectivity with another machine, such as Windows 7.
-
1Minimize Server Manager.
- Click Minimize to minimize Server Manager, which is displayed when the OS completes booting.
-
2Display menu items.
- Notice that when Server Manager is minimized, you will see the Recycle Bin and Taskbar; there are also menu items, such as Start, that are visible when the mouse is located at the bottom right.
- Move your mouse along the taskbar to the right and hover it to the right of the time and date; this action displays a number of icons, and to see their names, such as Search, Start, and Settings move the mouse straight up. If the icons are not shown, slightly move the mouse in any direction to display them.
- Click Start to display its contents.
-
3Display Control Panel contents.
- Notice that Start shows a number of icons, such as Control Panel.
- Click Control Panel to display its contents.
-
4Display Network and Internet links.
- Notice that items are shown in categories, but you can change how they are displayed.
- Click Network and Internet to display the screen containing their links.
-
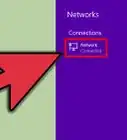
5Display Network and Sharing links.
- Notice there are two options, but only the first lets you configure the network adapter.
- Click Network and Sharing Center to display its options.
-
6Display Network Connections (Ethernet) Properties.
- Notice there are several options in the left pane, but your main interest is on the adapter settings.
- Click Change adapter settings to display Network Connections.
- Notice that this computer has one NIC.
- Right click Ethernet and click Properties to display its properties.
-
7Display TCP/IP Properties.
- Notice there are a number of protocol options for configuring network settings.
- Highlight Internet Protocol Version 4 (TCP/IPv4).
- Click Properties to display TCP/IP Properties.
- Notice that the default TCP/IPv4 configuration for network interface is DHCP client.
- Click Use the following IP address.
- Notice that the boxes are no longer grayed.
-
8Configure TCP/IP settings.
- Notice there are a number of textboxes, but to test connectivity, only the IP address and subnet mask are needed.
- Type 172.16.150.10 in IP address field.
- Change the entry in Subnet mask to 255.255.255.0.
- Click OK.
- Click Close.
- Click close (X) to close both Network Connections and Network and Sharing Center.


Advertisement
Part 3
Part 3 of 3:
Testing Connectivity and Shutdown
- After the OS is installed and network parameters configured, it is time to test both activities; an important test is to verify the server can communicate with another machine, such as a Windows 7 client, and the client can communicate with the server; you can do this using the Command Prompt, and after testing is complete, you can shutdown the server.
-
1Verify Connectivity.
- Display Start.
- Click the down arrow to display several Apps.
- Scroll right.
- Click the Command Prompt.
- Ping the second machine.
- From the second machine, ping the server.
-
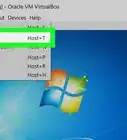
2Shutdown server.
- Display Start.
- Click Settings to display its contents.
- Click Power.
- Click Shutdown.
- Follow the displayed instructions to complete the shutdown.


Advertisement
Warnings
- When partitioning the disks, Next does not depend on a selection; this means whichever space is highlighted, partition or unallocated, and you click Next, setup formats the space, copy the necessary operating system files, and install the operating system. Everything on that partition will be lost.⧼thumbs_response⧽
- When partitioning the disks, if you select Delete, setup will delete the highlighted partition and label it unallocated; you will then have to use New to create a partition for the install, or click Next to install. Also, note that if you click Next, setup uses the entire highlighted space for the install, but if you do not want to use the entire space, to install the operating system, use New to create the partition size from the unallocated space.⧼thumbs_response⧽
Advertisement
Things You'll Need
- DVD you created with the .iso for Windows Server 2012 R2.
- DVD with a Windows client, such as Windows 7.
- One physical machine on which you can install and configure two virtual machines: one server and one client.
- Virtual machine software, such as VirtualBox.


References
- Microsoft. (2013, June 24). System Requirements and Installation Information for Windows Server 2012 R2. Retrieved from TechNet: http://technet.microsoft.com/en-us/library/dn303418.aspx
- Microsoft. (2013, June 24). Windows Server Installation Options. Retrieved from TechNet: http://technet.microsoft.com/en-us/library/hh831786.aspx
About This Article
Advertisement