This article was co-authored by Rachel Guffey. Rachel Guffey is a Plant Specialist and the Owner of Jungle House, a house plant shop based in Lawrence, Kansas. She specializes in plant education and caring for indoor plants. Rachel is passionate about using plants to help combat seasonal depression. She aims to make plants feel more accessible and approachable to everyone. Rachel has owned over 500 plants at one time.
There are 14 references cited in this article, which can be found at the bottom of the page.
This article has been viewed 17,096 times.
Potted hydrangeas are a fun, pretty option when you want to add colorful shrubs to somewhere like the patio, porch, balcony, or front entryway of your home. Hydrangeas are a hardy, easy-to-grow plant, and growing hydrangeas in pots is simple. Just pick up some decorative pots and nursery-grown hydrangeas in containers from your local garden center to get started. As long as you take care of your new hydrangeas properly, you can keep them in pots for several years. To help you out, we've put together this guide to growing hydrangeas in pots that includes hydrangea care instructions and tips for successful container gardening.
Steps
Potting a Hydrangea
-
1Pick a compact species of hydrangea like Red Hot Violet or Altona to pot. Compact varieties of hydrangeas, also known as dwarf hydrangeas, tend to do better in pots because they do not require as much space as other varieties. Visit a garden center or nursery and buy a compact type of hydrangea to grow in a pot at home.[1]
- Another example of a compact type of hydrangea that you could grow well in a pot is the Mountain hydrangea.[2]
- Note that hydrangeas can be planted in containers at any time of year.
- You can always ask an employee at the garden shop which compact species of hydrangeas they have available, since there are a wide variety of them.
-
2Choose a 15–18 in (38–46 cm) pot with multiple drainage holes in the bottom. Purchase a large decorative pot that is bigger than the nursery pot your chosen hydrangea came potted in and somewhere in the 15–18 in (38–46 cm) size range. Make sure it has lots of drainage holes, like 8 or more, because hydrangeas don’t like to have their roots sitting in water at the bottom of the pot.[3]
- If your chosen pot doesn’t have multiple drainage holes, you can always drill additional holes in the bottom using a power drill and the appropriate drill bit for the type of material the pot is made from.
- It doesn't matter what material the pot is made out of.
Advertisement -
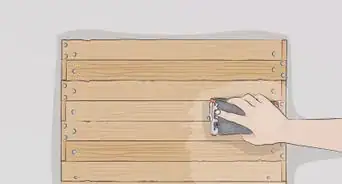
3Place an even layer of broken pottery or stones at the bottom of the pot. Spread out the bits of pottery or rocks in a flat, even layer that covers the bottom of the pot. This will help improve drainage for your hydrangea to keep it happy and prevent root rot.[4]
- For example, you could smash an old clay or ceramic pot you have sitting around and use the pieces of that. Alternatively, you could purchase a bag of gravel or river stones to put at the bottom of the pot.
- If you use gravel or stones, the layer just needs to be thick enough to cover the entire bottom of the pot.
-
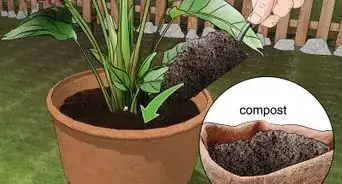
4Pour potting mix into the pot up to the depth of the hydrangea’s current pot. Any bagged potting soil mix will work, since these types of soils drain well and often have additives like compost and slow-release fertilizer that will help your hydrangea grow. Fill the bottom of the pot up with enough of the soil that the base of the shrub will be about 2 in (5.1 cm) below the rim of the pot when you put the hydrangea in the new pot.[5]
- You could also use a bagged compost mix made specifically for shrubs.
- A well-draining tropical soil is another great option.[6]
-
5Use ericaceous compost instead of potting mix to grow blue hydrangeas. Fill the bottom of the pot in up to the depth of the hydrangea’s current pot with ericaceous compost instead of regular potting mix and use it to fill in the rest of the pot after you transfer the hydrangea to its new home. Blue hydrangeas tend to change color if you grow them in an alkaline soil, so the acidity of an ericaceous compost mix will help preserve their color.[7]
- Alkaline soils are soils that have a high pH level, whereas acidic soils like ericaceous compost have low pH levels. Blue hydrangea flowers happen to get produced in soils with lower pH levels.
-
6Transfer the hydrangea from the small pot it came in into your new large pot. Gently squeeze the sides of the pot that your hydrangea came home with you from the store in or carefully work a small trowel around the edges of the pot to loosen the root ball. Tip the pot over slowly and gently pull the hydrangea out. Set it in the center of the new pot on top of the soil.[8]
- If the base of your hydrangea is more than 2 in (5.1 cm) or so below the rim of the pot, add a little more soil underneath the root ball to raise it up. The goal is to keep it at about the same depth that it was growing at in the pot you purchased it in.
-
7Fill in the pot with potting mix to about 2 in (5.1 cm) below the rim. Pour more of your potting soil mix in around the sides of the hydrangea. Spread the soil out to fill the pot in evenly until the top of the soil and the base of the hydrangea are approximately 2 in (5.1 cm) below the rim of the pot.[9]
- Leaving some space between the top of the soil and the rim of the pot will allow you to water your hydrangea thoroughly without the water spilling over the sides and taking soil with it.
-
8Press the soil down gently around the plant to even it out and firm it up. Use your hands or a small garden trowel to lightly pack down the soil around the base of the shrub. Try to get rid of any air pockets and even out any mounds of soil.[10]
- You can add a little more potting mix after you pack down the soil if the hydrangea feels loose or if the surface of the soil is uneven.
-
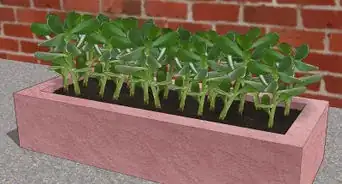
9Water the pot until it fills up to the rim, let it drain, then repeat this. Use a hose or a watering can to saturate the soil completely until the water reaches almost to the top of the pot. Wait a few seconds for the water to drain out from the bottom of the pot, then repeat the process.[11]
- This will ensure your hydrangea has plenty of water while it gets established and help it settle into the new soil.


Caring for Potted Hydrangeas
-
1Place potted hydrangeas where they will receive partial sun. Someplace where they will receive morning sun and afternoon shade is ideal for your hydrangeas. Hydrangeas tend to dry out quickly, so don’t put them someplace where they will receive full sun throughout the day.[12]
- Partial sun is generally considered to be anywhere from 3-6 hours of direct sunlight per day.
- You may have to move potted hydrangeas around to shadier spots during the hotter summer months if the soil is drying out very quickly.[13]
-
2Check your hydrangeas for moisture daily by sticking a finger into the soil. Poke your finger straight down into the soil about 1–2 in (2.5–5.1 cm) deep. Wiggle your finger around to feel whether the soil is dry or wet.[14]
- If your finger comes out totally clean, the soil is dry. If it comes out with bits of wet dirt stuck to it, there is still moisture in the soil.
- Try not to let the soil dry out completely.[15]
-
3Water your hydrangeas until soaked whenever the soil feels dry. Fill your potted hydrangeas up to the rim of the pot with water to thoroughly soak the soil and keep the plants moist.[16] This is usually going to be necessary at least 2 times a week and up to every day from the end of spring through summer.[17]
- If you ever notice that the leaves on your hydrangeas are starting to droop or wilt, this is another sign that it’s time to water them. As long as you water them whenever you see this, they’ll recover quickly and start looking bright and healthy again.
- Always remove any decorative wrapping before you start watering your hydrangeas.[18]
-
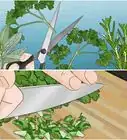
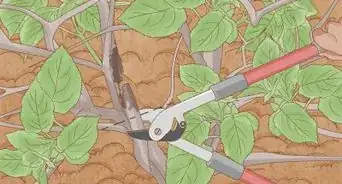
4Prune your hydrangeas at the end of summer when their flowers have faded. Wait until the blooming season is over and the flowers are starting to fade and die off. Use a sharp pair of pruning shears to cut off fading and dead flower heads just above a set of leaves.[19]
- Pruning after your hydrangeas are done blooming maximizes new flower growth the next time it blooms.
- You can also cut back leaves to shape your hydrangeas by trimming branches off just above a leaf joint.
- Make sure not to remove more than a total of 1/3 of a hydrangea plant at a time when you’re pruning it. This includes both dead heading and trimming back leaves.
-
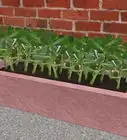
5Cover potted hydrangeas or bring them inside for the winter. Move potted hydrangeas inside a sheltered area or into a greenhouse before temperatures start to freeze, if possible.[20] Cluster potted hydrangeas together and surround them with a frame of stakes or chicken wire if you have to leave them outside when it’s freezing out. Fill the area inside the frame with pine needles or something similar and cover the frame with something breathable like a burlap sack or a fleece blanket.
- Indoor locations you could move hydrangeas to during the winter include a mudroom or sun room or even your garage. The plants don't have to receive natural light during this time as they are dormant.
- If you live in a temperate climate where temperatures never or rarely dip below freezing, this isn’t necessary. Hydrangeas are hardy plants, so they can survive short periods of cold temperatures.
-
6Fertilize hydrangea plants with slow-release fertilizer at the start of spring. Buy a bag of slow-release fertilizer and apply it to the soil of your potted hydrangeas as per the manufacturer's instructions. This is optional and there's no benefit to be gained from fertilizing hydrangeas more than once a year before the growing season gets fully underway.[21]
- Don’t ever fertilize hydrangeas at the end of summer. This can cause spurts of new growth after the growing season, which can get damaged during the winter. Always stick to fertilizing right before or at the beginning of the growing season.


Warnings
- Don’t fertilize hydrangeas outside of the growing season or you can cause late new growth that could get frost damaged during the winter.⧼thumbs_response⧽
- Don’t let your hydrangeas’ soil dry out. Water them every day if you have to in order to keep the soil moist.[24]⧼thumbs_response⧽
Things You’ll Need
Potting a Hydrangea
- Hydrangea
- 15–18 in (38–46 cm) pot
- Broken pots or stones
- Bagged potting mix
- Water
- Garden trowel (optional)
Caring for Potted Hydrangeas
- Water
- Pruning shears
- Winter coverings (optional)


-Oven-Step-15.webp)


References
- ↑ https://www.rhs.org.uk/plants/popular/hydrangea/shrubby/growing-guide
- ↑ https://www.southernliving.com/garden/flowers/grow-hydrangea-in-pot
- ↑ https://www.youtube.com/watch?v=pvKcieDfDcE&feature=youtu.be&t=199
- ↑ https://www.hortzone.com/blog/how-to-improve-drainage-in-potted-plants/
- ↑ https://www.youtube.com/watch?v=pvKcieDfDcE&feature=youtu.be&t=205
- ↑ Rachel Guffey. Plant Specialist. Expert Interview. 5 August 2021.
- ↑ https://www.rhs.org.uk/plants/popular/hydrangea/shrubby/growing-guide
- ↑ https://www.realsimple.com/home-organizing/gardening/outdoor/hydrangea-care
- ↑ https://www.youtube.com/watch?v=pvKcieDfDcE&feature=youtu.be&t=216
- ↑ https://www.youtube.com/watch?v=Pe4Umequvh8&feature=youtu.be&t=660
- ↑ https://www.youtube.com/watch?v=pvKcieDfDcE&feature=youtu.be&t=238
- ↑ https://www.mcall.com/entertainment/mc-garden-hydrangea-pots-tips-20161014-story.html
- ↑ https://www.rhs.org.uk/plants/popular/hydrangea/shrubby/growing-guide
- ↑ https://www.youtube.com/watch?v=pvKcieDfDcE&feature=youtu.be&t=254
- ↑ Rachel Guffey. Plant Specialist. Expert Interview. 5 August 2021.
- ↑ Rachel Guffey. Plant Specialist. Expert Interview. 5 August 2021.
- ↑ https://www.youtube.com/watch?v=pvKcieDfDcE&feature=youtu.be&t=257
- ↑ Rachel Guffey. Plant Specialist. Expert Interview. 5 August 2021.
- ↑ https://www.bhg.com/gardening/flowers/perennials/hydrangea-pruning/
- ↑ https://www.mcall.com/entertainment/mc-garden-hydrangea-pots-tips-20161014-story.html
- ↑ https://www.rhs.org.uk/plants/popular/hydrangea/shrubby/growing-guide
- ↑ https://www.rhs.org.uk/plants/popular/hydrangea/shrubby/growing-guide
- ↑ https://www.southernliving.com/garden/flowers/grow-hydrangea-in-pot
- ↑ https://www.rhs.org.uk/plants/popular/hydrangea/shrubby/growing-guide
About This Article