This article was co-authored by Brooke Cazier. Brooke Cazier is a Baker and the Owner & Founder of the Flaky Apple Pie Co based in Costa Mesa, California. She has over 20 years of experience in the kitchen and specializes in creating frozen pies to be baked at home. Brooke holds a Bachelors degree from Utah State University.
This article has been viewed 91,349 times.
When preparing pies, whether for a holiday or a family party, it is not always practical to finish baking the pies immediately before they will be served. You may wish to prepare several pies ahead of time, and freeze them to be baked and served at a later date. Most types of pies can be successfully baked, frozen, and then reheated. You can also to freeze pies before baking them, and then bake your pies shortly before you plan to serve them.
Steps
Freezing Baked Fruit or Nut Pies
-
1Bake your pies according to the recipe directions. Although it is possible—and sometimes preferable—to freeze unbaked pies, pies are typically frozen after they have already been baked. This simplifies the thawing and reheating process.
- Pies whose fillings is made of fruits or nuts—pecan, walnut, peach, cherry, apple, etc.—are relatively easy to bake, freeze, and reheat, because the firm texture of the fillings stays firm while frozen.
- It is unnecessary to change the recipe just because you are going to freeze the pies instead of eating them immediately after baking.
-
2Allow the baked pies to cool completely. This can take up to several hours—but it is an important step. The pie should be cool when you can rest your hand on the bottom of the pie pan and do not feel any heat. If you freeze your baked pie without first letting it cool completely, the quality will diminish; the pie may become soggy or lose its flavor.[1]
- You may simply set the pies on the counter to cool, or let them cool in the refrigerator.
Advertisement -
3Cover each pie with an airtight material. Start by putting several layers of cling wrap around the pies. The cling wrap will keep your pies from picking up bad tastes or smells from the freezer.
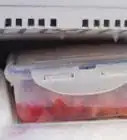
- For extra protection, place each wrapped pie in an airtight storage container. You can wrap your pies in large zipping freezer bags or airtight plastic storage containers.
- If you don’t have ziplock bags or large Tupperware, you can wrap the pies well with aluminum foil.
-
4Find a place in your freezer where the pies will be secure. You do not want the pies to be unsteady and fall. This will break the crust and make the pies much harder to bake and serve.
- You’ll also want to avoid placing the pies in a position where they’ll have more items stacked on top of them. Although the frozen pies will be relatively stable, the crust can still be crushed or damaged if you place heavy objects on the pies.
-
5Set the pies in the freezer carefully. Do not place the pies on top of each other; each pie should have nothing placed on top of it for the duration of its time in the freezer.
- If you do not have room in your freezer to distribute each pie individually, try to find a way to stack pies without damaging the filling or crust. First, freeze each pie individually, and then try stacking them inside of empty, clean pizza boxes.
-
6Check your frozen pies occasionally to be sure the containers remain airtight. If the containers come open, the pies may receive freezer burn or may pick up a bad taste or smell from the freezer.
-
7Remove the frozen pies from the freezer several hours before you plan to serve them. Allow the frozen pies to thaw completely before serving. If you would like to serve your pies hot, pre-heat your oven to 350°—then place the pies in the oven for about 6 minutes.
- If you have enough time before you need to serve the pies, you may choose to let the pies thaw slowly in the refrigerator. You should give the pies at least 24 hours to thaw, if you choose this method.
- If you prefer to serve the pie warm (apple or pecan pie, etc.), let the pie stand at room temperature for about 30 minutes, then place it in the oven at 350°, for about 30 minutes.


Freezing Custard, Cream, and Pumpkin Pies
-
1Avoid freezing your custard- or cream- based pies, if possible. Pies that lack a firm filling—such as fruits or nuts—are more difficult to successfully freeze. Due to their liquid consistency, custard and cream pies can make the pie crust soggy.[4]
- If you were planning to freeze your custard pies for a short amount of time, consider refrigerating them instead.
- Meringue pies—such as lemon meringue—are also difficult to freeze, for the same reasons. Try to serve these fresh to maintain the taste and consistency of the pies.
-
2Freeze the pie in two parts. The primary problem with freezing custard or cream pies is that the custard or cream filling will break down and become soggy, rendering the crust soggy as well.[5] Avoid this problem by freezing the custard filling separately from the pie crust.
- Freeze the baked pie crust (do not freeze raw dough).
- Freeze the custard, cream, or pumpkin filling in an airtight plastic container; a Tupperware would do nicely.
- Avoid freezing pumpkin pies for more than 4-5 weeks.
-
3Thaw the custard filling in your refrigerator. If you thaw the custard, cream, or pumpkin filling at room temperature, the filling will become watery and may result in a soggy pie.
- Give your custard or cream filling about 24 hours to thaw fully in your refrigerator.
-
4Bake the pie crust first and then add the filling and finish baking the pie. Unlike baking a fruit or nut pie, you should not bake the custard filling in a raw pie crust. After your pie filling has finished thawing for 24 hours, pull the frozen crust out from your freezer. Bake the pie crust until it is golden brown, then add the custard, cream, or pumpkin filling and finish making the pie as the recipe suggests.


Freezing Unbaked Pies
-
1Chill the pie crust and filling. If you are making a two-crust pie (one crust beneath the filling, and one crust on top), roll out both parts of the crust as usual. Press the lower crust into the pie pan, and gently set the top crust onto a sheet of wax paper. Put both the pan (with the lower crust) and the wax paper sheet (with the top crust) into the refrigerator until both halves of the crust are completely chilled.[6]
- Make the pie filling, and put that in the refrigerator to chill as well.
-
2Assemble the pie from the chilled filling and crusts. Once the crusts and filling have chilled completely, put the pie together as you normally would: spoon the filling into the lower crust, and add the top crust last, then crimp the edges.
- Do not add any slits in the top of the pie crust. While these play an important role in baking a pie, they will lower the quality and taste of your unbaked, frozen pie.
-
3Wrap the pie in plastic wrap to keep it air-tight. Two to three layers should be sufficient.[7] To make sure that your pie is airtight and will freeze well, you should further protect it by placing the pie inside two large ziplock bags.
- Make sure to squeeze all of the air out of the plastic wrap and ziplock bags when you put the pie in the freezer.
-
4Prepare your pie for baking. Once you are ready to bake and eat your pie, pull it out from the freezer and unwrap the layers of plastic wrap and ziplock bags. At this point, you should cut slits in the top of your pie to help it bake better.
- Do not thaw the frozen pie before baking.
-
5Bake your pie before serving. Preheat your oven to 425°, and gently set your pie on the center shelf. Bake for 15 minutes—then reduce the oven’s heat to 375° and bake for 30-45 minutes longer.[8] At this point, your pie will be fully cooked and ready to serve.
- Alternately, you can thaw the pie at room temperature for an hour rather than baking at 425°. After it’s thawed, bake your pie in the oven at 375° for 30-45 minutes.
-
6Finished.


Community Q&A
-
QuestionCan apple pies be frozen and eaten later
 Community AnswerThey can be frozen; see Method 1 above.
 -
QuestionCan you freeze meat and veg pies that are cooked in metal tins
 Community AnswerYes; there is no special trick to freezing meat or vegetable pies.
 -
QuestionCan the pie crusts be put in the dish they will be served when freezing?
 Community AnswerYes, as long as the dish is one that can be frozen (glass or metal do well).
Things You'll Need
- Pie plates
- Cling wrap
- Freezer bags
- Storage containers
- Aluminum foil
- Freezer


References
- ↑ http://www.hillbillyhousewife.com/what-is-the-best-method-for-freezing-pies.htm
- ↑ http://www.four-h.purdue.edu/foods/freezing%20pies.htm
- ↑ http://www.sixfiguresunder.com/can-you-freeze-that/
- ↑ http://www.finecooking.com/articles/make-freeze-holiday-pies.aspx
- ↑ http://www.finecooking.com/articles/make-freeze-holiday-pies.aspx
- ↑ http://www.hillbillyhousewife.com/what-is-the-best-method-for-freezing-pies.htm
- ↑ http://www.hillbillyhousewife.com/what-is-the-best-method-for-freezing-pies.htm
- ↑ http://www.bettycrocker.com/how-to/tipslibrary/baking-tips/storing-pies
About This Article

To freeze baked fruit or nut pies, start by letting them cool completely. Next, cover each pie with several layers of an airtight material like plastic cling wrap or foil. Then, place the pies in a stable area of the freezer where they won't be disturbed. Finally, remove the pies from the freezer several hours before you plan to serve them. If you want hot pie, bake them in the oven at 350°F for 6 minutes. For tips on freezing other kinds of pie, like custard, cream, and pumpkin, read on!