This article was co-authored by David Balkan. David Balkan is a Professional Plumber, CEO of Balkan Sewer and Water Main Service, and President of Balkan Sewer and Drain Cleaning. As a hands-on owner of these companies for over 40 years, David is knowledgeable about water service lines, sewers, and drain line issues. David is a Committee Chairman of the Master Plumbers Council and has sat on the Executive Committee of the Sub Surface Plumbers Association of New York for over 30 years. His knowledge and solution-oriented approach contributed to Balkan Sewer and Water Main Service being the largest and most trusted service in New York City and the recipient of the 2017 Angie’s List Super Service Award.
There are 8 references cited in this article, which can be found at the bottom of the page.
This article has been viewed 423,642 times.
A leaky toilet tank never feels like a simple problem to deal with. Whether water is leaking into the bowl or onto the floor, some plumbing work will be required to fix it. Luckily, once you know how to determine the cause of the leak, it’s a straightforward process to fix your leaky toilet tank. You can do this by replacing the flush valve, fixing a leaky fill valve, or simply tightening the toilet’s gaskets.
Steps
Determining the Cause of the Leak
-
1
-
2Mark the water level in the tank with a marker or a pencil. Make the mark at the highest point where the water in the back of the tank reaches. This will help you to determine whether the water in the tank rises or falls over time.[3]
- For best results, use a sharpie; a pencil mark will work, but it may be washed away if the water rises.
Advertisement -
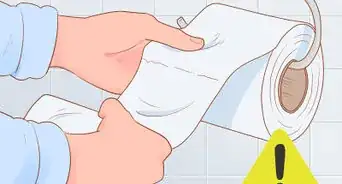
3Add coloring or food dye to the water and wait 10 minutes. Add 1 dye tablet or 10 drops of food coloring to the water in the tank. Dyeing the water this way will allow you to see whether the water in the tank is leaking into the toilet bowl.[4]
- You can normally purchase water dye tablets from your local water provider.
- Be sure to wait at least 10 minutes so that the water in the tank will completely change color.
-
4Check the water in the toilet bowl to see if it’s changed color. If the water in the bowl has any trace of the dye you put in the tank, the water in the tank has leaked into the bowl. This means the cause of your leak is a faulty flush valve.[5]
- If you have a damaged flush valve, it will have to be replaced.
-
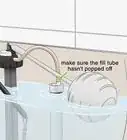
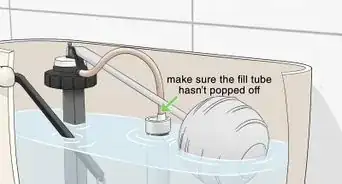
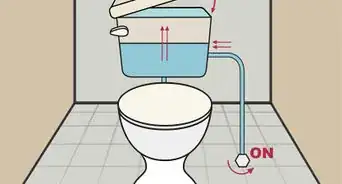
5Look to see if the water level in the tank has gone up or down.[6] If the water has risen, this means there’s probably something wrong with the fill valve. If the water has gone down, there’s a probably a leak in your flush valve.[7]
- If the water level has gone up, check to see if there’s any water in the overflow tube. This would also indicate that the fill valve is leaking and overflowing the water in the tank.
- If you're not sure exactly what part of the toilet assembly you need to replace, just buy a kit with all new parts and replace everything. They're pretty inexpensive and it will save you a lot of time.[8]
-
6Check if the dyed water from the tank has leaked onto the floor. If dyed water has seeped out from the bottom of the tank and onto the floor, this means it’s probably a leaky gasket. If dyed water has come out of the body of the tank, the tank itself may be cracked.[9]
- Unfortunately, if the tank is cracked, it will have to be completely replaced.
Tip: Toilets may develop condensation on the exterior of the tank during hot weather or when you’re taking a very hot shower. This “tank sweat” is harmless.


Replacing a Flush Valve
-
1Turn off the water supply to the toilet and flush it. This will drain all of the water out of the tank and down the commode. If you can’t flush the toilet for some reason, you can also use a cup or a hose to remove the water from the back of the tank.[10]
-
2Remove the nuts attached to the supply tube and to the toilet bowl. The tank is attached to the wall by the supply tube and attached to the toilet bowl by two bolts underneath the tank. Use an adjustable wrench to loosen and remove these nuts so you can remove the tank.[11]
- You may need to use a flathead screwdriver to hold the bolts in place as you turn the nuts under the tank.
-
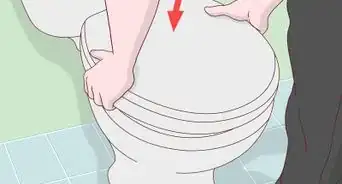
3Lift the tank off of the bowl once the nuts have been loosened. Place the tank upside down next to the toilet bowl on a stable surface. If you want to avoid water getting on the floor, put some towels down and place the tank on top of these.[12]
- Placing the tank upside down will give you direct access to the flush valve on the bottom of the tank.
-
4Unscrew the locknut on the bottom of the tank and remove the valve. This is the large nut in the middle of the tank that holds the flush valve in place. Once you’ve unscrewed the locknut, simply push on the flush valve to pop it out.[13]
- For best results, use a plumber’s wrench to unscrew the locknut.
-
5Place the new flush valve in the spot where the old valve was. Push the new flush valve down against the tank opening to install it. Follow the manufacturer’s instructions to ensure you install the new valve properly.[14]
- You can buy a new flush valve at any retailer that sells home improvement supplies.
-
6Tighten the locknut with a monkey wrench to complete the installation. Reattach any parts of the flush valve that you disconnected when you were removing the old one. Be sure to replace the gasket over the locknut, as well.[15]
-
7Place the tank back on the toilet and tighten the bolts. Tighten the nuts that you previously loosened that affix the tank to the supply tube and to the toilet bowl. Once the tank has been reattached, you can turn the water supply back on and refill the tank.[16]
- Once the installation is complete, flush the tank to ensure that the leak is fully gone. If it isn’t gone, check to make sure the leak isn’t coming from somewhere else.
- If water is still leaking into the toilet bowl, go back and make sure you’ve fully tightened the bolts attached the flush valve.


Fixing a Fill Valve Leak
-
1Turn off the toilet’s water supply and remove the water from the tank. Turn the water supply valve in back of the toilet all the way clockwise to turn off the supply.[17] Remove the water from the tank by flushing the toilet once the water’s been turned off.[18]
- You can also use a cup or a shop vac to get the water out of the tank.
-
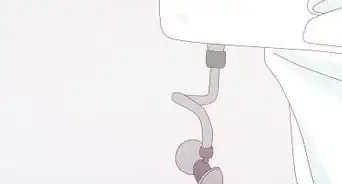
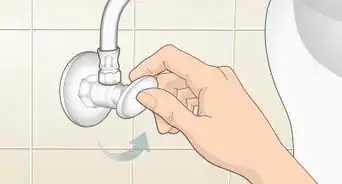
2Disconnect the water supply tube behind the tank. This is the tube immediately beneath the location of the fill valve underneath the tank. Use a wrench to turn this tube counterclockwise to disconnect it.[19]
- Depending on your toilet model, the supply tube will either be a long, rigid pipe or a short tube connected to the water supply shutoff valve.
-
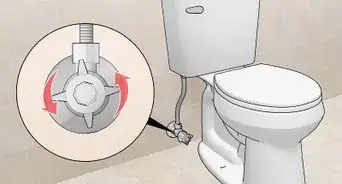
3Unscrew the locknut attached to the fill valve on the bottom of the tank. This is the nut located underneath the tank that holds the fill valve in place. Use a small wrench or pair of pliers to loosen and remove the locknut.[20]
- The locknut is most likely located right next to the supply tube.
-
4Remove the old fill valve through the top of the tank. Take the lid off of the top of the tank, if you haven’t already. Pull the old valve directly upwards in order to remove it from the tank.[21]
- Be sure you’ve removed all the water from the tank before you do this.[22] If you remove the fill valve with water still in the bottom of the tank, that water will fall out of the hole where the fill valve used to be and end up on the bathroom floor.
-
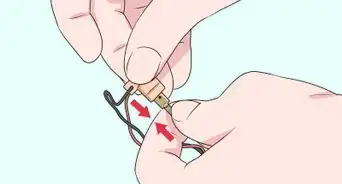
5Place the new fill valve in the tank and install it per its instructions. Put the new fill valve in the spot where you just removed the old valve and screw the locknut onto the bottom of it. Be sure to attach the refill tube to the side of the fill valve and orient it over the overflow tube in the tank.[23]
- Note that the instructions will also include guidelines for how high the fill valve’s float will need to be.
-
6Reattach the water supply tube behind the tank and turn on the water. Once the water supply has been turned back on, flush the toilet to test the new fill valve. If it fills correctly and doesn’t overflow, it’s fixed.[24]
- If you’re still experiencing problems with water leakage, your toilet may have a more serious problem. Call a plumber to have them diagnose the problem and see if it can be repaired.


Tightening Leaky Gaskets
-
1Turn off the water and empty the water out of the tank. Turn the water supply valve behind the toilet clockwise to turn off the water supply. Once the water’s been turned off, flush the toilet to empty out the tank.[25]
- You can also use a cup or a shop vac to get the water out of the tank.
-
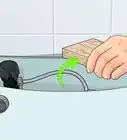
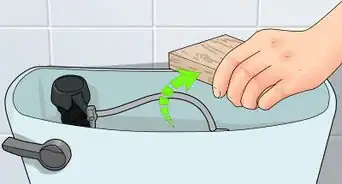
2Locate the bolts in the tank that connect the tank to the bowl. These are the 2 or 3 bolt heads surrounding the flapper in the bottom of the tank. You’ll recognize the bolts by the rubber washers underneath them.[26]
-
3Use an adjustable wrench and screwdriver to tighten these bolts. Use a flathead screwdriver to hold the bolts in place. Then, with the adjustable wrench, turn the bolts clockwise underneath the tank to tighten them.[27]
- Tightening the bolts should prevent water from seeping out from underneath the tank.
-
4Refill the tank and check for leaks coming from the bolts. Turn the water supply back on to allow the tank to refill.[28] Wait a few minutes, then look underneath the tank to see if it’s still leaking. If there’s no more leak, the gasket has been fixed.[29]
- If there is still a leak, the washers underneath the bolts in the tank will need to be replaced.


Expert Q&A
-
QuestionCan a toilet leak without you knowing?
 James SchuelkeJames Schuelke, along with his twin brother David, is the co-owner of the Twin Home Experts, a licensed plumbing, leak detection, and mold inspection company based in Los Angeles, California. James has over 32 years of home service and business plumbing experience and has expanded the Twin Home Experts to Phoenix, Arizona and the Pacific Northwest.
Professional PlumberYes, especially if the leak is in the tank. To see if your toilet tank is leaking, lift the lid on your tank and check if the water level has gone up or down. This might mean water is leaking into or out of you tank. -
QuestionHow do you know what part of the toilet to replace?
 David BalkanDavid Balkan is a Professional Plumber, CEO of Balkan Sewer and Water Main Service, and President of Balkan Sewer and Drain Cleaning. As a hands-on owner of these companies for over 40 years, David is knowledgeable about water service lines, sewers, and drain line issues. David is a Committee Chairman of the Master Plumbers Council and has sat on the Executive Committee of the Sub Surface Plumbers Association of New York for over 30 years. His knowledge and solution-oriented approach contributed to Balkan Sewer and Water Main Service being the largest and most trusted service in New York City and the recipient of the 2017 Angie’s List Super Service Award.
Professional Plumber & CEO of Balkan Sewer & Water MainIf you're not sure, just buy a kit with all the pieces—they're pretty inexpensive. Then, just turn off the water supply and swap everything out. That way, you don't lose hours trying to figure out if it's a washer, or a spring, or some other small part. -
QuestionMy toilet is leaking where the water supply line enters the tank. How do I fix it?
 Community AnswerEither the washer inside the tank is flawed or the nut underneath is not tight enough. Turn the water valve to the toilet off at the supply, either at the wall or floor. Then flush the toilet. The tank will now only have a couple inches of water. Try to turn the flush valve gently. If it moves easy and you do not see the washer squeeze out or a break in the washer, simply tighten the nut underneath the tank. You can buy a new flush valve for around $20.
Things You'll Need
- Marker or pencil
- Food coloring or dye tablet
- Adjustable wrench
- Flathead screwdriver
- Monkey wrench
- New flush valve (if needed)
- New fill valve (if needed)


References
- ↑ James Schuelke. Professional Plumber. Expert Interview. 1 October 2019.
- ↑ http://www.planitdiy.com/how-to/plumbing/how-to-replace-a-flush-valve/
- ↑ http://www.planitdiy.com/how-to/plumbing/how-to-repair-a-leaking-toilet/
- ↑ https://www.youtube.com/watch?v=_iOntqeVGOU#t=37s
- ↑ https://www.youtube.com/watch?v=vj4TP55-FO0#t=2m4s
- ↑ James Schuelke. Professional Plumber. Expert Interview. 1 October 2019.
- ↑ http://www.planitdiy.com/how-to/plumbing/how-to-repair-a-leaking-toilet/
- ↑ David Balkan. Professional Plumber & CEO of Balkan Sewer & Water Main. Expert Interview. 23 February 2021.
- ↑ http://www.planitdiy.com/how-to/plumbing/how-to-repair-a-leaking-toilet/
- ↑ http://www.planitdiy.com/how-to/plumbing/how-to-repair-a-leaking-toilet/
- ↑ http://www.home-repair-central.com/how-to-fix-a-leaking-toilet-tank.html
- ↑ http://www.home-repair-central.com/how-to-fix-a-leaking-toilet-tank.html
- ↑ http://www.planitdiy.com/how-to/plumbing/how-to-replace-a-flush-valve/
- ↑ http://www.planitdiy.com/how-to/plumbing/how-to-replace-a-flush-valve/
- ↑ http://www.planitdiy.com/how-to/plumbing/how-to-replace-a-flush-valve/
- ↑ http://www.planitdiy.com/how-to/plumbing/how-to-replace-a-flush-valve/
- ↑ James Schuelke. Professional Plumber. Expert Interview. 1 October 2019.
- ↑ http://www.planitdiy.com/how-to/plumbing/how-to-replace-a-toilet-fill-valve-video/
- ↑ http://www.planitdiy.com/how-to/plumbing/how-to-replace-a-toilet-fill-valve-video/
- ↑ http://www.planitdiy.com/how-to/plumbing/how-to-replace-a-toilet-fill-valve-video/
- ↑ http://www.planitdiy.com/how-to/plumbing/how-to-replace-a-toilet-fill-valve-video/
- ↑ James Schuelke. Professional Plumber. Expert Interview. 1 October 2019.
- ↑ http://www.planitdiy.com/how-to/plumbing/how-to-replace-a-toilet-fill-valve-video/
- ↑ http://www.planitdiy.com/how-to/plumbing/how-to-replace-a-toilet-fill-valve-video/
- ↑ http://www.home-repair-central.com/how-to-fix-a-leaking-toilet-tank.html
- ↑ http://www.home-repair-central.com/how-to-fix-a-leaking-toilet-tank.html
- ↑ http://www.home-repair-central.com/how-to-fix-a-leaking-toilet-tank.html
- ↑ James Schuelke. Professional Plumber. Expert Interview. 1 October 2019.
- ↑ http://www.home-repair-central.com/how-to-fix-a-leaking-toilet-tank.html
About This Article

To fix a leaky toilet, start by running a few simple tests to figure out what's causing the leak. For example, the source of your leak might be the flush valve, fill valve, or gasket, and the fix for each type is different. Once you know what kind of leak you're dealing with, you can address it! Flush valves usually need to be replaced, which you can do easily with a wrench. Gaskets typically need to be tightened with a wrench, but you'll also need a screwdriver to complete the job. Finally, a leaky fill valve can be fixed with a replacement valve. Be sure to turn the water supply to the toilet off before you attempt any repairs! To learn more about how to fix your specific leak, keep reading!