X
This article was co-authored by Daniel Olin. Daniel Olin is a Home Cleaning Specialist and the CEO of Easyway Maid Service, a home-cleaning company based in Austin, Texas. With over four years of experience, Daniel and Easyway Maid Service specialize in executive-quality maid service, as well as vacation rental cleaning and overall home deep cleaning. Daniel holds a BA in Psychology from The University of California, Los Angeles.
This article has been viewed 151,290 times.
So, someone threw something through a window without opening it first? It's going to cost you a bundle, huh. Nope. You can do it yourself. Really!
Steps
-
1Determine what kind of window or door you're dealing with; building codes in your area will likely require tempered glass in your storm windows and doors, but you may be able to use regular pane glass for inside (not storm) windows and doors. Be sure to check local codes.
-
2Remove the window from the casing if possible; take the door with the broken window off the hinges. Replacing the glass is far easier if the window/door is laying flat on the work surface and is clamped down, caulked side of window facing up. If this isn't possible, you can replace the glass in place; make sure you have a solid footing and are at eye level with the upper third of the pane.
- Consider just taking the window to a local hardware store and let them replace the glass. They tend to be reasonable and since they do so many windows, they tend to be fast and cheap on the labor and do excellent work.
Advertisement -
3Dispose of the broken glass.
- Wear protective gloves and remove the broken glass.
- Put it in a cardboard box or sturdy garbage bag.
- When all the glass is out of the frame, tape the box/bag up for disposal and mark it clearly "Broken Glass." Place the box/bag wherever your trash pickup might be.
- Use a wet cloth to pick up any small shards, and toss the cloth out with the rest of the glass.
-
4Remove any remaining old caulk with the putty knife. You may need to heat it up with a heat gun to get it completely loose. Also remove any of the old glazier's points from the broken pane; it's a good idea to save them in case they're a different size from the modern points. Use the metal brush to get the surface as clean as possible.
- Optional step: carefully brush linseed oil on the surfaces that will be holding the caulk. This extends the life of your caulk job, but it takes a day or more to dry, so plan your time accordingly.
- It is a very good idea to prime the wood with exterior primer or use exterior varnish to seal the wood. This will make the wood last decades. Without sealing the wood, it might rot in only a few years.
-
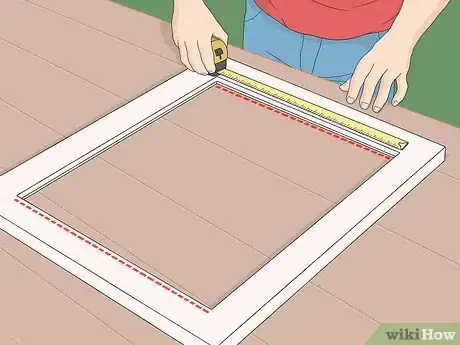
5Carefully measure the width and length of the opening for the window.
- Measure at both top and bottom to see if the window is plumb. If the shape of the window isn't square or rectangular, make a paper template.
- There is a very narrow shelf-type area that the glass lays on; there may also be one side, usually the top, slotted to receive the glass. Remember, you're measuring where the glass lays, not the visual opening.
-
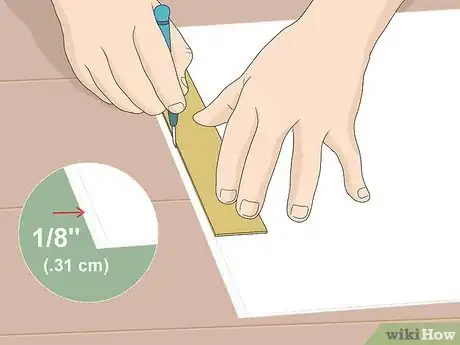
6Go to your friendly neighborhood hardware store or home center and have them cut the glass. The replacement glass should fit on the "shelf" from side to side and top to bottom fairly snugly, but to allow for expansion and contraction, have the glass cut up to 1/8" (.31 cm) smaller on the top and one side.
- 1/8th of an inch can cause the upper piece of wood to sag over time. Using 1/16th of an inch smaller makes fit tighter and is better for supporting the wood. If you use glass the same size as the opening, it will stretch the wood and might make the window harder to fit (or leave small gaps at the corners where water will get in and rot the wood).
-
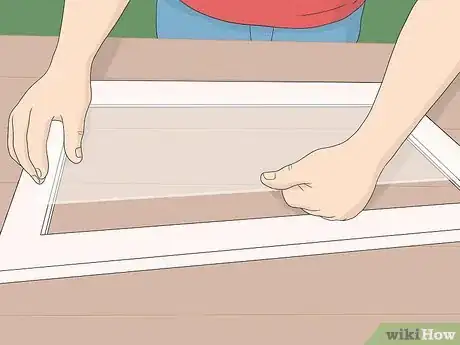
7Insert the glass into the frame.
- With the frame secured to a flat surface and the bottom of the window closest to you, hold the glass at a slight angle top to bottom.
- Guide the whole pane slowly on the "shelves" and work toward the top. When you're just about there, carefully lay the glass almost flat, then guide it as you slide it into the groove at the top of the window. You may need to use one hand on top of the glass, the other on the bottom.
-
8Find the spots where the old glazier points were and put in new ones.
-
9Prepare the glazing compound.
- Open the compound can and put a lump about half the size of a tennis ball (use more when you get the hang of it) into your left hand (right if you're left handed).
- Work it until it's soft and warm. You may have to replenish the supply in your hand more than once, depending on the size of the window.
-
10Using the flat edge of the glaziers tool or putty knife, scoop off a section of putty from your hand and spread it into the "shelf" area at any point; best not to start in a corner. Using the knife or tool at an angle, smooth the putty along the shelf. Be sure that the putty doesn't show from the other side of the window, that is, the width of your putty shouldn't be greater than the shelf width. Continue spreading and smoothing until the sides are covered.
-
11Corners. These can be tricky. Just remember that water will slide down the window and the caulking will guide the water away from the glass. You want the corners to be mitered, but smoothly mitered. Use the angled end of the glaziers tool.
-
12Once you've finished caulking the window, allow it to cure at least a day before cleaning up any spillage on the glass. You'll need to wait up to a week for the putty to cure enough to hold paint.
-
13Congratulations! You've now saved yourself about five times the cost of having the glass replaced by a professional.
Advertisement
Warnings
- Wear safety glasses!⧼thumbs_response⧽
- Keep kids away from your work area!⧼thumbs_response⧽
- Dispose of broken glass safely!⧼thumbs_response⧽
- Glass can be sharp!⧼thumbs_response⧽
- Don't use nails instead of clips to hold the glass because any little movement and the nail will break the glass.⧼thumbs_response⧽
Advertisement
Things You'll Need
- Gloves, leather or thick fabric
- Measuring tape
- Glass cut to fit (we'll get to that in a minute)
- Utility razor knife
- Putty scraper/knife
- Wire brush
- Heat gun (can do without but it's really much easier with it)
- Linseed oil and brush (optional but recommended)
- Glaziers points (little tiny metal bits that hold the glass in)
- Glazier putty or compound (same thing), the premixed kind is best. Get a fresh container if you haven't done a window for a while.
- A flat surface to work on with room to walk around all sides
- A place to clean up your hands--make sure you have a grease-cutting soap such as dishwashing liquid handy. A utility sink is preferable.
- Glass cut to fit. Even the most careful measurements produce glass that doesn't fit. Take the window to the hardware store with you, if possible. If transporting the window or door is impossible, make an accurate paper template. Remember: your 12" by 14" can end up 12.5"x13 if the hardware glass cutting person is having a bad day.
References
- These sites offer more information, pictures, and help in special circumstances:
- http://www.hometips.com/content/glazing_tp.html
- https://www.doityourself.com/stry/reglazing
About This Article
Advertisement


