This article was co-authored by Kpoene Kofi-Bruce and by wikiHow staff writer, Janice Tieperman. Kpoene Kofi-Bruce is a tailor, couture wedding gown designer, and the Creative Director of Mignonette Bridal and Ette the Wedding Tailor in Chicago, Illinois. With nearly two decades of experience as a wedding gown designer, small business owner, and vintage sewing enthusiast, Kpoene specializes in wedding gown design and the social history of wedding dresses. She received a BA in Creative Writing from Middlebury College and studied the business of fashion at the Fashion Institute of Technology. She is also a graduate of the Goldman Sachs 10KSB program and the Chicago Fashion Incubator and has written about wedding fashion for Jezebel, Catalyst, the Sun Times, and XO Jane.
There are 22 references cited in this article, which can be found at the bottom of the page.
This article has been viewed 2,554 times.
Want to take your embroidery skills to the next level? Embroidered baseball caps are a great project to try, whether you’re a casual crafter or a small business owner. We’re here to walk you through how to embroider a hat by hand or by machine from start to finish, so you can have a beautifully designed cap to either sell, give as a gift, or wear yourself.
Steps
Hand Embroidery
-
1Attach a 3 in (7.6 cm) embroidery hoop to the front of your baseball cap. Unhook the inner hoop from the outer embroidery hoop so there are 2 separate pieces. Then, flip the cap over and slide the smaller, inner hoop into the center of the hat. Turn the cap back over and fasten the larger embroidery hoop into place overtop.[1]
- Always use an unstructured cap for your embroidery projects. Structured hats are really hard to stitch over and work with.
- Pull along the edges of the hooped fabric to make sure it’s nice and taut.
- You don’t have to use an embroidery hoop, but it makes the process a lot easier. Embroidery hoops keep the fabric tight and allow your stitches to look more consistent and uniform.[2]
-
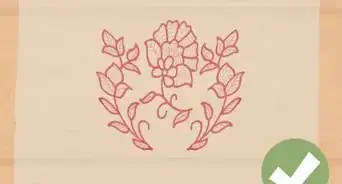
2Sketch your design onto the hooped section of the hat. Grab a water-soluble marker or pencil crayon and lightly draw your design along the center of the hooped fabric. Try to keep your design as centered as possible so the final embroidery work looks even and proportionate.[3]
- A white pencil crayon can come in handy if you’re working with a dark-colored hat. Just be sure to cover up your entire outline with embroidery stitches, as pencil crayon is pretty hard to wash out of fabric.
- You can also sketch your design on a small section of water-soluble stabilizer, which you can stick to the hooped surface of your hat. For extra security, use a basting stitch along the perimeter of the stabilizer to hold it in place.[4]
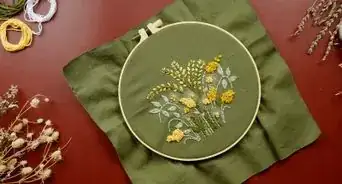
- Stick with a simple design when you’re first starting out, like a flower, heart, leaf, or another simple motif. For a more personalized project, embroider letters to spell out a name, initials, or a meaningful phrase.
Advertisement -
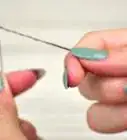
3Work in the first color of your design with an embroidery needle and embroidery floss. Thread your embroidery needle and start stitching your design into the front of the hat. Always work with one color at a time if you’re stitching something that’s multi-colored.[5]
- Some people prefer to start along the outside of their projects and work their way inward. This is especially helpful with floral designs.
-
4Tie off each strand of embroidery floss along the underside of the cap. Flip your cap over and thread the remaining floss tail underneath one of your previous stitches. Then, thread the needle through the stitch one more time, creating a small loop as you go. Pull the needle and thread through this loop to create a knot. To finish things off, simply tighten the knot into place and snip off the excess floss.[6]
- Securing your thread under your old stitches gives the underside of your embroidery project a cleaner, more organized look.
-
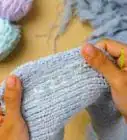
5Keep embroidering and tying off your threads until the design is finished. Continue working color by color and stitching your design in sections. Then, tie and secure each embroidery thread beneath your embroidery hoop as you finish with it. Repeat this process until you’re completely finished with your design.
-
6Remove the embroidery hoop from the cap. Loosen the screw along the top of your embroidery hoop to separate the hoops from one another. Slide the bigger ring off the top of your hat, and remove the smaller ring from inside of the cap.[7]
- You may notice a ring indentation around the hat from where the embroidery hoop was. No worries—this will disappear over time.
-
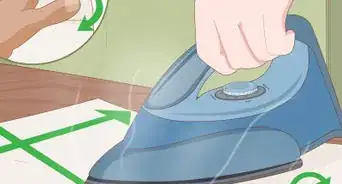
7Wet the hat if you used a water-soluble marker or stabilizer. Dip a felt paintbrush in some clean water and rub it along any visible marker lines. The ink will vanish completely with a little bit of water.[8] If you used water-soluble stabilizer, soak the hat in a container filled with lukewarm water. In a matter of minutes, the stabilizer paper will peel and disintegrate from the fabric.[9]
- Once the hat dries off, it’s good to wear or send off to your recipient.


Machine Embroidery
-
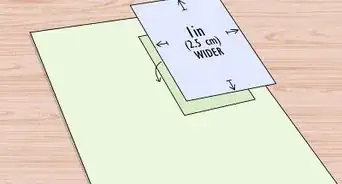
1Secure a piece of tear-away stabilizer adhesive-side-up in a hoop. Cut out a section of of stabilizer and center it over a rectangular, 5 by 7 in (13 by 18 cm) embroidery hoop. Make sure that the peel-away adhesive cover is facing upwards before you tighten the hoop into place.[10]
- You can also use a non-adhesive tear-away stabilizer for your project—you’ll just need to manually apply the adhesive later on.
-
2Remove the adhesive covering from the tear-away stabilizer. Slice through the adhesive covering with a pair of scissors. Then, peel away the rest of the adhesive covering so the front of the hoop is completely sticky.[11]
- If you’re using a non-adhesive stabilizer, apply 4 strips of painter’s tape along each edge of the embroidery hoop. Then, spritz over the flat surface of the stabilizer with quilt basting spray.[12]
-
3Mark the center and sides of the stabilizer with a ruler and an air-soluble marker. Use a ruler to measure exactly halfway along the edge of the embroidery hoop. Then, sketch out a straight, exact line lengthwise along the stabilizer with an air-soluble marker. Repeat this process by turning your ruler 90 degrees and marking an exact line along the other side of the stabilizer.[13]
- You can also layer a rectangular gridded template over the stabilizer and use that as a guide.[14]
-
4Tape down the inner flap of the baseball cap. Flip your baseball cap over and feel for a flap of fabric that’s curved up above the cap’s brim. Pull this flap down and secure it to the inside of the brim with painter’s tape.[15]
- This gives you a flatter surface to embroider.
-
5Draw a small mark 3⁄4 in (1.9 cm) above the hat’s bottom seam. Flip the hat so it’s right-side up and measure 3⁄4 in (1.9 cm) above the bottom seam, just above the brim.[16]
-
6Center the baseball cap on the stabilizer and pin it in place. Line up the central seam of the cap with the lengthwise guideline you drew on the stabilizer paper. Flatten the front section of the hat against the adhesive with your fingers, and use sewing pins to hold the cap in place against the embroidery hoop.[17]
- Place the pins on or below the line you marked above the brim.
-
7Set up your embroidery machine as per the manufacturer’s instructions. Grab your embroidery machine’s user manual and make sure that the machine is configured correctly and that the thread is installed properly. All embroidery machines and models are different, so be sure that you’re following the user manual to a tee.
- You can also reference embroidery machine setup tutorials on YouTube if you’re having trouble navigating the manual.
-
8
-
9Unpin the hat and rip away the stabilizer from the back. Gently pull out each pin from the hat and stabilizer sheet and unfasten the embroidery hoop to release the embroidered cap and stabilizer sheet. Then, rip the rest of the paper off the back of the hat until only the embroidered design remains.[22]
- Your hat is ready to wear or mail off at this point!


Things You’ll Need
Hand Embroidery
- Unstructured baseball cap
- 3 in (7.6 cm) embroidery hoop
- Water soluble marker or pencil crayon
- Embroidery needle
- Embroidery floss
- Scissors
- Water-soluble stabilizer (optional)
- Painter’s tape (optional)
Machine Embroidery
- Embroidery machine
- Unstructured baseball cap
- 5 by 7 in (13 by 18 cm) rectangular embroidery hoop
- Hoop template
- Tear-away stabilizer
- Scissors
- Air-soluble marker
- Sewing pins
- Painter’s tape
- Embroidery thread
- Measuring tape
- Quilt basting spray (optional)


References
- ↑ https://www.youtube.com/watch?v=-MaTY6sI9MU&t=0m59s
- ↑ https://www.better-cross-stitch-patterns.com/embroidery-hoop.html
- ↑ https://www.youtube.com/watch?v=h4DVprCDQTA&t=15s
- ↑ https://www.pamashdesigns.com/blog/2018/3/20/easy-embroidery-transfer-method-water-soluble-stabilzer
- ↑ https://www.youtube.com/watch?v=h4DVprCDQTA&t=1m32s
- ↑ https://www.youtube.com/watch?v=1l6mSYbuqz0&t=0m18s
- ↑ https://www.youtube.com/watch?v=h4DVprCDQTA&t=15m35s
- ↑ https://www.youtube.com/watch?v=yhUfL6tePJ0&t=2m5s
- ↑ https://www.pamashdesigns.com/blog/2018/3/20/easy-embroidery-transfer-method-water-soluble-stabilzer
- ↑ https://www.youtube.com/watch?v=nFdDg5MGebw&t=22s
- ↑ https://www.youtube.com/watch?v=nFdDg5MGebw&t=0m38s
- ↑ https://www.youtube.com/watch?v=Xpi6AfClAzI&t=0m47s
- ↑ https://www.youtube.com/watch?v=Xpi6AfClAzI&t=0m33s
- ↑ https://www.youtube.com/watch?v=nFdDg5MGebw&t=0m53s
- ↑ https://www.youtube.com/watch?v=nFdDg5MGebw&t=1m21s
- ↑ https://www.youtube.com/watch?v=nFdDg5MGebw&t=1m35s
- ↑ https://www.youtube.com/watch?v=Xpi6AfClAzI&t=1m54s
- ↑ https://www.goodhousekeeping.com/home-products/g37220559/best-embroidery-machines/
- ↑ https://www.youtube.com/watch?v=nFdDg5MGebw&t=2m51s
- ↑ https://www.goodhousekeeping.com/home-products/g37220559/best-embroidery-machines/
- ↑ https://www.youtube.com/watch?v=Xpi6AfClAzI&t=16s&t=4m43s
- ↑ https://www.youtube.com/watch?v=nFdDg5MGebw&t=4m5s
- ↑ https://www.youtube.com/watch?v=Xpi6AfClAzI&t=3m57s
- ↑ https://t2conline.com/8-tips-for-taking-up-custom-hat-embroidery-as-a-new-hobby/
About This Article