This article was co-authored by Amy Guerrero. Amy Guerrero is an Arts and Crafts Specialist and the Owner of Sunshine Craft Co., a crafting studio based in Phoenix, Arizona. Amy specializes in macrame, DIY crafting, and teaching fiber arts. She offers monthly in-person and online workshops along with having developed a range of DIY craft kits for at-home projects. Amy holds a BS in Industrial Design from Philadelphia University. She worked as a graphic designer before starting her own business. Sunshine Craft Co. is a creative hub that offers a wide range of workshops, tools, and resources for any craft project to inspire creativity and community engagement.
This article has been viewed 11,075 times.
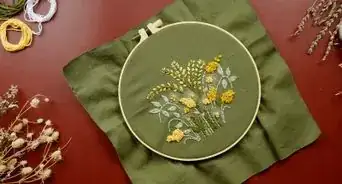
Embroidering on tulle can make it look like your stitches are floating, adding elegance and whimsy to your project. You can sew with embroidered tulle, or cut out the design to use it as an accent. Make sure that you have all of the necessary materials for embroidering, such as fine mesh tulle, a light design, and water-soluble stabilizer. Then, apply the stabilizer and embroider the design onto your tulle. Finish by soaking off the stabilizer and then use the embroidered tulle however you want!
Steps
Selecting Materials
-
1Select tulle with small holes to avoid gaps between stitches. Avoid tulle that has large holes in it as this will be much harder to embroider and may result in an unappealing finish. Choose the finest mesh tulle you can find so that you will have more spaces to sew through when you embroider the fabric.[1]
- You can purchase tulle in a craft supply store or order it online.
-
2Choose a light embroidery design free from running-stitches. Running-stitches are those that go in a single line. While these types of stitches may look fine on other types of fabric, they often look too sparse on tulle. Likewise, patterns that feature heavily-stitched areas can weigh down tulle fabric, so it’s best to avoid these as well.[2]
- Try choosing a design that feature delicate flowers or a lace-like pattern.
Advertisement -
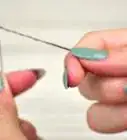
3Use a 75/11 sharp needle to embroider on the tulle. Opt for this type of needle whether you will be embroidering by hand or by machine. Check the needle’s package for these numbers and the word “sharp” to ensure that you have the right size and type.[3]
Tip: Unlike ballpoint needles that squeeze between fibers, sharp needles will pierce through them. However, you will be sewing through the gaps in the tulle rather than through the fibers, and the sharp, pointed end will come in handy for getting through these narrow spaces.
-
4Select embroidery floss or thread in colors compatible with your design. If you’re following a pattern, check to see what colors and types of thread or floss are recommended and purchase them. If you’re using a design of your own making, identify what colors and thread types you want to use and then purchase them.[4]
- Consider the finish on the thread or floss as well. You can find thread and floss that is metallic, matte, or shiny.
- You can purchase embroidery floss and thread at a craft supply store or order it online.
-
5Purchase heavy-duty, water-soluble stabilizer to cover the design. Compare the size of your design to the size of the stabilizer when you go to purchase it.[5] If you’re only embroidering a small area of the tulle, you may be able to get by with 1 sheet of water-soluble stabilizer, but it's always a good idea to have some extra on hand.[6]
- If the sheet is much larger than your design, you can always trim it down.
- You can purchase a heavy-duty, water-soluble stabilizer in a craft supply store or online.


Adding the Design
-
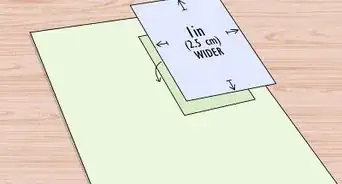
1Trim the water-soluble stabilizer if needed. If the stabilizer sheet is bigger than the design, trim the it down using a pair of sharp fabric scissors. As you cut around the edges of the design, leave at least 1 in (2.5 cm) of space on all sides.[7]
- Discard the excess stabilizer.
-
2Attach the stabilizer to the tulle with temporary adhesive. Spray a temporary adhesive onto the tulle. Then, press the water-soluble stabilizer sheet against the adhesive. Hold the stabilizer in place for about 30 to 60 seconds to ensure that it sticks.[8]
Tip: You may also pin the stabilizer to the tulle if you don’t have temporary spray adhesive. Insert the pins around the outer edges of the stabilizer. Ensure that the pins go through holes in the mesh rather than cutting through the fibers.[9]
-
3Stretch and secure the tulle in an embroidery hoop. Loosen the screws holding the hoop together until the hoops come apart easily. Place the inner hoop on a flat surface, then lay the tulle and stabilizer over the hoop. Center the stabilizer in the hoop since this is what you will need to embroider the design onto. Gently stretch the tulle to ensure that it lays flat, but be careful not to pull so hard that it tears. Place the outer hoop over the fabric and inner hoop, then tighten the screws again.[10]
- Use a wooden hoop if you will be embroidering by hand or use the hoop that pairs with your machine if you will be using an embroidery machine.
-
4Trace or secure the template to the tulle if embroidering by hand. Use a washable fabric pen or marker to trace the design onto the stabilizer. Center the template on the stabilizer and orient it how you want it to look on your fabric. Place the design behind the tulle and stabilizer and trace the lines with the pen or marker. If the template is on sheer paper, then you can pin the paper right onto the stabilizer.[11]
- If you’re using a programmable embroidery machine, you can skip this.
-
5Program your embroidery machine if you’re using one. Follow the manufacturer’s instructions for how to program the machine to create the design on your tulle. Your machine may have some pre-loaded designs that you can choose from or you may need to upload a design.[12]
- Make sure to select the desired dimensions as well.
-
6Embroider the design onto your tulle by machine or by hand. If you’ve never embroidered by machine or by hand before, make sure to learn the basics of stitching or using the machine first. You may also want to practice the design you want to place on the tulle on a piece of scrap fabric first, especially if it’s your first time using a machine.[13]
- Make sure to tie off the last stitch in your item on the backside if you are embroidering by hand.


Removing the Stabilizer
-
1Remove the tulle from the machine or hoop when you’re done. Raise the needle up and out of the fabric completely if you’re using an embroidery machine, and then unlatch the hoop to release the fabric. If you’re embroidering by hand, tie off the last stitch and cut the thread. Then, loosen the screws in the hoop, separate them, and remove the fabric.[14]
- Be careful not to catch the tulle fabric on the edges of the hoop as you remove it or it may tear.
-
2Trim the stabilizer as close to the embroidery as possible. Use a sharp pair of fabric scissors to slowly and carefully cut right along the outer edges of the embroidered design. Discard the excess stabilizer fabric that you cut off.[15]
- Make sure that you are very careful not to cut through any of the stitches or through the tulle fabric.
-
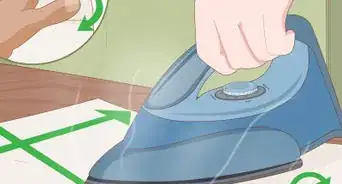
3Soak the tulle in lukewarm water to dissolve the stabilizer. Fill a large bowl with lukewarm water and place the remaining stabilizer in the water. Push it down with your fingertips and let it soak for about 5-10 minutes. Then, gently pull away any remaining stabilizer and remove the tulle from the water. Lay the fabric flat on a clean towel to dry before you do anything else with it.[16]
- Check the manufacturer’s instructions for additional details on how to soak off the stabilizer.
-
4Use the embroidered tulle fabric intact or trim around the design. Once the fabric is dry, you can use the embroidered tulle to finish your project. Sew the fabric as desired if you’re integrating it into an item of clothing, or you can cut out the embroidered design and sew it onto an item, such as a hat, purse, or sweater. If you cut out the design, be careful not to cut through any of the stitches.[17]
- Embroidery is like an overarching umbrella of stitching on fabric. And cross stitch is a specific way to do that with a specific cloth.
- Needlepoint is another specific way to do embroidery.
- In needlepoint, you work as a grid, like with cross stitch. But instead of doing X's, you make diagonal stitches to cover the entire fabric surface.
Tip: Embroidered tulle designs also make cute Christmas ornaments. For example, you could embroider a snowflake onto a piece of white tulle and cut around the edges of the design. Then, simply insert an ornament hook through it and hang it on your Christmas tree!


Things You’ll Need
- Tulle
- A light embroidery design template
- A 75/11 sharp needle
- Embroidery floss or thread
- 1 or more sheets of heavy-duty, water-soluble stabilizer
- Temporary spray adhesive or pins
- Fabric marker or pen
- Fabric scissors
- Large bowl


References
- ↑ https://www.emblibrary.com/EL/elprojects/pdf/pr1558.pdf
- ↑ https://www.emblibrary.com/EL/elprojects/pdf/pr1558.pdf
- ↑ https://www.emblibrary.com/EL/elprojects/pdf/pr1558.pdf
- ↑ https://www.emblibrary.com/EL/elprojects/pdf/pr1558.pdf
- ↑ https://www.emblibrary.com/EL/elprojects/pdf/pr1558.pdf
- ↑ https://sewguide.com/tulle-fabric/
- ↑ https://www.emblibrary.com/EL/elprojects/pdf/pr1558.pdf
- ↑ https://www.emblibrary.com/EL/elprojects/pdf/pr1558.pdf
- ↑ https://sewguide.com/tulle-fabric/
- ↑ https://www.emblibrary.com/EL/elprojects/pdf/pr1558.pdf
- ↑ https://www.threadsmagazine.com/2008/11/11/machine-embroider-allover-lace
- ↑ https://www.threadsmagazine.com/2008/11/11/machine-embroider-allover-lace
- ↑ https://www.emblibrary.com/EL/elprojects/pdf/pr1558.pdf
- ↑ https://www.emblibrary.com/EL/elprojects/pdf/pr1558.pdf
- ↑ https://www.emblibrary.com/EL/elprojects/pdf/pr1558.pdf
- ↑ https://www.youtube.com/watch?v=LfCmuvxayTk&feature=youtu.be&t=116
- ↑ https://www.emblibrary.com/EL/elprojects/pdf/pr1558.pdf
About This Article