This article was co-authored by wikiHow Staff. Our trained team of editors and researchers validate articles for accuracy and comprehensiveness. wikiHow's Content Management Team carefully monitors the work from our editorial staff to ensure that each article is backed by trusted research and meets our high quality standards.
There are 10 references cited in this article, which can be found at the bottom of the page.
This article has been viewed 14,816 times.
Learn more...
Sola wood flowers are becoming increasingly popular as a material to make long-lasting bouquets, centerpieces, and other crafting projects. They’re made of wood from the sola pith plant, so they’re not actually a live-growing flower at all. They’re very porous and easy to paint and dye, making them a great customizable flower for all different kinds of purposes. Dyeing them with acrylic paint is a fun and easy craft that can be done in as little as 10 minutes, though it could take longer if you have a lot of flowers to get through![1]
Steps
Mixing the Paint
-
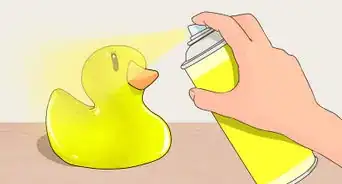
1Pick a color scheme and purchase acrylic paints for your project. Acrylic paints can be found at any local art store in a variety of colors. While you could absolutely dye your sola wood flowers a myriad of different colors, choosing complementary shades and hues may make a more cohesive arrangement. Especially if you’re dyeing these flowers for something like a centerpiece or a wedding bouquet, consider some of the following color combinations:[2]
- Light pink and burgundy
- Light green and dark green
- Burgundy, navy, and cream
- Light yellow and burnt orange
- Dark purple and gold
- Whatever colors you love! This is your craft and you have the freedom to get creative and explore any color combinations you like.
About Acrylic Paint: If you aren’t positive what colors you want to use, buy smaller 2 ounces (57 g) bottles so you can experiment before committing to a color and buying a larger bottle. You could also buy a set of acrylic paints, which would allow you to mix colors to create a custom hue.[3]
-
2Put on clothes you don’t mind getting dirty and set up your workstation. The paint can get pretty drippy with this project and you’ll most likely be using your hands to dip and turn the flowers, so wear something that’ll be okay if it gets a little paint on it. Lay down newspaper or paper towels over your workstation to protect the surface.
- If possible, it’s best to work on on a large, flat surface. You’ll need room for your flowers, the actual work area, and drying.
Advertisement -
3Fill a small bowl with 1 cup (240 mL) of water and 1 to 2 ounces (28 to 57 g) of paint. Use a bowl that is large enough to fully fit each flower—a cereal bowl or something similar in size would work well. Keep in mind that the ratio of water to paint is adjustable, depending on how deep or light you want the saturation of color to be.[4]
- Make sure to shake the bottle of paint well before adding it to the water.
- Use separate bowls for each color, or do one color at a time and wash out the bowl between uses.
- Use disposable bowls if you don’t want to worry about cleaning up afterward.
-
4Stir the water and paint together to create the dye for your flowers. Use a fork to gently swish the water back and forth. Be sure to scrape the bottom of the bowl to get any paint that had settled. You can stop mixing once you no longer notice any darker strands of paint in the water.[5]
- While acrylic paint is non-toxic, it’s still not a great idea to risk ingesting it. Use a disposable fork, or keep a special fork with your art supplies so it doesn’t go back into rotation to be used with food.[6]


Dyeing the Flowers
-
1Dip and flip the flowers to completely saturate them with the dye. Do one flower at a time. Pick it up and gently place it bloom-side-down in the bowl. Flip it over and rotate it around so that each side gets evenly colored. The flowers are super absorbent, so each one shouldn’t take more than 30-60 seconds to finish.[7]
- You can do this all by hand! The acrylic paint will easily wash off your skin with soap and water. If you don’t want to get paint on your hands, wear gloves.
-
2Check the petals to make sure the dye reached the whole flower. After dipping the flower the first time, gently pull back the petals to open up the bloom. If the dye didn’t reach all the way down, dip it again to make sure every part is covered.[8]
- As you work with the flowers, you’ll get a feel for what you need to do to ensure each one is completely saturated.
-
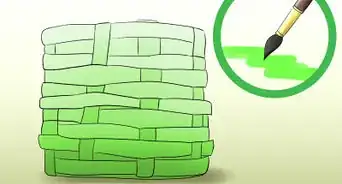
3Adjust the paint or water levels to achieve the perfect shade. Adding more water will create a lighter color, and adding more paint will create a deeper one. You can re-dip a flower that has already been dyed, too, to give it a deeper shade.[9]
- If you’re practicing for something special, keep track of your ratios by measuring how much paint or water you add to get to a specific color. You don’t want to achieve the exact right shade and not be able to create it again!
-
4Consider hand-painting your flowers for a more whimsical look. This is a great option if you like a tie-dyed appearance. Take a small paintbrush and dip it into the paint. Carefully paint around the edges of each petal in the bloom. The color will be the deepest right at the edge and will then bleed lightly toward the center of the flower.[10]
- You could alternate colors on each layer of petals for a cool effect.


Drying the Flowers
-
1Space the flowers out by drying them in an empty egg carton. It’ll take a while for the sola wood flowers to dry, and it’s important they not press up against each other or they could get stuck together. Cut an egg carton in half so the bottom and top are detached, and place a flower in every other spot as you finish dyeing them.[11]
- Cutting the carton is half is only important if it seems like the top might flip over onto the flowers while you’re getting them settled.
- The egg carton can also help hold the flowers in shape while they dry.
- You can save the carton to use with other craft projects.
-
2Use a tray lined with parchment paper for an alternative drying method. Parchment paper will keep any paint residue from getting onto your baking tray. Simply space out the flowers as you finish dyeing them so that they’re not touching, and place the tray in a safe, out-of-the-way place.[12]
- After the flowers are dry, just throw away the parchment paper and you’re good to go!
-
3Let the flowers dry untouched for 24 hours. Because the sola wood flowers are so porous, it takes a while for them to dry. Avoid putting them near heat sources to speed up the drying process, though. Simply leave them on a counter or somewhere they won’t get disturbed.[13]
- If you’re working in batches, use masking tape and a marker to mark down the time each one will be finished so you don’t forget.
-
4Store your flowers in a warm, dry place to keep them in great condition. Once your flowers are done, you can move on to complete your craft! To safely store your dyed sola wood flowers, try to keep them away from wet, moist, or damp areas.[14]
- Sola wood flowers make beautiful bouquets, flower arrangements, gifts, and other crafts.


Things You’ll Need
- Sola wood flowers
- Acrylic paints
- Small bowl or plastic container
- Fork
- Newspaper or paper towels
- Small paintbrush (optional)
- Empty egg carton or parchment paper


References
- ↑ https://plants.usda.gov/core/profile?symbol=AEAS
- ↑ https://www.hometalk.com/44271545/how-to-dye-sola-wood-flowers-dip-dye-method
- ↑ https://www.art-is-fun.com/acrylic-painting-supplies
- ↑ https://www.hometalk.com/44271545/how-to-dye-sola-wood-flowers-dip-dye-method
- ↑ https://youtu.be/wJ1aTGKdWbw?t=61
- ↑ https://www.poison.org/articles/2008-oct/safe-use-of-art-products
- ↑ https://www.hometalk.com/44271545/how-to-dye-sola-wood-flowers-dip-dye-method
- ↑ https://youtu.be/BKX5sVQNaBc?t=120
- ↑ https://www.hometalk.com/44271545/how-to-dye-sola-wood-flowers-dip-dye-method
- ↑ https://www.save-on-crafts.com/ideas/paint-sola-flowers/
- ↑ https://youtu.be/wJ1aTGKdWbw?t=101
- ↑ https://www.hometalk.com/44271545/how-to-dye-sola-wood-flowers-dip-dye-method
- ↑ https://youtu.be/BKX5sVQNaBc?t=26
- ↑ https://www.save-on-crafts.com/ideas/paint-sola-flowers/
- ↑ https://youtu.be/BKX5sVQNaBc?t=154
About This Article