This article was co-authored by wikiHow staff writer, Danielle Blinka, MA, MPA. Danielle Blinka is a Writer, Editor, Podcaster, Improv Performer, and Artist currently living in Houston, TX. She also has experience teaching English and writing to others. Danielle holds a Bachelor of Arts in English, Bachelor of Arts in Political Science, Master of Arts in English with a concentration in writing, and Master of Public Administration from Lamar University.
The wikiHow Culinary Team also followed the article's instructions and verified that they work.
This article has been viewed 162,426 times.
Learn more...
If you want to dry your own sage, then you're in luck. Sage is one of the easiest herbs to dry because it isn't tender, meaning that the leaves contain less moisture than those of other herbs. Before you dry your sage, you'll need to prepare it by separating and cleaning the leaves. Sage is easy to air dry, making it the perfect herb for hang drying.[1] If you want a quicker method, sage is also easy to dry in a food dehydrator or oven. After you dry the sage, store it in an airtight container.
Steps
Preparing Your Leaves for Drying
-
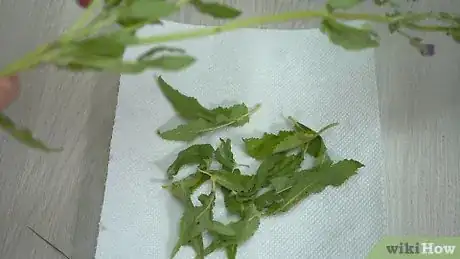
1Pull the leaves from the stalk. Since sage has a thick leaf, it dries well off of the stalk. Gently pull off each leaf and place it on a clean towel.[2]
- You could also use sharp scissors to cut the leaves from the stalk, but this is more time consuming.
-
2Discard any damaged, soiled, or imperfect leaves. Check each leaf to make sure it's healthy. Otherwise, your sage may not taste right, spoiling any dish you season with it.[3]Advertisement
-
3Inspect the leaves for insects. Insects are common on herbs, including sage. Look over each leaf to make sure there are no obvious signs of insects, such as bugs crawling, webbing, or little white specs that could be eggs.[4]
- You can remove insects, but it's best to discard any leaves that have webbing or possible eggs.
-
4Rinse the leaves in cool water, shaking off any excess. Hold the sage under running water for a few seconds either in your hand or in a colander. Since sage leaves are larger, using a colander is an easy way to rinse the herbs. After the rinse, gently shake the sage and then place them on a clean, dry towel.[5]
-
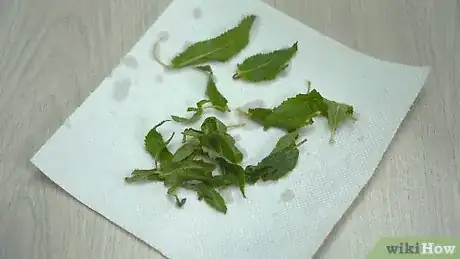
5Dry the sage with a clean towel. Gently blot away the remaining dampness by pressing a 2nd clean towel over the herbs. Place the prepared herbs on a dry towel.[6]
Hanging Your Sage
-
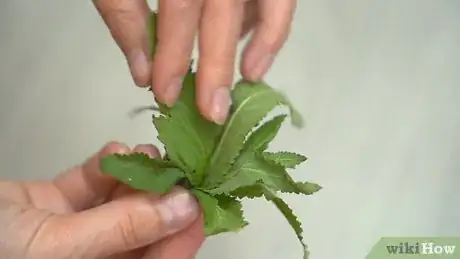
1Gather the leaves into a small bundle. Pick up the leaves individually, holding them by their ends. Add no more than 8 leaves to a bundle to ensure that they are able to get adequate air circulation for drying.[7]
-
2Tie the bundles with string, twine, or a rubber band. Wrap the tie around the base of the stems to secure the bundle. Leave extra string for hanging or tie a new piece of string around the end of the bundle so that you can hang the sage.
- If you use a rubber band, it will tighten as the sage dries. This will prevent you from losing leaves.[8]
-
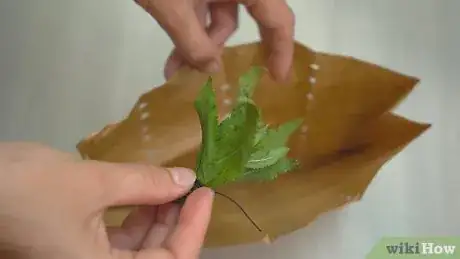
3Cover your sage bundles with a paper bag with holes punched into it. The bag will protect your herbs from dust, while the holes still allow for airflow around the leaves. Place the bag over the bundles, with the bottom open.[9]
- You can wrap them in muslin instead of a paper bag. However, do not use plastic, as it will cause mold.[10]
- Some people choose not to cover the herbs because they like the look of drying herbs, but you will need to watch for dust.
-
4Hang the sage in a well-ventilated area away from direct sunlight. The bundles should hang upside down from a string. Make sure that the place you choose gets good air circulation, such as an area near a fireplace or in a dry area of the kitchen.[11]
-
5Turn the sprigs every day or 2 for even drying. Unhook the string holding the bundles and turn the sage around. Even if you think the sage is getting the same air circulation around the bundle, the sides of the sage bundles could dry at different rates. It's possible that one side will get better air or more light, causing it to dry faster.[15]
-
6Watch for mold if you live in a humid area. Herbs can quickly mold if left to dry in a moist area. You can still air dry herbs in humid areas, but carefully monitor the sage for mold. If you see any black spots or white patches, take the bundles down immediately.
- If you live in a very humid area, it may be better to choose a different drying method, such as a food dehydrator.[16]
-
7Let them dry for 7 to 10 days. Check your sage daily to evaluate the progress. Give your leaves the time they need to dry, as taking them down early could ruin them.[17]
-
8Test the leaves to see if they're dry. Check the leaves to see if they are dry and crispy. Pick up a leaf and see if it easily crumbles between your fingers. If it does, then the sage is dry.[18]
-
9Treat air-dried sage for insects and insect eggs. It's possible to miss insects or their eggs during inspection, so you should always treat sage after air drying it. You can treat it in either the oven or the freezer.
- If you use the oven, heat it at 160 degrees Fahrenheit (71 degrees Celsius) for 30 minutes. Make sure that you do not go over this time because you may damage the herbs.
- If you use the freezer, freeze it for 48 hours.[19]
- You do not need to treat the sage if you use a heat method to dry it.
Drying Sage in a Food Dehydrator
-
1Set your dehydrator on a low temperature. The ideal temperature for drying sage is between 95 and 110 degrees Fahrenheit (35 and 46 degrees Celsius). Lower temperatures take longer to dry the sage, but they limit the risk that you will accidentally cook the sage, which will ruin them.[20]
- If you live in an area with high humidity, you may need to set the temperature at 125 degrees Fahrenheit (52 degrees Celsius).[21]
-
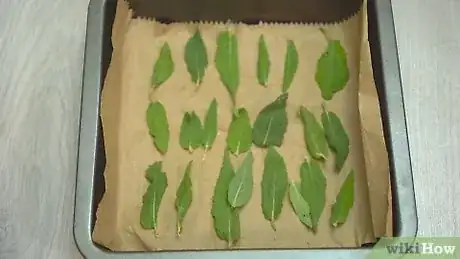
2Spread out the leaves on a tray in a single layer. Make sure that the leaves do not touch each other or overlap, as this could prevent them from drying properly. You may have to dry the sage in batches if you have a lot.[22]
-
3Dry the sage alone so that the flavors will not get mixed. It's tempting to dry several herbs together or to dry the herbs with fruit, but this could cause the flavors to mix. Stick to one item at a time in the dehydrator.[23]
-
4Check the leaves every 30 minutes to see if they're dry. Depending on your dehydrator, your sage may take 1 to 4 hours to dry. Read the instructions that came with your dehydrator to see if it recommends a time.[24]
-
5Determine if the sage is dry. Look for crispy, dry edges on the leaves. If they look dry, pick up a leaf and see if it easily crumbles between your fingers. When it does, then the sage is dry.[25]
Drying the Sage Leaves in an Oven
-
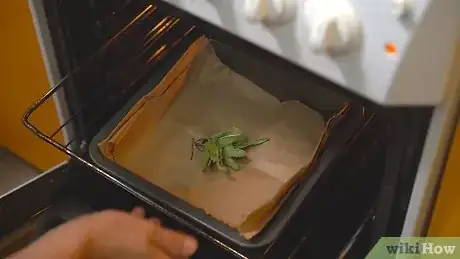
1Lay the sage in a single layer on a cookie sheet. It's best to wrap the cookie sheet in muslin or parchment paper before you put the sage on it. Make sure that the leaves do not touch each other or overlap, as this can make them dry unevenly. If only part of the leaf dries, then the sage could be ruined.[26]
-
2Set your oven on the lowest temperature. Choose the lowest temperature on your oven because oven drying can quickly destroy the flavor, color, and oils in the sage. You should dry the leaves as slowly as possible to prevent damage.
- The highest temperature you should use is 180 degrees Fahrenheit (82 degrees Celsius).[27]
-
3Prop open the oven door if you have an electric oven. This allows the air to circulate, which the herbs need to dry. It also keeps the temperature from rising too high inside the oven.[28]
- If you have a gas oven, don't prop open the oven because it's dangerous to let the gas fill the kitchen. Instead, open the oven every 5 minutes to allow the air to circulate.
-
4Turn the sage leaves after 30 minutes. Pull the cookie sheet from the oven and set it on a heatproof surface. Wear oven mitts and use tongs or a fork to flip the sage. Then return the tray to the oven.[29]
-
5Allow the sage to dry for 1 hour. Set a timer and check the sage every 15 minutes to make sure that it is not drying too quickly.[30]
- If you suspect that the sage is dry before you reach the 1 hour mark, pull it early. It's easy to over-dry the herb.
-
6Test the sage for dryness. The leaves should be dry and crispy. Rub a leaf between your fingers to see if it crumbles easily.[31]
Storing Your Sage
-
1Crumble the sage by rolling it between your fingers. If you're using sage for seasoning, it's best to crumble it. Rub each leaf separately, continuing until all of the sage is ready for storage.[32]
- If you are using the sage to form a sage bundle, keep the leaves whole.
-
2Transfer the dried sage to an airtight container. You could use a jar, tupperware container, or ziplock bag. Make sure that the seal doesn't have any leaks, as moisture from the air could ruin the batch.[33]
-
3Place the container in a cool, dry area. You can store the sage in a pantry, cabinet, or in the refrigerator.
- If you use a clear jar, place it in the dark to preserve the color of your sage.[34]
Community Q&A
-
QuestionCan I use a microwave to dry my sage?
 Community AnswerYou could try, but it won't really work. Drying is a process that involves low temperatures in a warm area. Microwaves will cook the moisture in the leaves and make it gross, not dry and crispy.
 -
QuestionCan i store dried sage in the freezer?
 Community AnswerYou can, but since drying sage properly will already do enough to preserve it, there is no need to.
 -
QuestionHow to make sage bundles?
 TorpiTop AnswererSee the wikiHow article How to Make a Smudge Stick . That uses white sage, which is actually a different kind of plant to the culinary sage discussed here (white sage is native to the Americas; sage the kitchen herb is native to Europe and is more closely related to oregano than it is to white sage). However, the method it uses for making a bundle is the same for making a sage bundle as well.
References
- ↑ https://extension.psu.edu/drying-herbs
- ↑ https://www.tasteofhome.com/article/how-to-dry-herbs/
- ↑ https://extension.psu.edu/drying-herbs
- ↑ https://extension.psu.edu/drying-herbs
- ↑ https://extension.psu.edu/drying-herbs
- ↑ https://extension.psu.edu/drying-herbs
- ↑ https://www.tasteofhome.com/article/how-to-dry-herbs/
- ↑ https://extension.psu.edu/drying-herbs
- ↑ https://extension.psu.edu/drying-herbs
- ↑ https://www.tasteofhome.com/article/how-to-dry-herbs/
- ↑ https://www.tasteofhome.com/article/how-to-dry-herbs/
- ↑ http://nchfp.uga.edu/how/dry/herbs.html
- ↑ https://extension.psu.edu/drying-herbs
- ↑ https://extension.psu.edu/drying-herbs
- ↑ https://www.tasteofhome.com/article/how-to-dry-herbs/
- ↑ https://www.tasteofhome.com/article/how-to-dry-herbs/
- ↑ https://www.tasteofhome.com/article/how-to-dry-herbs/
- ↑ https://www.tasteofhome.com/article/how-to-dry-herbs/
- ↑ https://extension.psu.edu/drying-herbs
- ↑ https://extension.psu.edu/drying-herbs
- ↑ http://nchfp.uga.edu/how/dry/herbs.html
- ↑ https://extension.psu.edu/drying-herbs
- ↑ https://extension.psu.edu/drying-herbs
- ↑ http://nchfp.uga.edu/how/dry/herbs.html
- ↑ http://nchfp.uga.edu/how/dry/herbs.html
- ↑ https://extension.psu.edu/drying-herbs
- ↑ https://extension.psu.edu/drying-herbs
- ↑ https://extension.psu.edu/drying-herbs
- ↑ https://www.tasteofhome.com/article/how-to-dry-herbs/
- ↑ https://extension.psu.edu/drying-herbs
- ↑ https://extension.psu.edu/drying-herbs
- ↑ https://www.tasteofhome.com/article/how-to-dry-herbs/
- ↑ https://extension.psu.edu/drying-herbs
- ↑ https://www.tasteofhome.com/article/how-to-dry-herbs/
About This Article
Before drying your sage, remove the leaves from the stalk, rinse them in cold water, and dry them carefully with a towel. Next, make bundles of 8 leaves and tie a piece of string around the stems of each bundle. Place a paper bag with holes in it over your sage to protect it from dust, then hang the sage in a well-ventilated place for 7-10 days. Alternatively, place the sage leaves in a single layer on a cooking sheet before putting them in the oven on its lowest temperature for 1 hour. For advice on how to use a food dehydrator to dry sage, keep reading!
