This article was co-authored by wikiHow staff writer, Darlene Antonelli, MA. Darlene Antonelli is a Technology Writer and Editor for wikiHow. Darlene has experience teaching college courses, writing technology-related articles, and working hands-on in the technology field. She earned an MA in Writing from Rowan University in 2012 and wrote her thesis on online communities and the personalities curated in such communities.
The wikiHow Tech Team also followed the article's instructions and verified that they work.
This article has been viewed 304,678 times.
Learn more...
Google Maps is a web mapping service developed by Google. You can't directly download user-uploaded photos from Google Maps, so you need to use some tech tricks. This wikiHow will help you to download any images from Google Maps through the desktop version of Chrome or by taking a screenshot on Mac or Windows computers.
Steps
Using Chrome
-
1Go to https://maps.google.com/ in a Chrome window. The directions are specific to the desktop version of Google Chrome, so you need to use that browser to download an image from Google Maps. You cannot use the mobile app or mobile website.
-
2Search for a destination. You'll see the search bar at the top-left corner of the page. You need to search for a destination to find images associated with that location.Advertisement
-
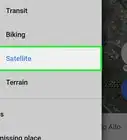
3Click All under "Photos." You might see "Latest" or "Street View & 360" instead; click any of those to open the image gallery.
-
4Right-click on the panel on the left side of the page. If you right-click over the right side of the page, you won't get a drop-down menu.
-
5Click Inspect. You'll see this at the bottom of the menu.
- You can also press Ctrl(Windows)/Cmd(Mac)+Shift+I to open the inspection panel.
-
6Click Sources. You'll find this tab above the code area next to Elements, Console, and Network.
-
7
-
8
-
9Locate an image. With your mouse, click through the files to see the images associated with the Google Maps location. You'll see a preview of the image to the right of the file you're selecting.
-
10Right-click an image and click Save…. Once you have a file chosen, you can right-click the image, and a menu will drop-down from your cursor. Click Save at the bottom of the menu and the image will open in a new window.
-
11Right-click the image again and select Save image as. A file manager window will open (Finder for Mac; File Explorer for Windows).
- Select a location and name to save the file under, then click OK or Save.


Using Snip & Sketch on Windows
-
1Go to https://maps.google.com/ in any browser. You can use any browser to take a screenshot with the snipping tool to get an image from Google Maps.
-
2Search for a destination. You'll see the search bar at the top-left corner of the page. You need to search for a destination to find images associated with that location.
-
3Click All under "Photos." You might see "Latest" or "Street View & 360" instead; click any of those to open the image gallery.
-
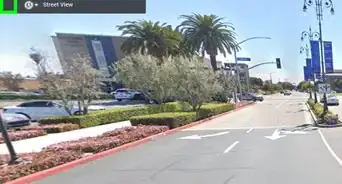
4Select an image from the panel on the left. When you click an image on the left side, it will appear larger on the right side of your screen.
-
5Open Snip & Sketch. You can click the Start menu icon (or press the Windows key) and type "snip & sketch" to find and launch the app.
- Make sure the Google Maps window is the next app open because a new snip will focus on that window. You cannot change the open browser window after the next step.
-
6Click New. The Snip & Sketch window will become a menu bar along the top of your screen and you'll see your browser window.
-
7Click the rectangle icon. If you hover your mouse over the different icons, you'll get an explanation of what that selection does.
- The last two icons will either take an instant screenshot of your current window or your entire screen.
-
8Click the portion of the screen you want to capture, then drag and drop your cursor to select the entire image. You'll notice that the selected area (the image you're taking a screenshot of) will highlight.
- Once you release the mouse button, you'll see a preview of your selection in the Snip & Sketch window. If you don't like it, you can try again by clicking New and repeating those steps.
-
9Click the floppy disk icon. You can also press Ctrl + S to save the image. Your File Explorer will open and you can select a name and location for the file.
- By default, the file will save as a .png file. If you want to change the file type, click the drop-down menu next to "Save as type" and select .jpg or .gif.
- Click Save to save the file.[1]


Using Mac
-
1Go to https://maps.google.com/ in any browser. You can use any browser to take a screenshot with keyboard shortcuts to save an image from Google Maps.
-
2Search for a destination. You'll see the search bar at the top-left corner of the page. You need to search for a destination to find images associated with that location.
-
3Click All under "Photos." You might see "Latest" or "Street View & 360" instead; click any of those to open the image gallery.
-
4Select an image from the panel on the left. When you click an image on the left side, it will appear larger on the right side of your screen.
-
5Press ⇧ Shift+⌘ Cmd+4. This key combination will prompt your computer to take a screenshot of a portion of your screen. Your mouse will look like a crosshair that you'll drag and drop to select the portion of the screen you want to capture.
- You can also use Shift + Cmd + 3 to capture your entire screen; Shift + Cmd + 4 + Space bar will capture an entire window when you click it.
- You'll find these screenshots on your desktop.[2]


-Step-23.webp)
References
About This Article

1. Go to https://maps.google.com/ in a Chrome window.
2. Search for a destination.
3. Click All under "Photos."
4. Right-click on the panel on the left side of the page.
5. Click Inspect.
6. Click Sources.
7. Click the arrow next to "Ih5.googleusercontent.com" and "p".
8. Locate an image.
9. Right-click an image and click Save….
10. Right-click the image again and select Save image as then select a location and name to save the file under, then click OK or Save.