This article was co-authored by wikiHow Staff. Our trained team of editors and researchers validate articles for accuracy and comprehensiveness. wikiHow's Content Management Team carefully monitors the work from our editorial staff to ensure that each article is backed by trusted research and meets our high quality standards.
This article has been viewed 51,812 times.
Learn more...
The half up top knot has all the qualities of a great hairstyle. It’s easy and quick to do, it works on virtually all hair lengths, and it’s trendy. If you’re familiar with the top knot, you already have the skills to create the half up top knot. The only difference is that this time, you’re only knotting up half your hair! If you love the look of a messy topknot but like to wear your hair down, this style is the perfect compromise.
Steps
Sectioning Off Your Hair
-
1Separate the top section of your hair. First, make sure that all of your hair is swept back. For this style, you do not want to have a part in your hair. Then, decide how much hair you want to leave down, and how much you want to put into the top knot. You can section off all the hair from your ears upwards, or just a little bit of hair on the top. Pick up that top layer, holding it in one hand. [1]
-
2Add some volume to the top layer. With your free hand, use a brush or come to tease the top section. This will make sure that it isn’t slicked back to your head, but has some nice volume. You can also spritz a bit of texturizing spray into the top section to add a bit of texture. This style is meant to look effortless and messy, so volume and texture are key.[2]Advertisement
-
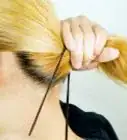
3Tie your top section into a ponytail. Once you are satisfied with the amount of hair in your top section, tie it off with a hair tie. Some people skip this ponytail step and go straight into the topknot. If you’re not a topknot pro, though, a ponytail is a helpful intermediate step. Make sure that the ponytail is held tightly to your scalp, because it will be a sturdy base for your [3]
- If you have light hair, it’s smart to use clear elastics. This will ensure that your hair ties don’t show through, which will distract from the style.[4]


Creating the Top Knot
-
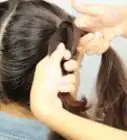
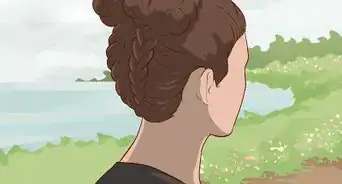
1Begin twisting your hair into the top knot. Grab your ponytail and coil it around the base of the ponytail. Remember, this look is not meant to be perfect. Don’t worry if it’s perfectly twisted or even ¬– just make sure that all of your hair has been coiled up around the base of the ponytail. Then, using a large hair tie, secure the entire bun. Wrap the hair tie around coiled section until it feels secure.[5]
- If you have shorter hair, you may not be able to coil the ponytail very many times. That’s fine! Just get whatever hair you have in a bun, and you will perfect the shape later.
-
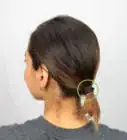
2Adjust your top knot until you like it. You probably won’t love the top knot immediately after you’ve coiled and secured it. Once it’s secured, use your hands to play around with the bun. Pull on pieces to loosen it up, giving it a loose, messy feel. Even out the sides of the bun. Just gently mess with it until you like how it looks.[6]
-
3Use bobby pins to perfect the top knot. Once you’ve played around with your bun and adjusted it to how you like it, use bobby pins to secure it in place. You want to make sure that it holds up for the whole day. Insert bobby pins on all sides of your bun, or anywhere that the hair seems a bit loose.[7]


Completing the Style
-
1Style the bottom section of hair. Once your bun is finished, you can tackle the bottom section of hair. You certainly don’t need to use a curling iron or a straightener on the bottom section, but you can if you want. Skipping the hot tools is the easiest option, and rocking your hair au natural.[8]
- The great thing about this look is that it is messy and carefree, so it doesn’t require meticulously curled or straightened hair.
-
2Tease the hair left down. Use a comb or brush to tease the underside of this hair at the root. This will add volume to this section, so that it doesn’t hang limply. Since you added volume and texture to the top section, you want to make sure the bottom section has it as well.[9]
-
3Add hair spray. Once your top knot is perfected and your hair is styled, secure it in place. Spray your favorite hairspray, focusing on the actual top knot.[10] Don’t spray much on the hair left down, because you want that hair to look soft and touchable. Use a handheld mirror to double check that everything looks good from the back, and enjoy all of the compliments you’re sure to get on your half up top knot!


Community Q&A
-
QuestionHow do I get rid of split ends?
 Community AnswerThere are some good tips in Remove and Prevent Split Ends.
Things You'll Need
- Brush or comb
- Texturizing spray or dry shampoo
- Hair ties (one or two)
- Bobby pins
- Hairspray
References
- ↑ http://www.eonline.com/news/658670/watch-how-to-wear-the-effortlessly-cool-half-up-top-knot-like-the-celebs
- ↑ https://www.youtube.com/watch?v=2Z5QGQRR9_o
- ↑ https://www.youtube.com/watch?v=2Z5QGQRR9_o
- ↑ http://www.eonline.com/news/658670/watch-how-to-wear-the-effortlessly-cool-half-up-top-knot-like-the-celebs
- ↑ https://www.youtube.com/watch?v=2Z5QGQRR9_o
- ↑ https://www.youtube.com/watch?v=2Z5QGQRR9_o
- ↑ https://www.youtube.com/watch?v=2Z5QGQRR9_o
- ↑ http://www.eonline.com/news/658670/watch-how-to-wear-the-effortlessly-cool-half-up-top-knot-like-the-celebs
- ↑ https://www.youtube.com/watch?v=2Z5QGQRR9_o
About This Article

A half-up top knot is a simple, trendy updo that keeps your hair out of your face. To style a half-up top knot, start by combing your hair back out of your face. Then, gather as much hair as you want at the top of your head and tie it in a tight ponytail. Coil the ends of the ponytail around its base and secure it with another hair tie. You can also use a few bobby pins to keep it extra tight and tie down any loose strands. For more fashion tips, including how to style the bottom half of your hair, read on!