This article was co-authored by Janet Miranda. Janet Miranda is a Professional Hair Stylist, Makeup Artist, and the Founder of Be.NYLA. With over 15 years of experience, Janet specializes in makeup and hair for advertising, commercial, editorial, runway, special events, television, and videos. She was trained at Vidal Sassoon Academy and with top hair and makeup artists including MAC Cosmetics and Redken. Janet has worked five seasons of New York Fashion Week and one season on Project Runway. She continues to add brands to her growing client list including Armani Exchange, Neutrogena, and Pantene. Janet’s work has been featured on CBS, Brides Magazine, 100 Layer Cake, Style Me Pretty, Green Wedding Shoes, Ireland Image Brides Magazine, and Elle Japan.
There are 15 references cited in this article, which can be found at the bottom of the page.
This article has been viewed 101,654 times.
If you have short hair, finding great hairstyles can be tricky. Luckily, there are several ways to create space buns if you have shorter hair. Pull the upper portion of your hair into a half updo for space buns, or separate your hair into two sections and pin all of your hair up into two space buns, securing any stray hairs with bobby pins. Incorporating braids into your space buns is a great way to ensure all of your hair is secured and styled.
Steps
Creating Half-up Space Buns
-
1Brush and part your hair so it’s ready to be pulled up. Brush out any tangles in your hair using a hair brush or comb. Use a comb to part your hair roughly down the middle so that you’ll have equal amounts of hair in both buns.
-
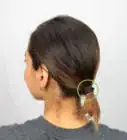
2Tie off two pigtails using the upper portion of your hair. With your hair evenly parted, pull half of your hair from up behind your ear to one side of your part. This is the section of hair you’ll use to make your half-up space bun. Once you’ve gathered the pigtail, tie it together using a small hair elastic so it doesn’t move. Repeat the same process to create the pigtail on the other side of your part as well.[1]
- Use a brush to smooth out your hair after you’ve gathered your pigtail in your grip, if desired.
- Purchase small hair elastics from a local drugstore or big box store.
Advertisement -
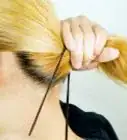
3Twist the entire length of one pigtail using your fingers. Hold one pigtail in your fingers and twirl it so that it begins to twist. Continue doing this until the entire pigtail is twisted, all the way down to its end.[2]
- Create a tight twist if you want small space buns, while twisting your pigtail loosely will help create larger space buns.
-
4Wrap the twisted pigtail in a circle around itself to form a bun. While keeping your pigtail still in its twist, start wrapping the pigtail around itself right where the elastic is sitting. Use your fingers to guide the pigtail in a circle until it has created a bun.[3]
- Use one hand to hold the bottom of your pigtail to keep the twist in place, and use the other hand to guide the pigtail in a circle around itself.
-
5Use bobby pins to hold the bun in place securely. Hold the bun in place with one hand and use the other hand to push bobby pins into your hair to keep the bun in place. Position the bobby pins around the bun evenly so that it won’t move, and pin back any stray hairs that pop out from the bun if needed.[4]
- Press the bobby pins far enough into the bun that they can’t be seen and provide good support.
- The more bobby pins you use, the more secure your space buns will be.
-
6Repeat the same steps with the other pigtail to form the second bun. Twist the second pigtail just like you did with the first. Wrap it around in a circle at the base of its elastic to form the bun, and use the bobby pins to secure it in place.[5]
- If your second space bun doesn’t look exactly the same as the first, try using bobby pins or loosening sections of your bun with your fingers until they look similar.
-
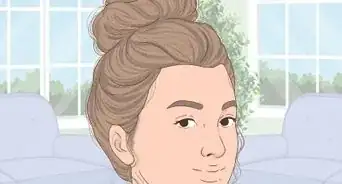
7Style the bottom portion of your hair as you’d like. With the upper portion of your hair in two space buns, choose to style the rest of your hair or leave it as it is. Create soft curls using a curling iron or straighten your hair with a flat iron, if desired.


Styling Full Hair Space Buns
-
1Part your hair down the middle after brushing out any tangles. Since your space buns will contain almost all of your hair, part your hair starting in the front and going all the way down the back of your head. Form a straight line using a comb, and use a mirror to help you see the back of your head, if needed.[6]
- While a straight part looks best, don’t worry if your part isn’t perfect.
- Use large hair clips to section off your two parts, if desired.
-
2Tie each half of your hair near the top of your head. Using your part as a guide, pull together one side of your hair so it’s resting near the top of your head, close to your part. Use a brush to smooth it out if necessary, and secure it using a hair tie or elastic. Repeat the same steps for the other side of your hair so you have two large pigtails.[7]
- Look in the mirror and see if your pigtails are evenly placed on your head. If one is lopsided or not even, try redoing it to make them more symmetrical.
- If you want space buns similar to Princess Leia's, tie them closer to your ears so they're on each side of your head.
-
3Tease the hair in your pigtail to give it more volume. Hold the pigtail out with one hand so you can tease your pigtail with the other. To tease your hair, comb or brush towards your scalp instead of down the length of your hair. This will give it more volume and make your bun look more full.[8]
- Avoid over-teasing your hair, as this damages it. Use the comb to tease your pigtail using 3-5 strokes and see if this makes it appear fuller before teasing it more.
-
4Wrap the pigtail in a circle to create a bun. Use your fingers to guide the teased pigtail around in a circle, forming a bun. How tightly or loosely you wrap your bun will determine how small or large it is.[9]
- Wrap your bun loosely for a larger bun, or wrap it tightly for a smaller, more secure bun.
-
5Secure the bun with bobby pins or a hair tie. Hold the bun in place with one hand and use the other to place the bobby pins. Focus on the base of the bun, sticking bobby pins evenly around the bun to hold it in place. Once the bun is secure, pin down any stray strands if needed.[10]
- To test your bun to see if it’s secure or not, insert the bobby pins and let go of the bun. Give your hair a small shake, and see if the bun moves or not. If it moves, add more bobby pins to keep it in place.
-
6Repeat the same steps on the other side to form the second bun. Tease your other pigtail just as you did with the first one. Twist the pigtail around itself to form a bun, wrapping it just as tightly or loosely as the other. Use bobby pins to secure the second bun in place.[11]
- If one of your buns is smaller than the other, use your fingers to gently pull on the hairs a bit, causing the bun to look larger.
-
7Use bobby pins to pin back stray hairs at the nape of your neck. Since your hair is short, you’ll likely have hairs that weren’t able to stay in your space buns. Gather these hairs together at the back of your head and use a bobby pin to secure them against the rest of your hair. Check in a mirror to make sure they’re all pinned up, if needed.[12]
- If you’re worried about the bobby pins holding your short hairs being visible, cover them using a stretchy, thick headband. Pull the headband up onto your forehead, and stretch it out at the back of your neck so it’s covering the bobby pins.


Adding Braids into Your Space Buns
-
1Opt for braided pigtails instead of twisted ones to avoid flyaway hairs. After you’ve created two pigtails by gathering up equal sections of your hair, tie each one with an elastic so it’s secure. Braid each pigtail all the way to the end, and secure each braid with another elastic. Now when you go to twist the pigtail into a bun, the hair will be much more secure.[13]
- You can braid pigtails whether you're doing half-up or full space buns.
-
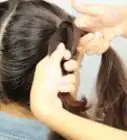
2Create a double dutch braid at the front of your hair for a stylish look. After parting your hair down the middle, begin braiding the first section starting above the outer corner of your eye. Gather more hair into the braid as you move back across your head. Stop the dutch braid once you get to the spot where you want your space bun to rest, and pull the rest of your hair into a pigtail. Secure the dutch braid and pigtail with an elastic, and form a bun to finish off that side.[14]
- Do the same thing with the other section of your hair, creating two dutch braids at the top of your head leading into your two space buns.
- If you’re worried about your dutch braid coming undone when you go to gather up the rest of your hair in a pigtail, secure it with an elastic first.
-
3Braid the short hairs at the back of your neck so they aren’t loose. Part your hair all the way down the back, and separate the two sides using clips. Flip your head over and start braiding one side, beginning at the base of your neck going upwards along your head. Once you get to the top of your head, secure the braid with an elastic and continue forming the rest of your bun.[15]
- Repeat this process on the other side of your part to create the other bun as well.
- Brush your hair out one more time while your head is flipped over for a smoother look.
- Keep pulling hair into the braid as you work your way up the length of your head.


Expert Q&A
-
QuestionWhat can I do to make the hair easier to work with?
 Janet MirandaJanet Miranda is a Professional Hair Stylist, Makeup Artist, and the Founder of Be.NYLA. With over 15 years of experience, Janet specializes in makeup and hair for advertising, commercial, editorial, runway, special events, television, and videos. She was trained at Vidal Sassoon Academy and with top hair and makeup artists including MAC Cosmetics and Redken. Janet has worked five seasons of New York Fashion Week and one season on Project Runway. She continues to add brands to her growing client list including Armani Exchange, Neutrogena, and Pantene. Janet’s work has been featured on CBS, Brides Magazine, 100 Layer Cake, Style Me Pretty, Green Wedding Shoes, Ireland Image Brides Magazine, and Elle Japan.
Professional Hair Stylist & Makeup ArtistI think pomade is exceptionally helpful with this, since it can give the hair a tack and grit that makes it a lot easier to work with. -
QuestionHow can I make my braids stick together while I'm working with them?Janet MirandaJanet Miranda is a Professional Hair Stylist, Makeup Artist, and the Founder of Be.NYLA. With over 15 years of experience, Janet specializes in makeup and hair for advertising, commercial, editorial, runway, special events, television, and videos. She was trained at Vidal Sassoon Academy and with top hair and makeup artists including MAC Cosmetics and Redken. Janet has worked five seasons of New York Fashion Week and one season on Project Runway. She continues to add brands to her growing client list including Armani Exchange, Neutrogena, and Pantene. Janet’s work has been featured on CBS, Brides Magazine, 100 Layer Cake, Style Me Pretty, Green Wedding Shoes, Ireland Image Brides Magazine, and Elle Japan.
Professional Hair Stylist & Makeup ArtistTry getting your hair a little damp before you start. It's often a lot easier to craft space buns when the hair is a little damp and it's hard to keep the braids together when the hair is dry.
Things You'll Need
- Brush or comb
- Small hair elastics
- Bobby pins
- Mirror
- Hairspray (optional)
References
- ↑ https://www.youtube.com/watch?v=40BqRaxka_s#t=2m30s
- ↑ https://www.youtube.com/watch?v=40BqRaxka_s#t=2m42s
- ↑ https://www.youtube.com/watch?v=40BqRaxka_s#t=45s
- ↑ https://www.youtube.com/watch?v=40BqRaxka_s#t=2m50s
- ↑ https://www.youtube.com/watch?v=40BqRaxka_s#t=2m52s
- ↑ https://www.youtube.com/watch?v=oKxVqql6avA#t=1m17s
- ↑ https://www.youtube.com/watch?v=oKxVqql6avA#t=1m23s
- ↑ https://www.youtube.com/watch?v=40BqRaxka_s#t=4m40s
- ↑ https://www.youtube.com/watch?v=40BqRaxka_s#t=4m50s
- ↑ https://www.youtube.com/watch?v=40BqRaxka_s#t=5m3s
- ↑ https://www.youtube.com/watch?v=40BqRaxka_s#t=5m6s
- ↑ https://www.youtube.com/watch?v=oKxVqql6avA#t=3m26s
- ↑ https://www.youtube.com/watch?v=40BqRaxka_s#t=3m21s
- ↑ https://www.women.com/ashleylocke/lists/space-buns-short-hair-tutorials-050818
- ↑ https://www.youtube.com/watch?v=KMkNoYCEuls&feature=share#t=1m
About This Article