This article was co-authored by Steve Horney PT, MPT, MTC, CSCS and by wikiHow staff writer, Hunter Rising. Steve Horney is a Licensed Physical Therapist and the Owner of Integrated Health Sciences, a New York City-based company that provides continuing education, health care products, and manual and movement physical therapy. Steve has over 15 years of academic and professional physical therapy training and specializes in the assessment and treatment of athletes with the goal of helping them become pain-free and less susceptible to injury. Steve is also a certified strength and conditioning specialist (CSCS) from the National Strength and Conditioning Association (NSCA). He received a BS in Health Science from Quinnipiac University in 2004 and a Masters of Physical Therapy (MPT) from Quinnipiac University in 2006. He then completed his Manual Therapy Certification (MTC) from the University of St. Augustine in 2014.
There are 17 references cited in this article, which can be found at the bottom of the page.
This article has been viewed 37,523 times.
Neck pain, back pain, and sciatica are hard to deal with, especially when shooting pain radiates into your arms and through your legs. If you’re feeling uncomfortable and want some relief, try alleviating your pain and improving your spinal mobility with McKenzie exercises. The McKenzie method is a form of physical therapy that helps you control your pain by progressing through simple range-of-motion exercises. While you can see a physical therapist for an individualized plan, here are a few simple exercises you can try on your own!
Steps
Back and Sciatica Pain
-
1Lie flat on your stomach for 5 minutes at a time. This is the most basic exercise you can do and where you should probably start if you’re feeling a lot of pain. Find a comfortable place to lie down on a bed or on the floor. Keep your arms out in front of you and turn your head to the side.[1] While you’re lying down, take deep breaths so you can relax. Stay in a prone position for about 5 minutes at a time, and repeat the exercise about twice a day.[2]
- If you still feel pain just from lying on your stomach, try putting a pillow under your stomach. After you feel comfortable on the pillow, try doing the exercise without one.
- Try squeezing your glutes together as tight as you can while you’re in this position to help your lumbar support.[3]
-
2Prop yourself up on your elbows while you lie on your stomach. Start in a prone position with your arms tucked underneath your chest. Press your forearms into the floor to lift your upper body up as far as you can without feeling pain. Keep your lower body relaxed so your hips stay against the ground and your spine stays curved.[4] Get in this position around 8 times each day for 2–3 minutes at a time.[5]
- Don’t try this exercise if you feel pain from just lying on your stomach since this might hurt even more.
Advertisement -
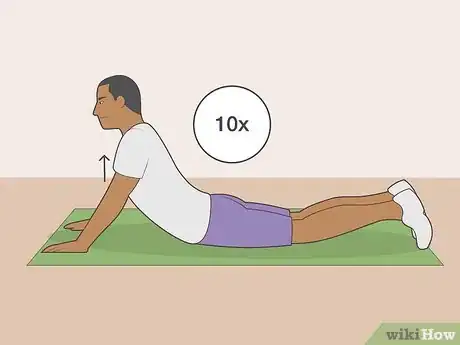
3Do prone press-ups. Lie down on your stomach so your hands are right underneath your shoulders. Straighten your arms so you lift your upper body off of the floor as far as you’re able. Make sure you keep your lower body relaxed so your hips and legs stay down against the floor.[6] Hold your position for 10 seconds before lowering yourself back down. Do 1 or 2 sets every day that are 10 repetitions each.[7]
- To make this exercise easier for you, take a deep breath when you’re at the bottom position. Hold your breath as you lift your body and exhale at the top.[8]
- If you feel too much pain when your arms are directly below your shoulders, try moving your hands further out in front of you so your back doesn’t curve as much.
-
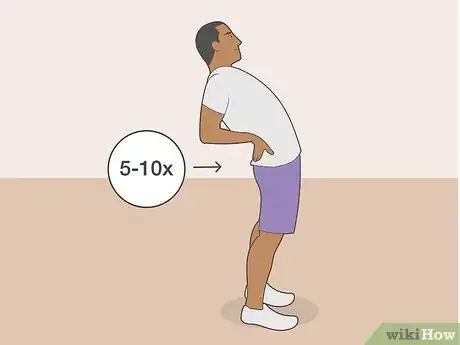
4Put your hands on your lower back and lean backward while standing. Stand with your feet shoulder-width apart and press your palms against your lower back.[9] Look straight ahead and slowly bend backward at the hips as far as you can without feeling any pain or falling over. Then return to your starting position. Aim to do about 5–10 reps at a time when you’re feeling pain.[10]
- Keep your upper back straight throughout the exercise since this only targets your lower back.
- This exercise doesn’t stretch your back as well as prone press-ups, but it is easier to do if you need to stretch in an office or public place.
-
5Lie on your back and drive your knees toward your chest. Lie on your back so your knees are bent and your feet are flat on the floor. Lift your legs off of the ground and slowly drive your knees up toward your chest. Wrap your arms around your knees and pull them even closer to your body for an even deeper stretch. Hold your position for 2 counts before relaxing again. Do about 4 sets that are each around 6 repetitions.
- If you feel a lot of pressure on your spine, try putting a pillow under your head for some relief.
- Don’t lift your hips or back off of the floor while you’re doing this exercise.
- This stretch helps you feel less pain when you’re bending forward.
-
6Bend forward in a chair and slide your hands underneath it. Sit right on the edge of a chair with your knees bent and feet firmly planted on the floor. Start with your back straight and bend forward at the hips as far as you can. Reach out in front of you with your hands and touch the floor. Arch your back and slide your hands underneath the chair as far as you can. Hold your position for 2 seconds before sitting up straight again. Do this stretch 4 times a day for 6 repetitions each time.[11]
- Breathe in as you’re leaning forward and exhale right before you sit up to help your body relax.
-
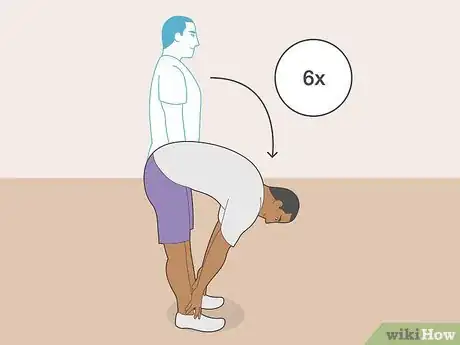
7Lean forward and touch your feet while you’re standing. Stand with your feet shoulder-width apart and your hands on your thighs. Whenever you’re ready, bend your upper body forward and slide your hands down your legs. Keep your knees straight and reach down as far as you comfortably can. As soon as you get to the lowest position, slowly straighten your back to the starting position. Do 2 sets every day with 6 repetitions each.[12]
- Don’t worry if you can’t reach your feet right away. It can take a little bit of time to relieve your pain and increase your flexibility.
- Avoid bending your knees, or else you won’t work your lower back as well.
Neck Pain
-
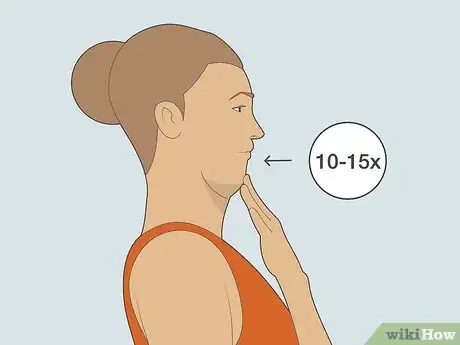
1Move your head straight back so it’s in line with your spine. We slouch forward a lot without even realizing it, and it may cause a lot of strain. Sit with your back straight and look directly in front of you. Put your fingertips on your chin and gently push your head back to straighten your neck.[13] Avoid pointing your chin up or down since it might be a little painful. Hold the position for about 1 second before letting yourself relax. Do 10–15 reps once an hour to help you strengthen your neck.[14]
- You might also hear this exercise called a neck or cervical retraction.
- Once you get the motion down, you’ll be able to move it back without using your hands.
- You can do this exercise sitting, standing, or even lying down with a pillow or towel under your head.
-
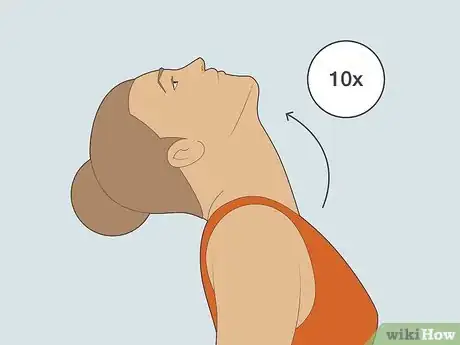
2Bend your head back as far as you can go without pain. Start by looking straight ahead in front of you. Push your chin in and slowly tilt your head back so you’re looking at the ceiling. Go back as far as you’re able to before returning to your starting position. Practice this exercise 10 times every hour to help your pain go away.[15]
- If you feel some pain when you tilt your head back, loop a towel behind your neck and hold the ends straight out in front of you.
- You can also do this exercise lying down by letting your head hang over the side of the bed. Support your neck and head with your hand or a towel.
-
3Tilt your head to the side where you’re feeling pain or numbness. Sometimes, you might feel sensations running from your neck down into your arm. If you have arm pain, sit straight up while you’re looking forward. Tuck your chin back and slowly tilt your head to the side to bring your ear closer to your shoulder. Hold your position for 1 count before straightening your head again. Aim to do 10 reps at least 5–6 times per day.[16]
- For a deeper stretch, pull your head closer to your shoulder with your hand.
- If you don’t have any pain or numbness, then do head tilts to each side.
-
4Turn your head as far as you comfortably can. Keep your chin tucked to activate your neck muscles. Keep your shoulders relaxed as you turn your head to the left as far as you’re able to without feeling pain. Hold your stretch for 10 seconds before repeating the stretch on the right side. Do 10 reps per side about 3 times every day.
- Push your chin further to the side with your hand if you don’t feel pain to help improve your range of motion even more.
-
5Tip your head forward so your chin touches your chest. Slowly tilt your head forward so your chin touches your chest. When you reach the bottom of your movement, gently push down on your neck with your hands to add slight pressure. Stay in this position for 2–3 seconds before relaxing. Do 5–6 reps at a time at least once an hour.[17]
- This stretch also works great if you suffer from headaches.
- Always do chin tucks or retractions after this exercise so you don’t stress your spine.
-
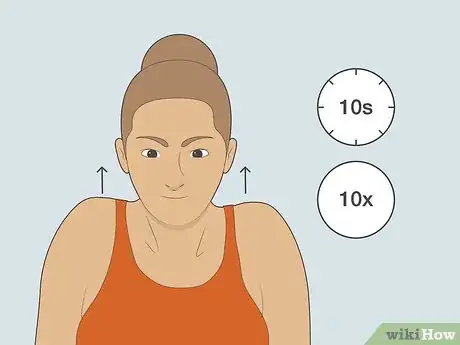
6Try shoulder shrugs. Keep your head back so it’s directly over your shoulders. Slowly raise your shoulders up toward your ears. Keep your shoulders there for about 10 seconds before relaxing them. Do shoulder shrugs about 3 times a day with 10 reps per set.[18]
- This will help you manage pain coming from your neck and radiating into your shoulders.
Expert Q&A
-
QuestionIs there anything I should know before I start stretching for the first time?
 Steve Horney PT, MPT, MTC, CSCSSteve Horney is a Licensed Physical Therapist and the Owner of Integrated Health Sciences, a New York City-based company that provides continuing education, health care products, and manual and movement physical therapy. Steve has over 15 years of academic and professional physical therapy training and specializes in the assessment and treatment of athletes with the goal of helping them become pain-free and less susceptible to injury. Steve is also a certified strength and conditioning specialist (CSCS) from the National Strength and Conditioning Association (NSCA). He received a BS in Health Science from Quinnipiac University in 2004 and a Masters of Physical Therapy (MPT) from Quinnipiac University in 2006. He then completed his Manual Therapy Certification (MTC) from the University of St. Augustine in 2014.
Licensed Physical Therapist You should always assess any issues that you might have with your range of motion before you begin an active stretching routine. That way, you'll know exactly what to address.
Warnings
- If you ever feel severe pain while you’re exercising, stop immediately and contact your doctor or physical therapist.⧼thumbs_response⧽
- Some studies have shown that the McKenzie method doesn’t have a significant difference compared to standard physical therapy and exercise.[20]⧼thumbs_response⧽
References
- ↑ https://youtu.be/clfpWjqVP6U?t=173
- ↑ https://sportsrehab.ucsf.edu/sites/sportsrehab.ucsf.edu/files/Mckenzie%20Back%20Protocol.pdf
- ↑ https://sportsrehab.ucsf.edu/sites/sportsrehab.ucsf.edu/files/Mckenzie%20Back%20Protocol.pdf
- ↑ https://www.ncbi.nlm.nih.gov/books/NBK539720/
- ↑ https://youtu.be/qnzg5ry1p10?t=85
- ↑ https://orthonc.com/uploads/pdf/Lumbar_Extension_Exercises.pdf
- ↑ https://sportsrehab.ucsf.edu/sites/sportsrehab.ucsf.edu/files/Mckenzie%20Back%20Protocol.pdf
- ↑ https://youtu.be/Sws_GwrlYO0?t=22
- ↑ https://www.ncbi.nlm.nih.gov/books/NBK539720/
- ↑ https://youtu.be/zN8mpqLqB8o?t=23
- ↑ https://youtu.be/qnzg5ry1p10?t=207
- ↑ https://youtu.be/qnzg5ry1p10?t=238
- ↑ https://youtu.be/1v9e8PdmqEI?t=43
- ↑ https://www.ncbi.nlm.nih.gov/pmc/articles/PMC2504973/?page=3
- ↑ https://youtu.be/_WrqTD33nDM?t=331
- ↑ https://youtu.be/hTkDW_HJFYA?t=54
- ↑ https://youtu.be/t0b_fTFz4iY?t=5
- ↑ https://www.healthinfotranslations.org/pdfDocs/NeckShoulderRelaxation_Sp.pdf
- ↑ Steve Horney PT, MPT, MTC, CSCS. Licensed Physical Therapist. Expert Interview. 27 March 2020.
- ↑ https://www.jospt.org/doi/10.2519/jospt.2018.7562












Medical Disclaimer
The content of this article is not intended to be a substitute for professional medical advice, examination, diagnosis, or treatment. You should always contact your doctor or other qualified healthcare professional before starting, changing, or stopping any kind of health treatment.
Read More...