This article was co-authored by wikiHow staff writer, Kyle Hall. Kyle Hall works on the content team at wikiHow. He helps manage our team of editors and creates content for a variety of wikiHow projects. Kyle continually looks for new ways to improve the content at wikiHow and make it more helpful and enjoyable for readers. He graduated from Eckerd College in 2015, where he majored in Political Science.
There are 8 references cited in this article, which can be found at the bottom of the page.
This article has been viewed 23,931 times.
Learn more...
Decorating your own denim jacket is a great way to add a personalized piece to your wardrobe. You can decorate your denim jacket so it reflects your style using things like patches and studs, and you can also distress it yourself so it looks more vintage. By planning out your design and using the right tools, you can create a denim jacket that perfectly matches your personality.
Steps
Ironing on Patches
-
1Find iron-on patches you want to decorate the jacket with. You can order iron-on patches online or pick some up at your local craft store. Try to find patches that reflect your personality.
- For example, you could get a patch with your favorite band's name on it, or a patch with a saying on it that's meaningful to you.
- Look for a patch that has the name of your home town on it, or a patch that's in the shape of your home country.
-
2Lay the jacket front side up on a flat surface. Use an ironing board or other surface that is heat resistant.Advertisement
-
3Position some of the patches on the front of the jacket. Move them around a bit and play with your design until you find something you like.
-
4Take a picture of the front of the jacket. The picture will help you remember where each patch goes as you’re ironing them on. After you take the picture, remove all of the patches.[1]
-
5Turn the jacket over and repeat. Position some patches on the back of the jacket and take a picture when you’re finished. Remove the patches and set them aside.
-
6Plug in an iron and turn it to the hottest setting. Wait for the iron to fully heat up before you use it.[2]
-
7Position a patch on the jacket and place a cloth over it. You can use a cloth sheet or a pillow case; just make sure the entire patch is covered.[3]
-
8Press the heated iron onto the cloth for about a minute. Make sure the iron is positioned on the part of the cloth covering the patch. Hold the iron in the same spot for the full minute; don’t move the iron back and forth.[4]
-
9Remove the iron and cloth and turn the jacket inside out. The patch should now be stuck to the front of the jacket, but you’ll need to secure it in place by ironing from the inside as well.[5]
-
10Repeat the process on the inside of the jacket. Place the cloth over the section of the jacket the patch is attached to and hold the iron on it for about a minute. After a minute remove the cloth and turn the jacket right side out. [6]
-
11Continue ironing on patches until you’ve finished your design. When you finish one side of the jacket, flip it over and do the other side. Once you're all done you can start wearing your new killer custom jacket.


Adding Studs
-
1Get fabric studs online or at your local craft store. Make sure the studs you get are pronged on the back; you’ll need the prongs to secure the studs to the jacket.
-
2Mark your design on the jacket using a pencil. If you want to do a square patch of studs somewhere on the jacket, draw the square out with pencil first.
- You can make all kinds of patterns using studs. Try doing triangles on each flap of the collar, or covering both shoulder areas of the jacket with studs. You can also do studs along all of the seams on the jacket.
-
3Take the first stud and press the prongs through the jacket. Go from the outside of the jacket to the inside with the prongs so the face of the stud is exposed. The sharp metal prongs should easily push through the denim.[7]
-
4Turn the jacket inside out and bend the prongs down with a butter knife. Press down on the prongs with the knife until they are completely flat against the inside fabric. The stud should now be securely in place.[8]
-
5Turn the jacket right side out and push another stud through. Reverse the jacket and do the same thing you did with the first stud, using the butter knife to push down the prongs until they are flat against the fabric.[9]
-
6Repeat the process until you’ve covered your design with studs. When you finish with your first design, try sketching out another design on a different section of the jacket.


Distressing the Jacket
-
1Lay the denim jacket front side up on a flat surface. Place a piece of cardboard underneath the jacket so the surface doesn’t get scratched during the distressing process.[10]
-
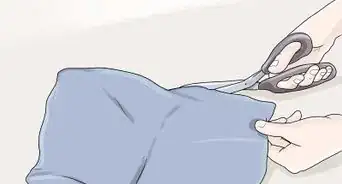
2Use a razor to cut slits where you want the jacket to look distressed. Make long and short slits, and horizontal and vertical slits, so the final result looks natural. The larger the slits you cut, the more distressed the jacket will look. Don’t forget to add cuts to the seams, cuffs, and collars as well.[11]
-
3Turn the jacket over and cut any slits you want on the back. Make cuts on the back of the collar and the back of the sleeves for an all around distressed look.[12]
-
4Brush over the slits in the jacket with a piece of sandpaper. Gently bring the sandpaper back and forth over each tear you made in the jacket. This will help fray the denim around the tears so the jacket looks more distressed.[13]
-
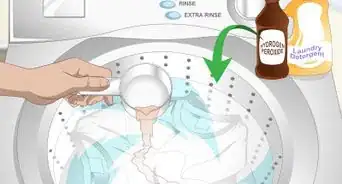
5Wash the jacket in a machine with cold water. Dry the jacket on a normal setting, or let it air dry if you’re worried about it shrinking.[14]
-
6Repeat the process if you want the jacket to look more distressed. Try applying more pressure to the sand paper to help fray the fabric more.


Adding Extra Flair
-
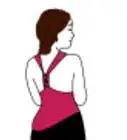
1Attach some pins to the front of the jacket. Turn the jacket into a canvas for your pin collection and use the pins as another way to express yourself.
- For example, you could attach pins featuring your favorite movie or TV characters, or pins that promote causes you're passionate about.
-
2Sew tassels onto the jacket. Find a strip of tassels at your local craft store or online and pick a seam on the jacket to sew them into.
- For example, you could have tassels dangling from the seam that runs along the shoulder blade area on the jacket, or you could sew tassels into the seams running along each sleeve.
-
3Replace the jacket buttons with something more flashy. Use a thread cutter to remove the old buttons. Replace them with colorful buttons or buttons covered in rhinestones. You could even sew old earrings or pins onto the jacket to use as buttons.
-
4Finished.


Community Q&A
-
QuestionWill I need to wash the jean jacket differently if I add patches to it?
 MicheleTop AnswererAs long as the patches are securely adhered to the jacket, either by iron or sewn on, you should be able to throw it in the washing machine and dryer. If they’re adhered by iron, though, you might want to use the delicate cycle.
Things You’ll Need
- Iron-on patches
- Iron
- Cloth
- Studs
- Pencil
- Butter knife
- Razor
- Sandpaper


References
- ↑ https://www.youtube.com/watch?v=Z8NXYwqRbT0&feature=youtu.be&t=71
- ↑ http://www.ebay.com/gds/How-to-Iron-On-Appliques-and-Embroidered-Patches-/10000000004399537/g.html
- ↑ http://www.ebay.com/gds/How-to-Iron-On-Appliques-and-Embroidered-Patches-/10000000004399537/g.html
- ↑ http://www.ebay.com/gds/How-to-Iron-On-Appliques-and-Embroidered-Patches-/10000000004399537/g.html
- ↑ http://www.ebay.com/gds/How-to-Iron-On-Appliques-and-Embroidered-Patches-/10000000004399537/g.html
- ↑ http://www.ebay.com/gds/How-to-Iron-On-Appliques-and-Embroidered-Patches-/10000000004399537/g.html
- ↑ https://www.youtube.com/watch?v=uvmcadb4aEg&feature=youtu.be&t=48
- ↑ https://www.youtube.com/watch?v=uvmcadb4aEg&feature=youtu.be&t=52
- ↑ https://www.youtube.com/watch?v=uvmcadb4aEg
- ↑ https://www.youtube.com/watch?v=oXhWqpxekJs&feature=youtu.be&t=24
- ↑ https://www.youtube.com/watch?v=oXhWqpxekJs&feature=youtu.be&t=24
- ↑ https://www.youtube.com/watch?v=oXhWqpxekJs&feature=youtu.be&t=24
- ↑ https://www.youtube.com/watch?v=oXhWqpxekJs&feature=youtu.be&t=119
- ↑ https://www.youtube.com/watch?v=oXhWqpxekJs&feature=youtu.be&t=184
About This Article