This article was co-authored by wikiHow staff writer, Travis Boylls. Travis Boylls is a Technology Writer and Editor for wikiHow. Travis has experience writing technology-related articles, providing software customer service, and in graphic design. He specializes in Windows, macOS, Android, iOS, and Linux platforms. He studied graphic design at Pikes Peak Community College.
The wikiHow Tech Team also followed the article's instructions and verified that they work.
This article has been viewed 604,571 times.
Learn more...
Adobe Animate (formerly Adobe Flash Professional) has long been the standard for creating animations for the web, television, video games, and other interactive applications. Many famous cartoons; including Blue's Clues, My Little Pony, and Metalocalypse, have used Flash/Animate in their animation process. During the 2010's, Adobe Flash Player fell out of favor on the internet due to security reasons and was gradually replaced with other formats, such as HTML5 and WebGL. As of December 2020, Adobe and all major web browsers have officially ended support for Flash Player and it is no longer available for download. However, Adobe Animate is still part of Adobe's Creative Cloud suite. You can still use Adobe Animate to create animations for Flash and various other formats. This wikiHow article teaches you the basics of how to create an animation in Adobe Flash or Animate.
Steps
Getting Started
-
1Download and Install Adobe Animate or Flash. Adobe Animate is part of Adobe's Creative Cloud suite. It requires a subscription to the Adobe Animate software or Creative Cloud. If you have an older version of Adobe Flash Professional, you can use that as well. You can download Adobe Animate from https://www.adobe.com/products/animate.html.
-
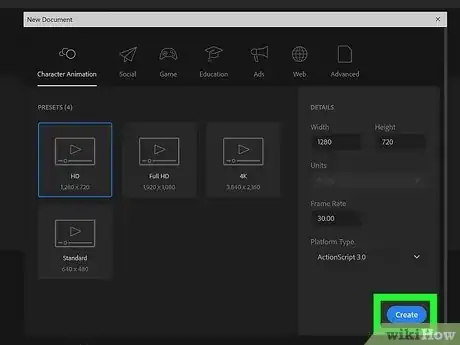
2Create a new project in Flash or Animate. Flash has an icon that resembles a red square that says "Fl" in the middle. Adobe Animate has a purple icon that says "An" in the middle. Click the icon to open Adobe Flash or Animate. Then click Create New in the menu to the left. Enter the height and width of the video animation you want to produce, or select one of the standard resolution options. Then click Ok or Create.
- You can create a new project at any time in Adobe Animate or Flash by clicking File in the menu bar at the top, followed by New.
- If you want your animation to have any interactive elements, such as menus, or buttons, you'll also need to select a scripting language. Use the drop-down menu below "Platform Type." You can choose ActionScript 3.0, which is the old scripting language that Flash used, or you can choose "HTML Canvas" to create an HTML5 document.
Advertisement -
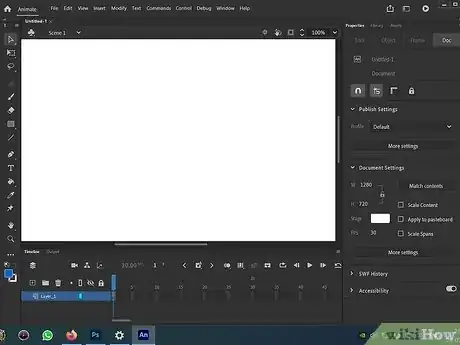
3Understand the layout. When you create a new project in Adobe Animate or Flash, you will see the following items on your screen:
-
Toolbar: The toolbar contains all the drawing tools you can use to create and manipulate objects.
- The selection tool is used to select and move objects.
- The shape tool is used to create basic shapes.
- The brush and pencil tools are used to draw shapes free-hand.
- The pen tool can be used to create precision vector objects.
- The eraser tool is used to erase drawings you have made, and the text tool is used to add text to your animation.
- The toolbar also contains the Stroke and Fill color boxes, which are used to select the color of your objects.
- The Stroke color is the color of the outline around your shapes, and the Fill color is the color inside your shapes.
- The Toolbar is to the left by default. If you do not see the toolbar, click Windows in the menu bar at the top and then click Tools.
- Stage: The stage is the white area in the center of the screen. This is the area that will be viewable when you publish your animation. You can have objects on the stage or to the side of the stage. Objects to the side of the stage will not be viewable when you publish your animation.
- Timeline: The timeline is the horizontal bars at the bottom of the screen. This is where you create changes in your animation. This contains a series of rectangles that represent each frame. Every fifth frame is numbered at the top of the timeline. The timeline can have multiple layers, each containing different objects that can move independently. You will also see a red or blue vertical line. This is the playhead. You can click and drag the playhead to move forward and backward through the timeline. You can click the Play triangle at the bottom of the Timeline to preview your animation.
- Panels: You will see a variety of tabs and panels on the left side of Adobe Animate or Flash. This contains panels, such as the Library or the Properties panel. There are also panels for color swatches, motion presets, components and more.
-
Toolbar: The toolbar contains all the drawing tools you can use to create and manipulate objects.
Creating a Motion Tween
-
1Understand the basics of tweening. Flash/Animate uses a function called tweening, which allows you to set start and end points for an object. Each starting and endpoint is called a keyframe. Flash/Animate will move and transform the object automatically from one keyframe to another. This is much simpler than the traditional method of animating objects, which requires you to move an object by hand in each frame.
- Tweening can be used to move an object from one position to another in a straight line, rotate an object, grow or shrink an object, or a combination of these types of movements.
- You can use tweening and traditional frame-by-frame animation in conjunction with each other.
-
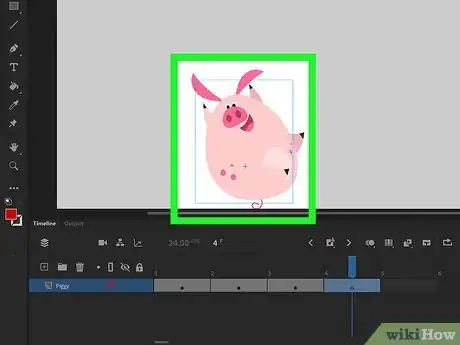
2Create your first object. You can use the tools in the toolbar to draw objects in Flash or Animate. Start by creating a simple object, such as a bouncing ball.
- If you want, you can draw a background image on a separate layer in the timeline. You can also import an image into Animate or Flash to use as a background.
- Animate and Flash are vector-based graphics programs. It is highly recommended that you use Flash/Animates's built-in drawing tools in the toolbar or import an image from a vector-drawing program, like Adobe Illustrator or Inkscape. Vectors can scale easily without distortion, while traditional raster images will get fuzzy and pixilated if you try to enlarge them.
- You can only tween one object per timeline layer at a time. So if you want to create an object with multiple moving parts, you will need to draw each moving part separately and put them on their own layer.
-
3Convert your object to a symbol. In order to tween your object, you will need to convert it into a symbol. This is the format that Flash and Animate use in order to manipulate them. If you try to tween an object that has not been made into a symbol, you will be prompted to do so first.
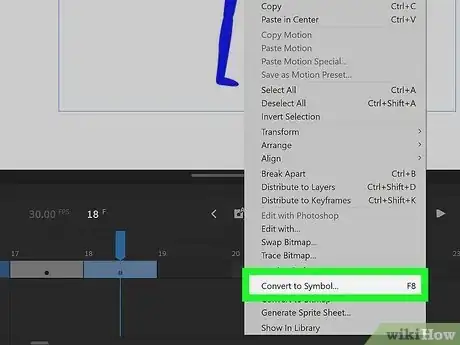
- To convert an image to a symbol, right-click the object and click Convert to Symbol. Use the drop-down menu next to "Type" to select Movie Clip. Then click Ok.[1]
- To edit an object after it's been converted to a symbol, simply double-click on it. You will see a blank timeline at the bottom of the screen that is specific to the symbol you have selected. You can use this to create symbols within symbols, each with its own independent animation.
-
4Insert frames needed to create a motion tween. Right-click the frame where you want the motion tween to end and click Insert Frame. This will insert a series of blank frames starting from the first frame and ending at the frame you inserted a frame at.
-
5Move the object to where you want it to be at the start of the animation. Click the frame you want your animation to start on. Then click the selection tool (it's the icon that resembles a black mouse cursor) and click and drag your object to where you want it to be at the start of your animation.
- Objects do not have to start or stop on the stage. For example, if you want an object to fly in from off camera, you would drag it outside of the stage on the side you want it to fly in from. That would be the starting point of your motion tween.
-
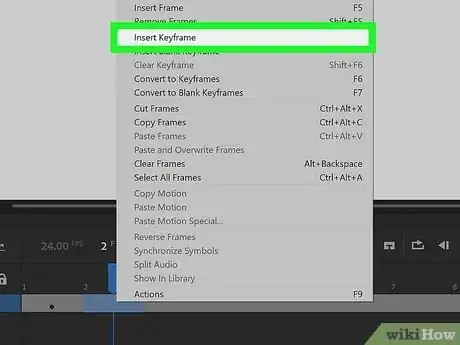
6Insert a keyframe where you want the motion to stop or change. Keyframes are used to indicate when an animation starts, stops, or changes. This includes a change in the direction it is moving. To insert a keyframe, right-click the frame you want to insert a keyframe and click Insert keyframe. This places a dot in the frame, indicating that the frame is a keyframe.
-
7Create a motion tween. To create a motion tween, right-click the keyframe you want the motion tween to start on. Then click Create Motion Tween. All the frames will turn blue or purple, depending on if you are using Flash or Animate.
-
8Move the playhead to the end of the motion tween. To do so, simply click the last frame of the tween in the timeline.
-
9Move the object to where you want it to be at the end of the tween. Use the selection tool to click and drag the object to where you want it to be at the end of your motion tween. This will automatically create a new keyframe on the frame you moved the object. Flash or Animate will automatically calculate the movement between the first and second keyframes. This is the basics of motion tweening in Flash and Animate.
- You will need to create a separate motion tween for each object that moves and for any change in the animation.
- Alternatively, in addition to using motion tweens to move an object, you can use the Free Transform tool to rotate an object or change its size. The Free Transform tool resembles a mouse cursor over a box. Click this option in the toolbar or press "Q" to select the free transform tool. You will see a bounding box around your object with a white dot in the middle. The white dot is the pivot point that your object will rotate around. You can click and drag the white dot to move the pivot point. Click and drag the small dots in the corner or side of the bounding box to adjust the size of your object. Hold Shift while dragging to keep the object shape proportional. Click and drag outside of one of the dots in the corner of the bounding box to rotate an object.
- Use the Properties menu to the right to adjust the ease of a motion tween. Easing in will make the motion start slow and gradually speed up. Easing out will start fast and gradually slow down. On Animate, select "Ease In" or "Ease Out" from the drop-down menu and then use the graph to adjust the ease. On Flash locate "Ease" in the Properties panel and enter a number between -100 and -1 to ease in and 1 to 100 to ease out.
- You can also use a shape tween to make an object change shape in Flash and Animate.
Making a Frame-by-Frame Flash Animation
-
1Understand the basics of frame-by-frame animation. This is considered the "traditional" method of animation, in that each frame has the same picture but is slightly altered. When the frames are played in quick secession, the images appear to move. This is the same basic technique used in traditional hand-drawn animations and is more time-consuming than tweening.
- By default, Flash and Animate will produce animations at 24 frames per second (FPS). That means one second of animation will have 24 frames, but not every frame has to be different. You can adjust this if you'd like, and many Flash animations use 12 FPS, but 24 will produce a much "smoother"-looking animation.
- You can use frame-by-frame animation in conjunction with motion tweening. For example, you may want to use frame-by-frame animation to animate the movement of a character's legs. But you may want to use motion tweening to make them move from one side of the stage to the other.
-
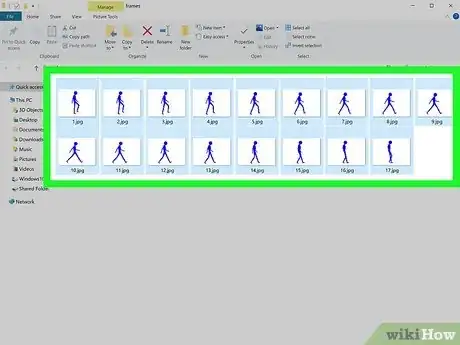
2Create your assets. Because frame-by-frame animation requires multiple images with slight differences, you will need to create all of these assets by hand. You can create them all before you begin, or make them as you go using the tools in the toolbar.
- While creating your assets, consider all the parts that will be moving in your animation. Create a separate image for all the moving parts so that they can be placed on a separate layer in the timeline. For example, if you want to animate a character talking, it's much easier to create the character's blank face, and then create the eyes and mouth as separate assets. That way, you only have to redraw a new mouth and eyes for each frame, instead of having to draw an entirely new character for each frame.
-
3Create your first frame. When you first start Flash or Animate, you will have a blank layer and an empty Timeline. Use the drawing tools in the toolbar to draw assets, or import a pre-drawn image to the first frame.
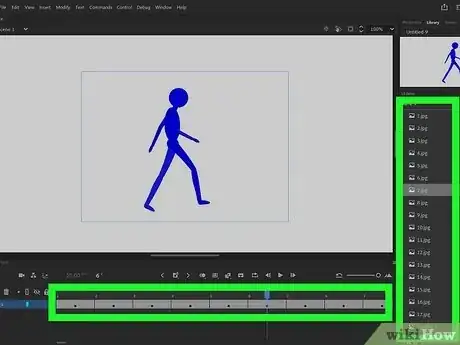
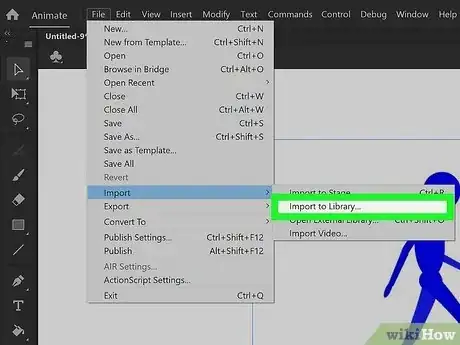
- To import an image into Flash or Animate, click File in the menu bar at the top. Then click Import followed by Import to Stage. Select your image asset(s), and click Open. Alternatively, you can import all your assets into your library. To do so, click File followed by Import. Then click Import to Library and select all of your assets. Then click Open. Click the Library tab to the right to view all the assets in your Library. You can drag and drop them into the stage when you are ready to use them.
-
4Convert your image into a symbol. By turning an object or drawing into a symbol, you can use it again in multiple frames. To turn an object into a symbol, select it. Then right-click it and click Convert to Symbol. Give the symbol and name and select "Move Clip" as the symbol type and click Ok
-
5Insert a keyframe at the next frame where you want the animation to change. Keyframes are used to denote any change in the animation. This includes when a new asset or instance is used. To create a new keyframe, right-click the frame you want to add a new keyframe to and click Add Keyframe. Keyframes that contain an image will have a black dot in the timeline frame. Blank keyframes are denoted by a hollow circle over the frame.
- You don't need a new image in each frame. In general, having a keyframe every two to four frames will produce a good animation.
-
6Import or create a new drawing at the new keyframe. Click the keyframe you just created. Then use the drawing tools in the toolbar, or import a new image to the stage at that keyframe. The new image should only be slightly different from the previous drawing.
-
7Convert the new drawing to a symbol. Convert each asset or instance into a symbol so that it can be used later on. Right-click the new drawing and click Convert to Symbol. Then give the new symbol a name and select "Movie Clip" as the symbol type.
-
8Repeat the process. Continue adding a keyframe at each frame that changes. Then add a new drawing at each new keyframe. Continue until your animation is finished. [2]
- Make small, incremental changes. Your animation will look much smoother if you make very small changes to the keyframe. For example, if you want a stick person waving an arm, your second keyframe should not be the other end of the wave. Instead, use a few keyframes to transition from the beginning of the wave to the end. This will produce a much smoother animation.
Adding Sound and Music
-
1Record or find your sound effects and music. Sound gives your animation more engaging. You want to add different sound files for music, sound effects, and dialogue. Flash/Animate supports a variety of file formats, including Adobe Sound, MP3, WAV, AIFF, and OGG.[3]
- You can record your sounds in Adobe Audition, or another digital audio workspace, such as Pro Tools, or even Audacity.
- MP3 will typically give you perfectly acceptable sound quality while keeping the file size to a minimum. Avoid WAV files if possible, as these are often quite large.
-
2Import the sound files to your Library. Use the following steps to import your sound files to your Library:
- Click File in the menu bar at the top.
- Click Import.
- Click Import to Library.
- Select your audio files.
- Click Open.
-
3Create a new layer for each sound type. You may want to have a separate layer for music, sound effects, and dialogue. To create a new layer, either click the icon that resembles a turning page at the bottom of the timeline or use the following steps to insert a new layer:
- Click Insert in the menu bar at the top.
- Click Timeline.
- Click Layer.
-
4Create a keyframe where the sound will start. To do so, right-click the frame you want the sound to start playing in the sound layer in the timeline. Then click Insert keyframe.
-
5Add the sound or music file. To do so, make sure you have the keyframe that you want the sound to start selected. Then click the Properties tab in the menu to the right to display the Properties panel. Then use the drop-down menu next to "Sound" to select the sound file you want to start playing.
- If you do not see the Properties panel tab or panel, click Window in the menu bar at the top. Then click Properties.
-
6Add an effect to the sound (optional). If you want to add an effect to the sound, use the drop-down menu next to "Effect" to select an effect. The effects you can choose from are as follows:[4]
- Left channel: This plays the sound in the left speaker only.
- Right channel: This plays the sound in the right speaker only.
- Fade to right: The starts the sound on the left speaker and gradually shifts it over to the right speaker.
- Fade to left: The starts the sound on the right speaker and gradually shifts it over to the left speaker.
- Fade in: This starts the volume at 0 and gradually increases the volume to full.
- Fade out: This starts the sound at full volume and gradually quiets the volume to silence.
- Custom: This option allows you to customize the fade and channels using an envelope. This option is not supported in HTML5 or WebGL projects.
-
7Select how the sound will sync with the animation. Use the drop-down menu next to "Sync" to select how the audio will sync with the animation. Your options are as follows:
- Event: This will start playing the audio in it's entirety when the keyframe is hit in the timeline. The audio will keep playing, even if the timeline or final SWF file reaches the end. It will play again, even if an instance of the sound is already playing.
- Start: This works the same as "Event", except that it will not play the sound if an instance of the sound is already playing.
- "Stop:' This silences the sound if it is already playing. You can use a separate keyframe to stop a sound that is already playing.
- Stream: This forces your animation to keep pace with your sound. If the frames can't be rendered fast enough, they will be skipped. Unlike "Event" sounds, "Stream" sounds will not keep playing after the animation is done playing.
Publishing Your Animation
-
1Save your work. You should save often when working in Adobe Flash or Animate. To save your work, simply click File, followed by Save. To rename your saved file, click Save as instead. Enter a name for your project and click Save.
-
2Click File. It's in the menu bar at the top.
-
3Click Publish Settings. It's in the file menu. This opens the Publish Settings menu, which allows you to select the format(s) you want to publish in.
-
4Select the formats you want to publish your animation in. Use the checkboxes along the left side to select which formats you want to publish your animation in. In addition to the standard SWF format that Flash/Animate normally publishes in, you can also select HTML Wrappers to publish an HTML document with your animation embedded in it, as well as GIF, JPEG, or PNG. You can also select Windows Projector, or Mac Projector to create a Windows or Mac application.
- You will need Flash Player to view a published SWF file. Since Adobe no longer supports Flash, you can download Flash Player Projector Content Debugger from a third-party website like Archive.org, or Techspot.com.
- If you plan on doing further editing in Adobe After Effects, make sure you click the checkbox next to "Optimize for Adobe After Effects."
-
5Enter a file name for your final file. Enter the name that Flash/Animate will create when you publish your work in the box next to "Output File" near the top of the menu. Additionally, you can click the folder icon and select a location to publish your animation.
- If you have multiple file formats selected, click the format type in the menu to the left and check the Output File name for each format.
-
6Click Ok. It's at the bottom of the menu. This saves your publish settings.
-
7Publish your animation. Use the following steps to publish your animation using the Publish settings you have selected:
- Click File in the menu bar at the top.
- Click Publish.
Exporting Your Animation
-
1Click File in the menu bar at the top. Since Adobe no longer supports Flash Player, if you want to share your movie with other people, you'll need to export it in a format that other people can view. Click File to access the Export menu.
-
2Click Export. It's near the bottom of the File menu. This displays a fly-out menu.
- Alternatively, if you are using newer versions of Adobe Animate, you can click the icon that resembles a square with an arrow pointing up in the upper-right corner. Click Publish and then click the radio option next to "Video." Then click Publish to publish the animation as an MP4 video file.
-
3Click Export Movie. It's in the fly-out menu that appears when you hover over "Export."
-
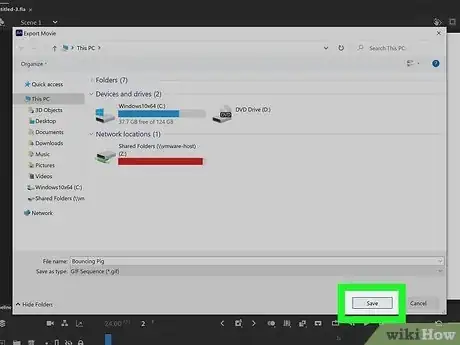
4Select the file format you want to export your animation as. Use the drop-down menu next to "Save as type" to select the file type you want to save your animation as. You can save it as a GIF, Quicktime (.mov), Windows Media (.avi), or a PNG, JPEG, PICT, or Bitmap sequence.[5]
- Saving your animation as a PNG, JPEG, Bitmap, or PICT sequence will render each frame of your animation as an individual image. You can load these images into a video editor, like Premiere Pro, or After Effects as an image sequence and render your animation as a video file. What's useful about this method is that if Flash or Animate crashes while publishing your animation, you can start up again right where you left off.
-
5Enter a filename for your animation.
- If you are exporting your animation as an image sequence, each image filename will be numbered sequentially. It's recommended you save your image sequence images to a separate folder.
-
6Click Save. This saves your animation in the file you selected.[6]
Community Q&A
-
QuestionWhere can I download Flash?
 Community AnswerYou can subscribe to the Adobe Creative Cloud package in your Creative Cloud account and download it from the Adobe site Or you can start a free trial for seven days by registering a Creative Cloud account. Download Flash Pro CC (now Animate CC) from the Adobe site.
 -
QuestionHow can I send an animation through Gmail, if possible?
 Community AnswerYou have to zip up the files first. There are multiple tools for zipping up files, and Windows comes with one. However, if there is not a pre-installed zipping tool, you can download 7-ZIP which is very easy to use. Once you have it installed, simply right click on your folder and click zip. You can then drag it into your email and send it.
 -
QuestionDo I have to pay for the program?
 Bijan GhaffariCommunity AnswerFlash comes with Creative Cloud, along with Photoshop and Stock, as well as other various Adobe services. Creative Cloud has a free trial. Afterwards, you will have to pay a certain fee per month.
References
- ↑ http://www.adobe.com/devnet/flash/learning_guide/animation/part05.html
- ↑ http://edutechwiki.unige.ch/en/Flash_frame-by-frame_animation_tutorial
- ↑ https://helpx.adobe.com/animate/using/using-sounds.html
- ↑ https://helpx.adobe.com/animate/using/using-sounds.html
- ↑ https://helpx.adobe.com/animate/using/exporting-content.html
- ↑ https://helpx.adobe.com/animate/using/exporting-content.html
