This article was co-authored by Joy Cho. Joy Cho is the Founder and Creative Director of the lifestyle brand and design studio, Oh Joy!, founded in 2005 and based in Los Angeles, California. She has authored six books and consulted for creative businesses around the world. Joy has lectured on business, leadership, and entrepreneurship at conferences and companies such as AltSummit, Pinterest, Target, and Hallmark, while her home and studio have been featured in magazines such as House Beautiful, Parents, and Domino. She has also been named one of Time's 30 Most Influential People on the Internet multiple times and has the most followed account on Pinterest with more than 14 million followers.
This article has been viewed 112,702 times.
You can easily make awesome, unique patches yourself! Simply grab some fabric, draw on your design, and choose between hand embroidering, sewing zigzag stitches, or using inkjet transfer sheets to create your patch. Once you make your patch, cut it to size, and stick it onto a piece of Peel ‘n Stick Fabric Fuse. After that, you’re all set to iron your design onto your jacket, backpack, or item of your choice!
Steps
Creating Hand-Embroidered Patches
-
1Choose a simple design if you are new to embroidery. It is best to start with basic designs while you get the hang of hand embroidery. Draw your own simple design, or find a design online to use. Go with art you can complete with 3 or less colors of embroidery thread.[1]
- Find a design like a smiley face, yin yang sign, or cherries.
- You can also use a short word or phrase like “peace” or “love.”
- While previous sewing experience is helpful, you can try embroidering your own patch even if you’ve never sewn before.
-
2Transfer your design onto a piece of fabric. Once you pick out your design, draw it onto your piece of fabric with a pencil. If the design is drawn on a piece of paper, try placing the paper behind your fabric and trace over the lines.[2]
- If you still can’t see the design through the fabric, hold both layers up to a nearby window so you can see the lines clearly.
- You can use any piece of fabric. To make durable, attractive patches, use canvas material in a neutral color.
Advertisement -
3Place the fabric inside an embroidery hoop and tighten the screw. Embroidery hoops come with 2 wooden circles. Place the circle with the metal screws on the outside of your design, and put the other circle underneath your fabric. Then, secure the hoop in place by screwing the fastener at the bottom.[3]
- Keep your fabric tight when you secure your hoop. It will be more difficult to complete your designs if the fabric is loose in your hoop.
-
4Thread your needle with your embroidery floss. Cut your floss, and insert your floss through the eye of your needle. Take the end of your thread and match it with the other end, so the needle is exactly in the center. Then, tie a secure, double knot at the end.[4]
-
5Make basic embroidery stitches to fill in your design. Pick a starting point, and poke your needle through the fabric. Stick the needle back through the front of your fabric to make a basic embroidery stitch. Continue stitching until you fill in your artwork.[5]
- When you run out of string, simply cut another and threat it through your needle. You can also do this to change the color of your thread.
-
6Remove your embroidery hoop when you finish sewing your design. Loosen the screw on your embroidery hoop, and lift up the outer hoop. Separate your fabric from the inner hoop, then reassemble your hoop to use for next time.
- Your fabric is now ready to become a patch!
-
7Cut your patch to your desired size when you finish hand-embroidering. After your patch is finished, cut around the edges to your preferred size and shape. For best results, use fabric scissors to make your cuts.[6]
- You can cut your patch into a square, rectangle, circle, or triangle, for example.
-
8Remove the backing sheet from 1 piece of Peel ‘n Stick Fabric Fuse. The backing overlaps on the edges, and you can easily separate it with your fingers and peel away the covering.[7]
- You can use 1 sheet to make 1 patch. If you have multiple small patches, you can likely fit both on the same sheet.
- Purchase Fabric Fuse sheets at most craft stores or online.
-
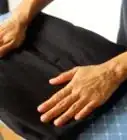
9Place your patch onto the sticky side of the Peel ‘n Stick sheet. Make sure you stick the back of your patch to the sheet, rather than the side with your artwork. Smooth your fingers over all sides of your patch to stick it into place, using firm pressure.[8]
-
10Cut away the remaining Fabric Fuse sheet to the size of your patch. Using a pair of scissors, trim around the shape of your patch to remove the extra Peel ‘n Stick sections.
- Once you cut all sides of your patch, you are ready to iron it onto your jacket, backpack, baseball hat, or whatever you’d like!


Sewing with a Zigzag Stitch
-
1Select your artwork and transfer it onto your fabric. Draw your own simple design or select an image offline. Cut a piece of fabric about 4 by 4 inches (10 cm × 10 cm), or use a scrap piece. You can draw your design directly onto your fabric if you’d like. You can also print out a design and trace it onto your fabric.[9]
- You can make virtually any design into a patch, though it’s best to start out with simple designs. Avoid designs with complicated linework or intricate details until you master this method.
-
2Choose a zigzag pattern on your sewing machine. There are a number of different zigzag patterns, depending on your unique sewing machine. Use the 1-08 setting for a classic zigzag stitch.[10]
- To create your patch, you will use your sewing machine to fill in your design with zigzag stitches.
-
3Adjust your stitch length to 0 and your stitch width to 2. You can get very different stitches by adjusting the stitch length and width. Try these settings to get thick, bold lines.[11]
- Sewing with bold, thick stitches allows you to fill in your design quickly and easily.
- Use a higher numbered stitch length if you want a longer, flatter stitch. Use small numbers if you want your stitches to be close together.
- Change the width to a higher number if you want bigger zigzags, and try smaller sizes if you want to create tighter zigzags.
-
4Pick a starting point at a corner of 1 of your lines. Thread the needle of your sewing machine following the guidelines on your particular machine. Once you select a starting point, lower the presser foot to your fabric using the adjustment lever. This keeps the needle securely in place as you make your stitches.
- Working from your longest edge is a good place to start, but you can start virtually anywhere!
-
5Press down on the foot control pedal to make your stitches. To create the design of your patch, sew zigzag stitches over each line of your artwork. To make your lines, gently press down on your foot pedal and hold the fabric with your hands to guide your stitches. Lift up on the foot control when you reach the end of your line. Continue sewing until you sew over all your lines and complete your design.[12]
- Sew your line until you reach about 1⁄8–1⁄4 in (0.32–0.64 cm) from the edge of your fabric.
-
6Pivot the needle as you reach a corner. When you sew your line and reach an intersection with another line, lift up your foot from the foot pedal to stop stitching. Raise the lever of your presser foot, and leave the needle in your fabric. With the needle inside the machine, rotate the fabric in the direction of your next line. Then, lower the presser foot back onto your fabric and continue your stitches.[13]
- You want your needle to remain in the sewing machine as you change the direction of your stitches.
-
7Trim the edges of your patch to your desired size. After you sew all the lines of your patch, use fabric scissors to cut off extra fabric around the edges of your design. If you’d like, you can cut it into a particular shape, like a triangle, oval, or square.[14]
-
8Stick your patch to 1 piece of Peel ‘n Stick Fabric Fuse. Peel away the back covering from the Peel ‘n Stick sheet, and place your patch on the sticky side. Using your fingers, smooth over your patch so all edges are adhered. Then, trim away the extra Peel ‘n Stick from your patch.[15]
- If you are making multiple small patches, you can stick a few patches to 1 sheet of Peel ‘n Stick Fabric Fuse.


Using Inkjet Transfer Paper
-
1Select an image to use for your patch and resize it if needed. Take a picture of a hand-drawn design, or select an image off the internet. If you need to change the size, use a photo editor program, Paint, or Microsoft Word, and go to the “Resize” settings. You can change the size in inches or centimeters.[16]
- You can make your patch whatever size you like! If you want a small patch, go with a design about 2 by 2 inches (5.1 cm × 5.1 cm). For larger patches, use designs 4 by 4 inches (10 cm × 10 cm) or larger.
-
2Print out your image on inkjet transfer sheets. Load your printer’s paper tray with a sheet of inkjet transfer paper. After you are satisfied with the size of your image, select “Print” on your photo editing program.[17]
- If you’d like, print a test page with regular printer paper before you use the transfer sheet. That way, you can change the size if you need to.
-
3Place the artwork face down on your fabric. Use a piece of fabric about 4 by 4 inches (10 cm × 10 cm), or find a scrap piece. Then, take your inkjet sheet and place it so the artwork faces the fabric.[18]
- The back of the inkjet transfer sheet should face you.
- Typically, thick fabric like canvas or muslin are often used. Go with fabric in a neutral color, like tan or white. However, you can use basically any fabric you’d like.
-
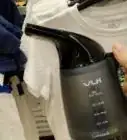
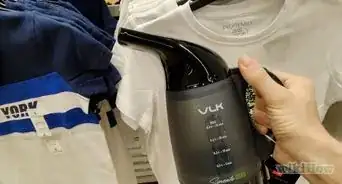
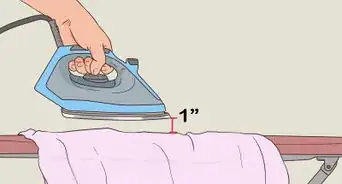
4Iron the artwork onto your fabric and let dry for at least 2 minutes. Let your iron warm up for about 2 minutes to reach maximum temperature, and place it on top of the inkjet transfer sheet. Move your iron constantly in small circular motions over your image. Iron for about 1-1.5 minutes, then remove the heat from your patch.[19]
- Make sure you cover every edge so the entire image transfers properly.
-
5Peel off the paper backing from your fabric to reveal your image. Leave your transfer sheet on your fabric for 2 minutes, then remove the paper.[20]
- Your image is now transferred over to your patch!
-
6Cut your patch to your desired shape and size. After you transfer your image to your fabric, grab a pair of fabric scissors, and cut around the edges to your preferred size and shape.[21]
- If you don’t have fabric scissors, that’s okay! You can use a sharp pair of household scissors. Fabric scissors help cut straight, accurate lines in all sorts of materials.
-
7Adhere your patch to a sheet of Peel ‘n Stick Fabric Fuse. Use 1 piece of Peel ‘n Stick Fabric Fuse, and peel off the backing sheet. Place your patch onto the adhesive side of the Fabric Fuse sheet, so the back meets the sticky side. Then, simply trim away the extra parts of the Fabric Fuse.[22]
- Once you trim your patch, the last thing you need to do before ironing it to your items is attaching the iron-on adhesive. After that, you can iron your patch onto anything you’d like.


Community Q&A
-
QuestionHow long do iron-on patches last?
 wikiHow Staff EditorThis answer was written by one of our trained team of researchers who validated it for accuracy and comprehensiveness.
Staff AnswerwikiHow Staff EditorStaff AnswerIt depends. If the patch is on a garment you wash a lot, it’s likely to come off after about 25 washes. They’ll come off faster if they’re exposed to heat, since the glue becomes soft when it’s heated. They’ll last longer if you wash and dry the garment on a cool setting, and avoid exposing the patch to heat (e.g., by leaving the item in a hot car). -
QuestionIs it better to sew or iron on a patch?wikiHow Staff EditorThis answer was written by one of our trained team of researchers who validated it for accuracy and comprehensiveness.
Staff AnswerwikiHow Staff EditorStaff AnswerSewing is more secure and will last longer, but ironing is quicker and easier. In general, iron-on patches are good for things like bags and jackets that don’t need to be washed frequently. For items like shirts or pants, sew-on patches work better. -
QuestionWhat is the best fabric glue for patches?wikiHow Staff EditorThis answer was written by one of our trained team of researchers who validated it for accuracy and comprehensiveness.
Staff AnswerwikiHow Staff EditorStaff AnswerFabric glue can be great for reapplying iron-on patches after the original glue gives out. Some good options include Stitch Withery, Dritz Liquid Stitch, or Aleene’s Fabric Fusion Permanent Fabric Glue. Some fabric glues will need to air dry for several days, while others are heat activated like the glue on an iron-on patch. Read the instructions carefully.
Things You'll Need
Creating Hand-Embroidered Patches
- Muslin or canvas fabric
- Heat’n Bond Iron-On Adhesive
- Embroidery thread
- Embroidery hoop
- Sewing needle
- Fabric scissors
- Pencil
- Peel ‘n Stick Fabric Fuse
Sewing with a Zigzag Stitch
- Artwork
- Sewing needle
- Thread
- Sewing Machine
- Piece of fabric
- Fabric scissors
- Pencil
- Peel ‘n Stick Fabric Fuse
Using Inkjet Transfer Paper
- Artwork
- Inkjet printer
- Camera (optional)
- Piece of fabric
- Heat ‘n Bond Inkjet transfer sheets
- Peel ‘n Stick Fabric Fuse
References
- ↑ http://mesewcrazy.com/2016/08/how-to-make-your-own-patches.html
- ↑ http://mesewcrazy.com/2016/08/how-to-make-your-own-patches.html
- ↑ https://youtu.be/uUP0Jg_r6bU?t=18s
- ↑ http://mesewcrazy.com/2016/08/how-to-make-your-own-patches.html
- ↑ http://mesewcrazy.com/2016/08/how-to-make-your-own-patches.html
- ↑ http://mesewcrazy.com/2016/08/how-to-make-your-own-patches.html
- ↑ http://mesewcrazy.com/2016/08/how-to-make-your-own-patches.html
- ↑ http://mesewcrazy.com/2016/08/how-to-make-your-own-patches.html
- ↑ http://mesewcrazy.com/2016/08/how-to-make-your-own-patches.html
- ↑ https://www.craftsy.com/sewing/article/zigzag-stitch/
- ↑ http://mesewcrazy.com/2016/08/how-to-make-your-own-patches.html
- ↑ http://mesewcrazy.com/2016/08/how-to-make-your-own-patches.html
- ↑ https://www.youtube.com/watch?v=0VAQG80cfOw
- ↑ http://mesewcrazy.com/2016/08/how-to-make-your-own-patches.html
- ↑ http://mesewcrazy.com/2016/08/how-to-make-your-own-patches.html
- ↑ http://mesewcrazy.com/2016/08/how-to-make-your-own-patches.html
- ↑ http://mesewcrazy.com/2016/08/how-to-make-your-own-patches.html
- ↑ http://mesewcrazy.com/2016/08/how-to-make-your-own-patches.html
- ↑ https://youtu.be/Us7yI6VjdUg?t=3m51s
- ↑ http://mesewcrazy.com/2016/08/how-to-make-your-own-patches.html
- ↑ http://mesewcrazy.com/2016/08/how-to-make-your-own-patches.html
- ↑ http://mesewcrazy.com/2016/08/how-to-make-your-own-patches.html
About This Article

Iron-on patches are a great way to personalize your clothes and bags. If you know how to sew, you can embroider your own patches. Just draw your design onto a piece of fabric, fasten it in an embroidery hoop, and stitch the design by hand. Alternatively, transfer your design onto a patch with inkjet transfer paper. Just print your design out on the transfer paper, then place the paper face down on your fabric, and iron it on. You’ll also need a sheet of adhesive fabric to attach the patch to your clothing. For more tips, including how to make your own patches with a sewing machine, read on!