This article was co-authored by Shara Strand. Shara Strand is a Makeup Artist and the Founder of Shara Makeup Studio, a makeup and image consulting studio based in New York City. She has over 15 years of image and makeup consulting experience including working as a regional artist for Bare Escentuals and Estee Lauder, Saks 5th Avenue, Bloomingdales, and Bergdorf Goodman. Her work has been featured in WNBC, Fox 5, Direct TV ABC morning news, and Hamptons Magazine. She is the creator of Shara Cosmetics and is a two time Billboard charted singer. She holds a BFA from New York University.
There are 15 references cited in this article, which can be found at the bottom of the page.
This article has been viewed 85,967 times.
Ready to take your look to the next level? Contouring could be the solution that you're looking for. It may seem difficult at first, but the process is actually quite simple—and we're here to show you how. Read on to learn everything there is to know about powder contour, including how and when to apply it.
Steps
Contour Application Tips
-
1Note where the shadows fall naturally on your face. Again, everyone's face is different. Step into a well-light room with a mirror, and take note of where the highlights and shadows fall naturally on your face. These are the areas that you will be applying the highlighter and contour to.
- If your skin tone is dark enough, then the highlighter may give you enough contrast so that you don't need the contour.
-
2Apply cheek contour to the hollows of your cheeks to slim them down. Use a medium-sized brush to apply the contour powder into the hollows of your cheeks, below the highlighter, leaving a slim gap. There should be a small gap at the round of the cheek where blending occurs. Focus on the area closest to your ear; the contour should be very thin and light the closer it gets to your mouth.[1]
- If you have very prominent cheekbones or sunken cheeks, then you might not need to contour this area.
- Don't worry about blending everything in just yet. You'll do that at the end.
- Suck your cheeks in if you have troubles finding the hollows.
- Apply the powder contour after you've applied the rest of your makeup.[2]
Advertisement -
3Apply powder to your forehead and temples, if desired. Use a medium-sized brush to apply shadow around the top of your face, right along your hairline and temples. Use the shadows that fall naturally upon your face as a guide. Blend the shadow along your hairline towards the middle of your forehead.[3]
- If you have a small forehead, you may not have much shadow at the top of your forehead, which is fine. You are working with your natural features, after all!
- For a more masculine look, make the shadows at the temples more angled and prominent.
-
4Add contour to your jaw to slim it down, if desired. Use a medium-sized brush to apply contour to the edge of your jaw--it should rest right below the highlighter, if you added it. This is a great way to slim down your jaw or make it appear more angular.[4]
-
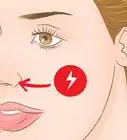
5Slim down your nose by adding contour to the sides. Use a thin brush to apply a thin line of contour to either side of your nose bridge, next to the highlighter, leaving a slim gap for blending. Blend the shadow away from the highlighter and towards your face.[5]
- Do not apply contour to your entire nose, or it will end up too intense. It is better to apply just a thin line, then blend it out.
- Do not blend the contour over your nostrils. Instead, sweep it down and under the tip of your nose.
-
6Apply contour to any other desired areas. Use your natural shadows as a guide. For example, if you have shadows under your lip or around your chin, apply more contour there. Some people also like to apply a thin line of contour down the center of their lip (fulcrum).
-
7Blend the contoured areas until no harsh lines remain. Start by running a large, clean brush along the edges where highlighter meets contour. Next, blend the shadows away from the highlighted edges, as needed. For example, if you applied contour to the hollows of your cheeks, blend it downward. Use large brushes for large areas, such as your forehead, and small brushes for small areas, such as your nose.[6]
- For small areas, such as the fulcrum, simply run a clean brush along that area to soften it up.

Selecting Your Powder and Tools
-
1Determine whether you have warm or cool undertones. Look at the veins on your wrist. If they appear green, you have warm skin. If they appear blue, you have cool skin. Another way to determine your skin undertone is to see how easily you suntan or burn. If you tan easily, you likely have warm skin; if you burn easily, you probably have cool skin.[7]
- If your skin has a pink or red base, you likely have a cooler skin tone. If you have a yellow base, you likely have a warmer skin tone. A lot of people are somewhere in between.[8]
- Knowing your skin's undertone is important. If your makeup does not match your skin's undertone, it will look make you look too ashy or yellow.
-
2Choose a contour kit that matches your skin's undertone. Some companies sell contouring kits that are labeled for warm or cool skin. In this case, buy the one that matches your undertone. If the kits are not labeled, purchase a yellow-tinted kit if you have warm skin, or a pinkish kit if you have cool skin.
- Gold and bronze shades are good for warm skin.
- Nutty or woodsy hues like mahogany and walnut are better for cool skin.
- Many contour kits work well for both warm and cool.
- You should also think about if your skin is light, medium, or dark. Using a palette that is too dark looks fake.
-
3Make sure that the highlighter and contour work with your skin tone. The highlighter needs to be a 2 shades lighter than your skin tone, and the contour needs to be a 2 shades darker. A kit may work for most people, but if it doesn't, you'll have to buy the powders separately.[9]
-
4Buy the powders separately if you cannot find the right kit. Contouring kits are just a set of pressed powders that are a few shades lighter and darker than your skin tone. This means that you can use just about any pressed powder, such as foundation or blush, as long as it works with your undertone and tone.[10]
- Eyeshadow tends to be more intense in color than other powders, so it's harder to work with. If you do use eyeshadow, choose matte for your shadows and either matte or shimmery for your highlights.
- Do not buy loose powder. Use pressed powder; it is easier to apply.
-
5Do not use bronzer or illuminator on your nose. Bronzer is too shimmery and won't cast natural shadows. Illuminator is also too shimmery. While you can use it above your lips or on your cheeks, you don't want to use it in areas that will get shiny, like your nose.
- Using illuminator on your nose will make it even more shiny.
-
6Obtain a selection of clean, natural-hair powder brushes. Camelhair brushes will work the best, but you can use other brushes that are soft and fluffy. Have a selection of large, small, and medium brushes. Blush and angled contour brushes work great here.
- Do not use brushes with stiff or synthetic bristles, such as lipstick or foundation brushes.
- If your powders are more creamy, consider using a makeup sponge or beauty blender instead.


Applying Your Base Makeup
-
1Start with a clean, toned, and moisturized face. Wash your face with warm water and a facial soap suitable for your skin type. Pat your face dry with a clean towel, then apply toner. Finish off with moisturizer.
- Wait for the moisturizer to absorb into your skin before proceeding.
- Even people with oily skin should use moisturizer. Make sure that the product is labeled for oily skin, however.
-
2Apply a face primer, if desired. While not absolutely necessary, a face primer will fill in any pores and fine lines. It will make your face smoother, and make it easier to apply the foundation.
-
3Apply your choice of foundation and concealer. Choose a foundation that matches your skin tone and undertone. Apply the foundation using your preferred method (i.e. sponge, brush, or fingers). Be sure to blend it in well and let it dry.[11]
- If you wish to use concealer, apply it at this time. Remember to blend it in.
-
4Apply the rest of your makeup as desired, except for the contour. This includes things like lipstick, eyebrows, eyeshadow, eyeliner, and mascara. You can apply all of these, or you can omit some of them for a more natural look.[12]
- If you prefer a more natural look, comb your brows and use lip balm or lip gloss instead of lipstick.
- You will not be using any blush at all when contouring your face.
-
5Set your makeup with translucent powder. When it comes to makeup, you should apply liquid products over liquid products, and powder products over powder. Setting your foundation with setting powder will not only help keep your makeup in place, but it will also give the contouring powders a smooth surface to stick to.

Applying the Highlighter
-
1Focus on bringing out your natural features. Like shoes, contouring is not a "one size fits all." Everyone's face is shaped differently. Some people will want to contour just their nose, while others made want to contour their jaw.
- Contouring can help you balancing your features and enhancing what you love about your face.
- Contouring your nose is optional, but it's best not to contour just one part of your face, as this could look unnatural.
-
2Note where the highlights fall naturally on your face. Again, everyone's face is different. Step into a well-light room with a mirror, and take note of where the highlights and shadows fall naturally on your face. These are the areas that you will be applying the highlighter and contour to.
-
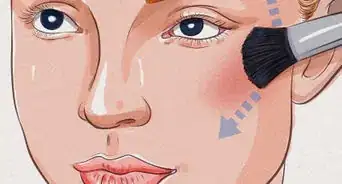
3Brighten your face up by applying highlighter to your cheekbones. Find where the light hits your cheekbones, or suck your cheeks in to find your cheekbones. Use a medium to large-sized brush to apply highlighter along the top of your cheekbones. Blend the powder in upwards towards your eyes. This will brighten the area under your eyes as well as emphasize your cheekbones appear.[13]
- If you have very prominent cheekbones, focus instead on the area in the center of your face, just under your eyes, and around the sides of your nose.
-
4Apply highlighter to your forehead and blend it out. Use a medium to large brush to apply highlighter to the center of your forehead, right between your brows. Blend the highlighter in using radiating upward strokes. Make sure that you blend the highlighter in above your eyebrows too.[14]
- Focus more on the center of your forehead. Do not apply highlighter to your temples or hairline.
-
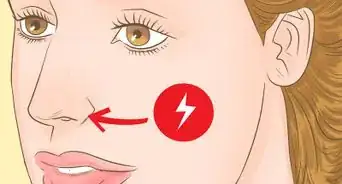
5Use a thin brush to highlight your nose bridge. Take a small eyeshadow brush, then rotate it so that the bristles are oriented vertically. This will give you a nice, thin line. Use the brush to draw a thin line down the center of your nose, from top to bottom. Sweep a clean brush up and down the side edges of the highlighter to blend it in.
- If you have a wide nose that you wish was a little skinnier, make the line thinner. A pointed, crease eyeshadow brush will work great here.
- Highlighting your nose is optional.
-
6Finish off with your chin. Use a medium-sized brush to apply a dab of highlighter to your chin. Blend it out using long, light strokes with your brush. This is a great idea for those with small or weak chins. If you have a large or prominent chin, you might want to skip this step.
-
7Add highlighter to any other areas you'd like to emphasize. For example, if you have a very weak jaw, you could apply highlighter to your jawline. Some people also like to apply highlighter to their cupid's bow with a tiny, eyeliner brush.
Final Touches
-
1Apply a light dusting of setting powder to your T-zone. Use a large, clean powder brush to apply a light dusting of translucent setting powder all over your face. Focus on the areas that will get the most oily, typically your nose, forehead, and chin.[15]
-
2Soften any harsh lines with a heavier application of setting powder. If there are any areas where you feel that you applied contour heavily, apply a generous dusting of translucent setting powder. Let it sit for a few minutes, then dust it off.[16]
-
3Do any final touch-ups with illuminator, if needed. Take a look at your face in the mirror from various angles. If you feel that some areas could use more highlighter, apply a shimmery illuminator to those areas. For example, you could apply some to your nose bridge or cheekbones.[17]
- Remember to use the appropriate-sized brush for these areas.
- Your makeup is done at this point. If you really want to, you can apply a light coating of setting powder or setting spray.
Expert Q&A
Did you know you can get expert answers for this article?
Unlock expert answers by supporting wikiHow
-
QuestionDo you put on powder before or after contouring?
 Laura MartinLaura Martin is a Licensed Cosmetologist in Georgia. She has been a hair stylist since 2007 and a cosmetology teacher since 2013.
Licensed CosmetologistIf you're using pressed powder, it should go on before contouring. A light layer of translucent powder on top of your contouring will help to blend and set it.
Support wikiHow by unlocking this expert answer.
-
QuestionHow do you blend in contour?Laura MartinLaura Martin is a Licensed Cosmetologist in Georgia. She has been a hair stylist since 2007 and a cosmetology teacher since 2013.
Licensed CosmetologistUse a large, clean makeup brush to sweep lightly over the contoured areas to soften and blend them.Support wikiHow by unlocking this expert answer.
-
QuestionDo you put foundation on before you contour your face?Laura MartinLaura Martin is a Licensed Cosmetologist in Georgia. She has been a hair stylist since 2007 and a cosmetology teacher since 2013.
Licensed CosmetologistYou should put foundation on first and contour on top. This gives the contour a base shade to blend with.Support wikiHow by unlocking this expert answer.
Things You'll Need
- Setting powder
- Pressed powder 2 shades lighter than your skin tone
- Press powder 2 shades darker than your skin tone
- Powder brushes in various sizes (eyeshadow, blush, etc.)


References
- ↑ https://www.youtube.com/watch?v=E-2EWx6lyxE&feature=youtu.be&t=1m45s
- ↑ http://www.projectvanity.com/projectvanity/cream-vs-powder-contour
- ↑ https://www.youtube.com/watch?v=E-2EWx6lyxE&feature=youtu.be&t=2m
- ↑ https://www.youtube.com/watch?v=E-2EWx6lyxE&feature=youtu.be&t=2m5s
- ↑ https://www.youtube.com/watch?v=E-2EWx6lyxE&feature=youtu.be&t=2m10s
- ↑ https://www.youtube.com/watch?v=E-2EWx6lyxE&feature=youtu.be&t=2m45s
- ↑ http://www.byrdie.com/figure-out-undertones/slide2
- ↑ Shara Strand. Makeup Artist. Expert Interview. 14 April 2020.
- ↑ https://www.allure.com/story/other-uses-for-eye-shadow
- ↑ https://www.allure.com/story/other-uses-for-eye-shadow
- ↑ https://www.youtube.com/watch?v=E-2EWx6lyxE&feature=youtu.be&t=15s
- ↑ https://www.youtube.com/watch?v=E-2EWx6lyxE&feature=youtu.be&t=40s
- ↑ https://www.youtube.com/watch?v=E-2EWx6lyxE&feature=youtu.be&t=1m5s
- ↑ https://www.youtube.com/watch?v=E-2EWx6lyxE&feature=youtu.be&t=1m15s
- ↑ https://www.youtube.com/watch?v=E-2EWx6lyxE&feature=youtu.be&t=3m30s
- ↑ https://www.youtube.com/watch?v=E-2EWx6lyxE&feature=youtu.be&t=4m15s
- ↑ https://www.youtube.com/watch?v=E-2EWx6lyxE&feature=youtu.be&t=4m15s
About This Article

Combining contour with highlighter can give you a glowing, healthy complexion and enhance your favorite features. Start by applying your primer, foundation, concealer, eye shadow, and any other makeup you'd like to wear. Then, add highlighter wherever the light naturally falls on your skin, like your cheekbones, the center of your forehead, and the bridge of your nose. When you’ve finished your highlighter, add contour to the hollows of your cheeks, below the highlighter. You can also add contour to your forehead along your hairline, your temples, jawline, and the sides of your nose. Blend your contour and highlighter with the rest of your makeup using clean brushes. Finally, add a little setting powder on top to hold your makeup in place. For more tips from our Beauty co-author, including how to choose the right contour products for your skin tone, read on!