This article was co-authored by wikiHow Staff. Our trained team of editors and researchers validate articles for accuracy and comprehensiveness. wikiHow's Content Management Team carefully monitors the work from our editorial staff to ensure that each article is backed by trusted research and meets our high quality standards.
There are 22 references cited in this article, which can be found at the bottom of the page.
This article has been viewed 23,161 times.
Learn more...
The suspension on your dirt bike is a heroic multitasker. It maintains good wheel traction, smooths out your ride, and reacts in an instant to all the excitement a racetrack or a trail can throw at it. To get this all working right, start with the fundamentals: check your rider sag, then static sag. Once those are set, you can quickly adjust compression and rebound between rides to match different terrains. Adjust your fork suspension to change how your front wheel handles, and your shock to affect the rear.
Steps
How do I measure my rider sag?
-
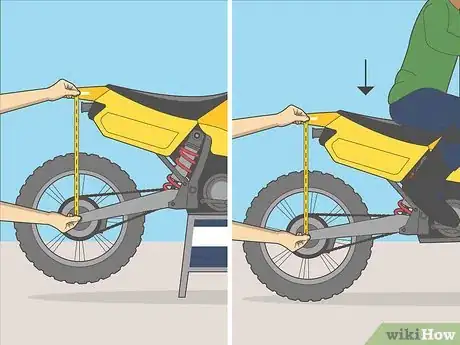
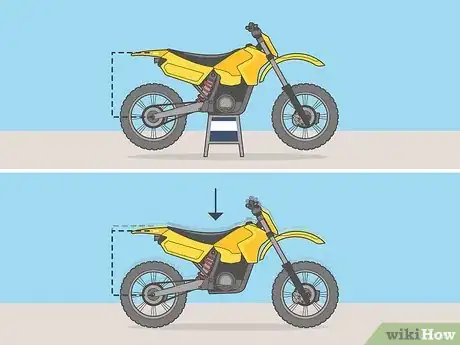
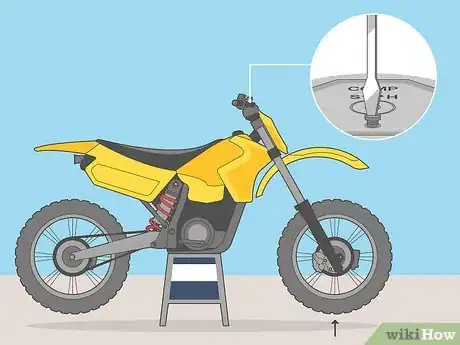
1Start by getting the bike off the ground. Rider sag (also called laden sag or race sag) is the amount the suspension compresses from the weight of the bike and rider. To measure that, you first need to know what your bike looks like without any weight on it. Put the bike on a stand with both wheels off the ground—and get a friend, since this is a two-person job.
- Start here whenever you're doing a thorough suspension check—it's best to get this right, then adjust everything else around it.[1]
- Don't check the sag right after riding. These measurements are only accurate when your bike is cooled down.[2]
- You'll need a lift stand or hydraulic stand that puts the wheels in the air, not on the ground or on a platform. If you don't have one, have someone lift the rear of your bike until there's no weight on the rear wheel.
-
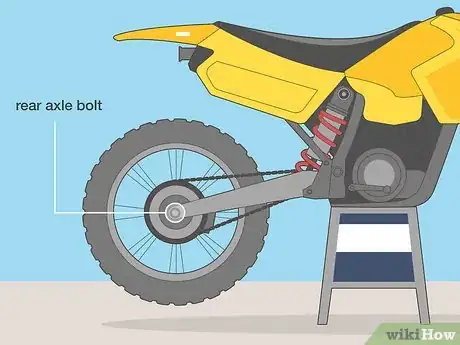
2Take a measurement straight up from the rear axle bolt. Get the tape measure as vertical as possible from the center of the rear wheel.[3] Choose any point where the tape measure intersects with the bike body, and make a mark there. Write down this measurement.
- Use a metric tape measure with millimeter markings. This gives you the precision you need, and should match the units in your owner's manual.
- The exact point doesn't matter, as long as you mark it. You're going to use this measurement as a comparison to see how much the bike sags with weight on it.
Advertisement -
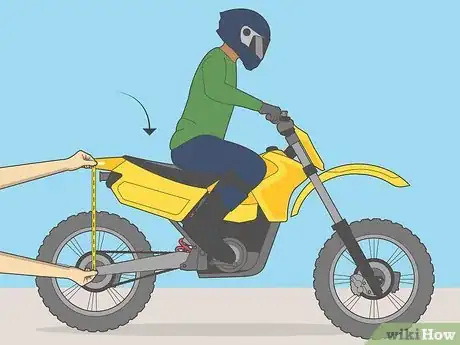
3Have a friend measure again while you're on the bike. Return the bike to the ground and get on it. Repeat the same measurement between the rear axle bolt and the mark you made. The rider sag is the amount this distance changed. In other words, your first measurement minus your second measurement equals the rider sag. Follow these tips for the most accurate results:
What is the ideal rider sag?
-
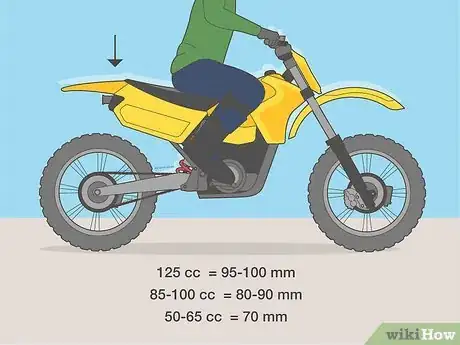
1This is usually around 100mm, but your owner's manual knows best. It's best to keep your rider sag inside the range set by your manufacturer, or "sag window."[6] But as a general rule, most dirt bikes with an engine size of 125cc and up are designed for a rider sag between 95 and 105mm. Typical bikes in the 85 to 100cc range work best with a rider sag between 80 and 90mm, and most bikes in the 50 to 65cc range work best with a rider sag around 70mm.[7]
- You can also think about sag as a percentage of travel, or the total vertical distance your suspension is capable of moving. Ideal rider sag is usually around 30% of travel.[8]
-
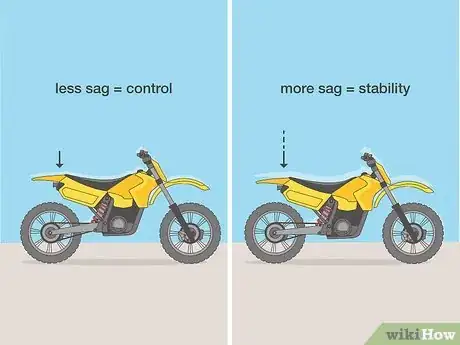
2Choose slightly less sag for control, or more sag for stability. Which point you choose within the sag window depends on how and where you plan to bike. Less sag (a taller bike) makes your bike easier to turn, but can be a bit less stable with a more active, "kicky" shock. More sag (a lower bike) makes your bike more stable but "squatty"—riding low to the ground where it's harder to turn and to absorb impacts.[9]
- Don't be afraid to tweak your sag. It makes sense to use less sag for a closed-course race than for a rough trail, or to use less sag as your skills improve and you ride faster and harder.[10]
How do I adjust my rider sag?
-
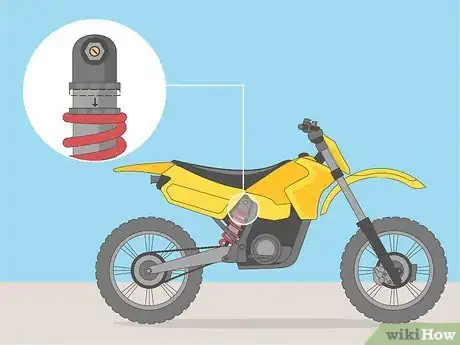
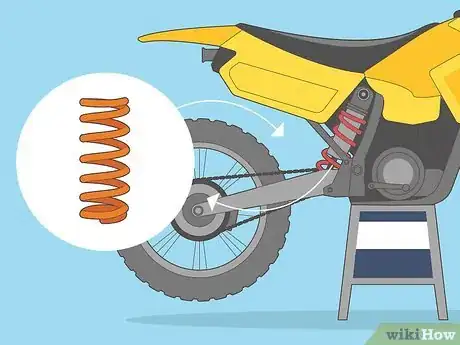
1Change the rear shock spring preload to tweak rider sag. Tighten the shock collar to compress the spring and add more preload; this pushes up with more force and reduces sag. Loosen the shock collar to reduce tension on the spring, increasing sag and making your suspension softer.
- Most dirt bikes shock springs are held in place by two metal collars or lock nuts at the top. To adjust spring preload without a special tool, first loosen the top collar or lock nut by placing a punch tool or a blunt chisel against it, then striking the end with a mallet. Once this is loose, adjust the bottom collar or nut by hand to tighten or loosen the spring. Tighten the top collar again once you're done.
- Turn a collar clockwise (looking from above) to tighten or counter-clockwise to loosen.
- As a rule of thumb, one full rotation of a lock nut is 2 or 3 mm of sag adjustment. Mark one edge of the nut to track this.[11]
-
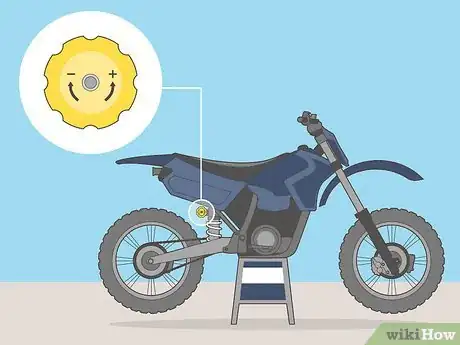
2Look for pinch bolts or knobs if there is no collar. Check these instructions if your shock doesn't have the typical collar-and-spring setup, or if it has additional adjusters installed:
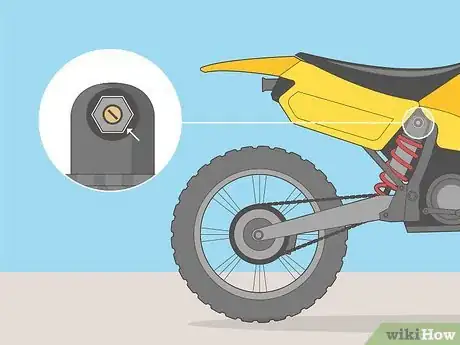
- On most KTM or Husqvarna dirt bikes, loosen the pinch bolt with a hex key, then adjust the single plastic nut to adjust the spring preload. Tighten the pinch bolt again when you're done.[12]
- Most hydraulic preload adjusters have a simple knob on the shock or attached to it by a hose. (If you didn't have one of these installed, any wheel on your shock is more likely to adjust compression or rebound, not preload.)[13]
-
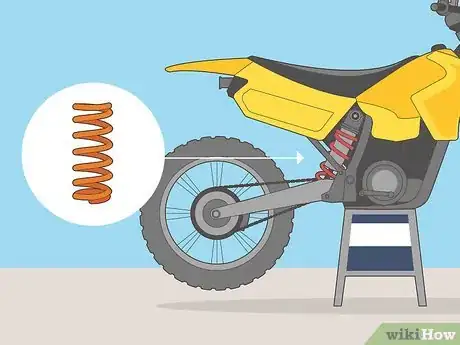
3Switch your coil if you have to make large adjustments. Adjusting spring preload can only get you so far if the coil on your shock isn't right for your weight. A stiffer coil with a higher spring rate will reduce your sag, while a softer coil with a lower spring rate will increase it.
- You can check your coil by measuring your static sag after making these adjustments. That's the vertical distance your bike sags under its own weight, compared to when it's on a stand with both wheels in the air. If the static sag is outside the range recommended in your owner's manual, get a new coil.
How do I measure and account for static sag?
-
1Measure the amount your bike sinks under its own weight. Start with your bike on a stand that puts zero weight on the wheels. Measure the distance in millimeters from the rear axle bolt directly upward to any point on the bike body, and mark this point with a pen. Now put the bike on the ground, with no rider or gear on it, and measure between the same two points. The amount this measurement has changed is the static sag.
- For example, if you measure 580mm in the air and 540mm on the ground, the static sag is 580 - 540 = 40mm.
- If you already measured your rider sag (which is recommended before doing this), you already have the first measurement.
-
2Check your owner's manual for the target static sag. As a rule of thumb, a dirt bike with a 125cc or larger engine usually wants a static sag between 25 and 30 mm, while smaller bikes can have a target static sag as low as 8 to 10 mm. That said, it's always best to check the owner's manual for your model.
-
3Change your shock coil to fix your static sag. If you've set your rider sag correctly, but your static sag is outside of your model's intended range, then the coil on your shock is not right for your weight. Choose a coil with a higher spring rate if you need to reduce static sag, or a lower spring rate to increase sag.
- If your bike has to handle a wide range of loads (for instance, it is used by two riders of different weights), you can install preload adjusters and/or a coil with an adjustable spring rate.[14]
- If your goal is to get more ground clearance, consider a taller suspension with more total travel instead of making extreme adjustments to your preload. You can then set your rider sag near the recommended setting of 30% of your suspension's total travel, but your bike will be higher off the ground.[15]
- After replacing the coil, measure and adjust your rider sag again, then measure the static sag again.
How do I stiffen or soften the front forks?
-
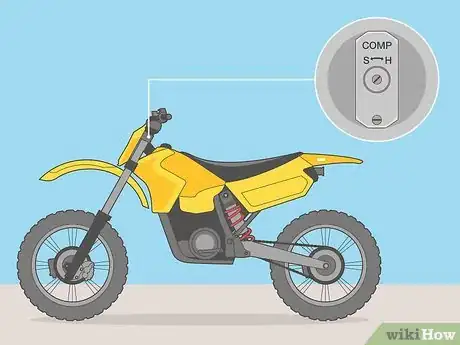
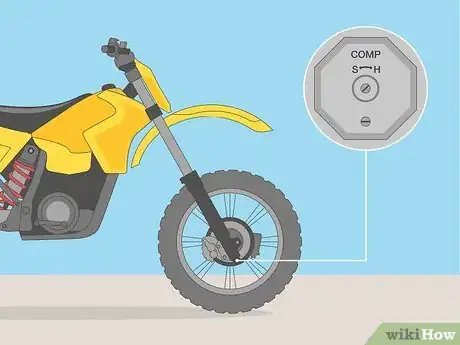
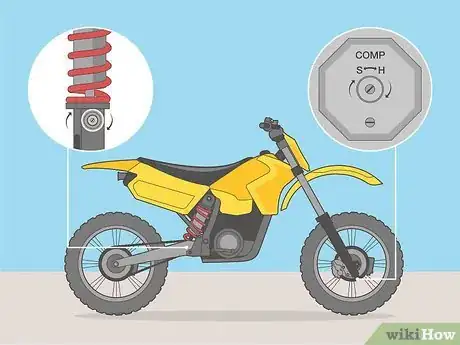
1Turn the compression clicker to adjust fork stiffness. Look for the flathead screw labeled "C" or "comp" at the top or bottom of your forks.[16] This "clicker" controls the fork compression, or how fast the fork shortens during impact.[17] Adjust this one or two "clicks" at a time between test rides, using a flathead screwdriver.[18]
- Wind clockwise toward the "H" for harder compression. Stiff compression is better for soft terrain like sand, and for large, rolling bumps and hills.[19]
- Wind counter-clockwise toward the "S" for softer compression. This is best for rough terrain full of small bumps.[20]
- If your clickers are unlabeled, check your owner's manual to identify them.
-
2Bleed air out of your forks before each ride to maintain this setting. The air inside your forks is part of their suspension system, cushioning their movement as they compress. As you ride, friction builds up the air pressure and makes compression harsher.[21] To prevent this messing with your settings before a ride, lift the front wheel off the bike to take the weight off the fork, then loosen the air bleed screw at the top of the fork. Tighten it again before putting the bike back on the ground.[22]
- It's best to do this before each ride, when your bike is cool.[23] Bleeding out hot, higher-pressure air after a ride will get rid of too much air and leave you with a too-soft compression once the air that's left cools.
How do I adjust the rear shock compression?
-
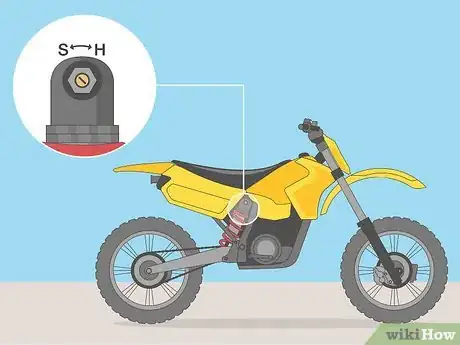
1Adjust the low-speed compression to alter riding feel. This setting is almost always controlled by the compression clicker at the top of your shock: a flathead screw that clicks as it turns.[24] This low-speed compression or LSC setting controls how your suspension behaves during gradual compression: driving over hills, braking, or accelerating.
- Turn the screw clockwise toward "H" for a harder compression, or counter-clockwise toward "S" for a softer compression.
-
2Change the high-speed compression for impacts. On a typical bike, the high-speed compression (HSC) is controlled by a nut set around the LSC screw, or by a separate nut nearby. Turning this nut changes how the damping works while the shock compresses quickly, for instance from an impact after a jump.[25] Use a wrench to turn this clockwise for a stiffer compression during impacts, or counter-clockwise for a softer one.
- Unlike the clickers, this turns smoothly instead of clicking through discrete settings. Draw a line across the edge of the nut and the shock to keep track of its starting position. The HSC is pretty sensitive: a 1/2 turn makes a sizeable difference.[26]
- Try stiffening your HSC if your rear wheel bottoms out hard on impacts (hitting the front face of a jump, landing a jump, riding over a series of square edge bumps).[27]
- Try softening your HSC if your suspension isn't using the full stroke when landing a high jump, or if your bike kicks or deflects when it hits a braking bump.[28]
How do I adjust the rebound?
-
1Turn the rebound clickers on your forks. Look for the flathead screw labeled "R" at the top or bottom of your forks. Twist this "clicker" one or two clicks at a time between test rides using a flathead screwdriver. This controls how fast the forks rise up again after they compress.
- Wind clockwise toward "H" (hard) for a slower rebound. Your bike will handle better over rolling hills and large bumps if its rebound is slow enough to let the wheel hug the ground, instead of skipping up and down.[29]
- Wind counter-clockwise toward "S" (soft) for a faster rebound. A fast rebound lets your fork move quickly to adjust to rapid changes on bumpy ground.[30]
- Check your owner manual if your clickers aren't labeled.
-
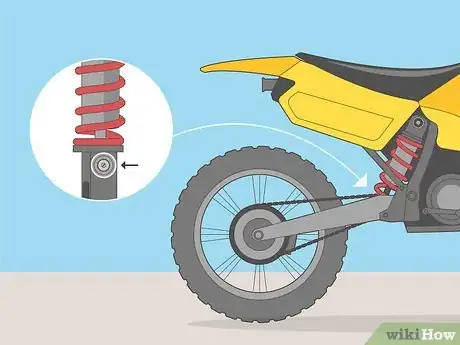
2Adjust the shock rebound clicker. Now look for a similar screw at the rear of your bike, almost always on the bottom of the shock. This works the same as the front rebound clicker, controlling the rebound over the rear wheel.[31]
- On some bikes, you'll need a friend to push down on the bike seat to shift things around and make this clicker accessible.[32]
- Some bikes have a simple hand-turned wheel around the base of the shock instead of a screw.
-
3Change your rebound if your bike bucks or skips. It's not always intuitive how to set your clickers. If your bike's not handling bumps, try these approaches:[33]
- If your rear wheel gets low over choppy ground, then bucks up suddenly, soften the shock rebound. This lets your shock extend up again between bumps, instead of "packing"—getting forced lower and then bucking up the full travel.
- If bumpy ground makes your front wheel skip or your handlebars shake, soften the fork rebound.
- If adjusting the rebound clickers doesn't fix these problems, change the compression. Pay attention to how your bike feels: a wheel that bottoms outs when you accelerate has too soft a compression. A wheel that skips over bumps instead of hugging the ground has too stiff a compression.
Warnings
References
- ↑ https://motocrossactionmag.com/living-with-the-race-free-sag-convergence/
- ↑ https://motocrossactionmag.com/living-with-the-race-free-sag-convergence/
- ↑ https://motocrossactionmag.com/living-with-the-race-free-sag-convergence/
- ↑ https://motocrossactionmag.com/living-with-the-race-free-sag-convergence/
- ↑ https://www.dirtbikeearth.com/how-to-adjust-dirt-bike-suspension-to-your-weight-how-to-set-dirt-bike-sag-101-series/
- ↑ https://www.dirtbikeearth.com/how-to-adjust-dirt-bike-suspension-to-your-weight-how-to-set-dirt-bike-sag-101-series/
- ↑ https://www.procircuit.com/content/Setting%20the%20Sag.pdf
- ↑ https://enduro-mtb.com/en/setup-guide-mtb-suspension/
- ↑ https://dirtbikemagazine.com/amp/race-sag-set-up-mr-know-it-all/
- ↑ https://www.singletracks.com/mtb-gear/five-common-mountain-bike-suspension-misunderstandings/
- ↑ https://www.dirtbikeearth.com/how-to-adjust-dirt-bike-suspension-to-your-weight-how-to-set-dirt-bike-sag-101-series/
- ↑ https://www.dirtbikeearth.com/how-to-adjust-dirt-bike-suspension-to-your-weight-how-to-set-dirt-bike-sag-101-series/
- ↑ https://youtu.be/CCCl2KBpP5g?t=631
- ↑ https://youtu.be/CCCl2KBpP5g?t=250
- ↑ https://youtu.be/CCCl2KBpP5g?t=215
- ↑ https://youtu.be/aTiAeY2lVSo?t=309
- ↑ https://www.dirtbikeplanet.com/dirt-bike-suspension/
- ↑ https://www.dirtrider.com/features/adjusting-your-suspension-clickers/
- ↑ https://www.dirtrider.com/features/adjusting-your-suspension-clickers/
- ↑ https://www.dirtrider.com/features/adjusting-your-suspension-clickers/
- ↑ https://dirtbikemagazine.com/ten-things-you-need-to-know-about-motocross-forks/
- ↑ https://www.dirtbikeplanet.com/dirt-bike-suspension/
- ↑ https://dirtbikemagazine.com/ten-things-you-need-to-know-about-motocross-forks/
- ↑ https://www.dirtbikeplanet.com/rear-shock/
- ↑ https://youtu.be/9H0513NHEDw?t=129
- ↑ https://youtu.be/9H0513NHEDw?t=408
- ↑ https://youtu.be/9H0513NHEDw?t=336
- ↑ https://youtu.be/9H0513NHEDw?t=366
- ↑ https://www.dirtbikeplanet.com/dirt-bike-suspension/
- ↑ https://www.dirtbikeplanet.com/dirt-bike-suspension/
- ↑ https://www.dirtbikeplanet.com/rear-shock/
- ↑ https://motocrossactionmag.com/mxa-wrench-tech-how-to-dial-in-your-shock-in-20-easy-steps/
- ↑ https://motocrossactionmag.com/bare-bones-why-your-suspension-is-is-packing-what-to-do-about-it/
- ↑ https://youtu.be/CCCl2KBpP5g?t=404
- ↑ https://www.dirtbikeplanet.com/dirt-bike-suspension/
- ↑ https://www.cycleworld.com/sport-rider/suspension-setup-guide/
