This article was co-authored by Katie Quinn. Katie Quinn is an Image Consultant, Personal Wardrobe Stylist and the Founder of Q the Stylist, an image consulting service based in New York City helping men and women understand their specific goals, improve their wardrobe, performance, and life. She has over 11 years of image consulting experience and has worked as a stylist for Trunk Club, Modewalk, and Moda Operandi. Her work has been featured in Vogue, InStyle, Martha Stewart Weddings, Sheridan Road, Slate, Newsy, Rue, and Thrillist.
There are 11 references cited in this article, which can be found at the bottom of the page.
This article has been viewed 161,513 times.
Bra inserts are removable pads that add extra lift, definition, shape, and coverage. If you want a natural boost, some additional coverage, enhanced cleavage, or an added cup size, select a set of inserts in either cotton, polyester, or silicone materials. Slide them into your bra or bathing suit, and you’ll instantly notice the difference!
Steps
Selection
-
1Use half-size bra pads if you want a minor, natural boost. If you want to add just a little extra lift and definition but don’t need a full cup size difference, go for bra pads that line the bottom of your bust. They offer a natural appearance while still adding fullness. Typically, these come in 1 size, though you can also find them in sizes small, medium, or large.
- These are great for formal wear and day-to-day bras.
- You can also use these in sports bras if you want a little extra coverage. These are not recommended for bathing suits, as they aren't full size.
- These usually come in round or oblong shapes.
-
2Go with bust enhancer pads if you have a smaller or asymmetrical bust. Shop for pads that are labeled as “bust enhancer pads,” or something similar. Opt for 2 pads if you’d like to make your bust look a little bigger, or use a single pad to even out your bust.[1]
- These pads usually provide complete coverage.
-
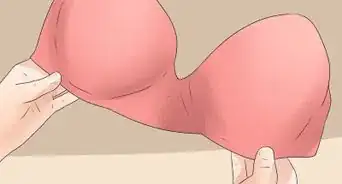
3Select full-size, push-up inserts for added lift and extra cleavage. For voluptuous, sexy looks, consider using push-up pads. These slide into your bra and provide full-coverage lift and definition. You can purchase your push-up inserts based on your bra size.[2]
- Push-up inserts go great with nightlife outfits or date night!
- Full-size inserts are triangular in shape.
-
4Choose silicone inserts for maximum lift and bust enhancement. Silicone inserts are squishy plastic pads you add to the bottom of your bra for increased shape, lift, and cleavage. Their thick base helps lift your breasts up and forward for the ultimate addition to your bra. Typically, these come in 1 uniform size. [3]
- They can add up to a cup size!
- Silicone inserts come in round or half-moon shapes. They are usually transparent.
-
5Use the padding from an old bathing suit or bra for a free option. Instead of purchasing inserts, you can use the ones you already own. Most bathing suit tops have removable pads secured by a small flap of fabric. Some sports bras also come with removable padding. To remove your inserts, separate both layers of fabric from the bra or bathing suit, and pull out the insert.[4]
- You can always put it back in your swimsuit or bra later.


Placement & Position
-
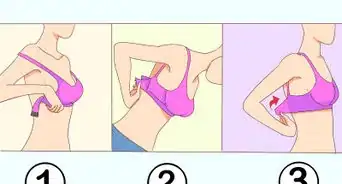
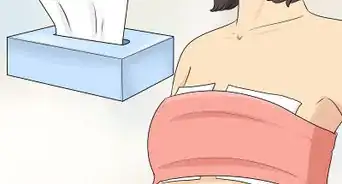
1Put on your bra. Fasten the band of your bra to a comfortable size, and slip your straps over your shoulders.[5]
- You will add your inserts to your bra after it is on your body.
-
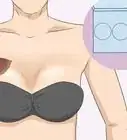
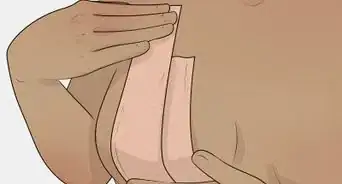
2Slip the inserts into both cups of your bra so they sit at the bottom. Pull the cup of your bra forward, and place an insert inside. Then, do this for the other cup. The thickest part of the insert should be at the bottom of your breast.[6]
- Adjust it into place so it fits comfortably on top of the bottom band of your bra.
- The insert will sit between your bra and your skin.
- If you don't want your insert to shift around, try holding it in place with double-stick fashion place. You can also double-up with a safety pin or even sew them into place, if you'd like.[7]
-
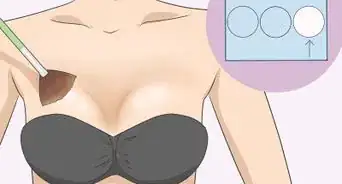
3Put on a shirt to check the insert placement and adjust them if needed. After your inserts are situated, get dressed and check yourself out in the mirror. Look at the sides and shape of your breasts, and adjust your inserts if you need to. If one side looks fuller than the other, adjust the inserts so both sit completely under your bust. These should stay in place all day. but you should double-check throughout the day just in case.[8]
- Check out how great you look!


Inserts for Swimwear
-
1Locate the opening of your bathing suit top. For most bathing suits, the opening begins along your bust line, usually placed at the outer corner of your top towards your arms. Lay your bathing suit top on a flat surface, and run your fingers along the bust line to locate the opening.[9]
-
2Cut a slit into the lining if your top doesn’t have an existing opening. If your bathing suit does not have an opening, that’s okay! Grab a pair of scissors, and cut a slit about 1–2 inches (2.5–5.1 cm) wide in the lining of your suit along your bust line. Make sure you only cut the lining of your top, not the actual bathing suit itself.[10]
- To cut discreet holes, you can make your cuts on the corner closest to your underarm. Cut them along the bottom band of your bathing suit top.
-
3Stick your insert inside the opening in your bathing suit top. You can lightly squeeze the sides of the inserts, and push them into the opening or the slit you cut. Your inserts will stay in place because they are larger than the size of your slits.[11]
- If using full-size inserts, fold them in half before you insert them and let them unfold into full shape when they are inside.
-
4Adjust your inserts as needed so they lie flat in your top. Use your fingers to slide around the insert so it is flush with your bathing suit top.
- If you have full-size inserts, position the triangle shape so it aligns correctly with the shape of your top.
- If using half-size inserts, they should line the bottom of your bathing suit.
-
5Sew your inserts into place if you’d like. After you slip the inserts into the liner, thread a sewing needle so you can stitch up the hole you cut. Pierce your needle through the lining at the edge of your slit, and pull your needle through to the other side of the lining. This is how you can make your stitches. Then, bring your needle back through the top to repair the small hole you cut.
- Make your stitches starting at the beginning of the slit, and tie a knot at the end of your thread when you reach the end.
- While this is not required, it will help keep your insert securely in your top.
- This applies for both bathing suits that have openings and those that you cut yourself.


Care & Cleaning
-
1Wash your inserts after each use. To keep your inserts clean, it is best to wash them after each time you wear them.[12]
- Cotton or polyester inserts can be washed with your other clothing, but silicone inserts must be hand washed.
-
2Launder your cloth inserts with your other clothes. Bra pads made of cotton or polyester can easily go into your wash. Rinse your clothes on a gentle cycle with mild detergent, and you can wash them with similar colors.[13]
- You can throw them into a lingerie bag and wash them with your bras if you’d like.
- If you put your inserts inside your bathing suit, you can wash the top with the inserts inside.
-
3Clean your silicone inserts with a washcloth, soap, and water. When you are ready to wash your silicone inserts, hold your inserts under running warm water. Apply hand or dish soap to a washcloth, and clean the cups in a circular motion. Rinse off any remaining soap and water.[14]
- Use a dime-sized amount of soap to wash your inserts. This should be plenty to use for both of them.
-
4Let your inserts air dry. Rather than machine drying your inserts, leave both your cloth and silicone inserts out to dry. If the inserts are folded or shaped oddly after the wash, you can reshape them with your hands before you lay them to dry. Silicone inserts will dry in about 30 minutes, and you can use a towel to pat them dry. Cloth inserts will dry in 2-4 hours.[15]
- You can clip your inserts to a drying rack or leave them lying on a flat surface.


Expert Q&A
-
QuestionHow do you keep bra inserts in place?
 Katie QuinnKatie Quinn is an Image Consultant, Personal Wardrobe Stylist and the Founder of Q the Stylist, an image consulting service based in New York City helping men and women understand their specific goals, improve their wardrobe, performance, and life. She has over 11 years of image consulting experience and has worked as a stylist for Trunk Club, Modewalk, and Moda Operandi. Her work has been featured in Vogue, InStyle, Martha Stewart Weddings, Sheridan Road, Slate, Newsy, Rue, and Thrillist.
Image ConsultantUse double-stick fashion tape to help keep your bra inserts in place. If you're going to be wearing them for a long time, you might want to double up with a safety pin. If you wear your bra inserts every day, I would suggest hand-sewing them in or getting a bra where they're already built in.


References
- ↑ https://www.swimoutlet.com/guides/how-to-choose-a-bra-pad
- ↑ https://www.swimoutlet.com/guides/how-to-choose-a-bra-pad
- ↑ https://youtu.be/zztd4cc9h-M?t=12s
- ↑ https://youtu.be/0SeSHxd53AA?t=4m12s
- ↑ https://youtu.be/bbs1G5wQMfU?t=43s
- ↑ https://youtu.be/bbs1G5wQMfU?t=42s
- ↑ Katie Quinn. Stylist. Personal interview. 8 May 2020.
- ↑ https://youtu.be/bbs1G5wQMfU?t=47s
- ↑ https://youtu.be/WOVyF_MB7GI?t=32s
- ↑ https://youtu.be/WOVyF_MB7GI?t=32s
- ↑ https://youtu.be/WOVyF_MB7GI?t=38s
- ↑ https://jezebel.com/the-great-bra-washing-extravaganza-509259173
- ↑ https://jezebel.com/the-great-bra-washing-extravaganza-509259173
- ↑ https://jezebel.com/the-great-bra-washing-extravaganza-509259173
- ↑ https://jezebel.com/the-great-bra-washing-extravaganza-509259173
About This Article

Bra inserts are removable pads that add a little extra lift and definition. To put them in, first, put on your bra. Then, slip the inserts into both cups so they sit near the bottom. Make sure that the thickest part of the insert sits near the bottom of your bra for proper support. Put your shirt back on to check the placement, then you can adjust them if needed. If you want to put inserts into swimwear, locate the opening in the lining, which should be on the outer corner of the inside of the cup. Fold the insert in half before sliding it into the cup. Then unfold them when they’re inside. To learn which type of bra inserts will work best for you, read on!