wikiHow is a “wiki,” similar to Wikipedia, which means that many of our articles are co-written by multiple authors. To create this article, volunteer authors worked to edit and improve it over time.
This article has been viewed 50,395 times.
Learn more...
Have you ever wanted to see live footage from your home or your office on the internet? Watching IP cameras’ footage on the internet requires a bit more of modem/router and IP camera configurations than on a local network, and you have to configure port settings on cameras and port forwarding on modem/router. In this tutorial we are going to drill down to its setup steps. However, port forwarding set up is reliant on the specific brand and model number of the modem/router being used, and also the required IP camera ports to be forwarded also differ in various IP camera brands. Thus we are going to show you how to get the hang of this procedure’s concepts and apply them to different devices.
Steps
IP Camera settings
-
1Figure out which devices you will use. In this tutorial we have used D-Link DSL 2750U router with an IP address of 192.168.1.1, as well as two RedLeaf DF-2011 IP cameras with the IP addresses of 192.168.1.20 and 192.168.1.30. Please note that you must have a static IP address at the installation location of the cameras so you can see the streams from the IP cameras.
- If you would like to watch more than a few IP cameras, it’s recommended to use your NVR (Network Video Recorder) port settings (i.e. using the web client of your NVR) instead of those of every single IP camera.
-
2Log into the IP camera web console. Enter its IP address in your web browser’s address bar (e.g. 192.168.1.20). The default username/password of RedLeaf IP cameras is admin/admin. If this doesn't work, contact the camera providers to figure out your username and password.Advertisement
-
3Install any necessary software. The browser may prompt you to install an appropriate plug-in to show the live video stream, like Quicktime, which you can download here.
- If necessary, minimize the security and privacy levels of the browser to get the required plug-ins or built-in Active-X installed. (e.g. “Phishing and malware protection” or “Pop-up allowed” options may temporarily need change in defaults)
-
4Make sure you can see the live video stream of the camera before you proceed to next steps.
-
5Perform the port forwarding. In your camera’s web console, click on Setup tab and then Open Network > UPnP menu. In order to manually perform the port forwarding in the modem/router, you may uncheck “Enable” box, and let the “Router State” remain in failure state. Click on Save button to save the changes.
-
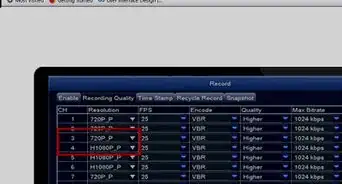
6Configure the TCP/UDP ports. Open Network > Connection menu. Apart from https port which is optional to use, you need to forward the other four ports respectively in your modem. But before proceeding to the next step (if no NVR server is used) make sure that you have set unique TCP, UDP, HTTP, and RTSP port numbers to each of the IP cameras. Unique port numbers help the modem to properly recognize the proper IP camera for which the requested traffic is deemed to, thus routing would be accomplished correctly.
-
7Set your IP settings. In this example we have set the following network settings for Camera #1 and #2.b|IP table]]

-Step-2.jpg)
-Step-3.jpg)
-Step-4.jpg)
-Step-5.jpg)
-Step-6.jpg)
-Step-7.jpg)
Modem/Router Configuration
-
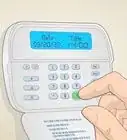
1Navigate to the virtual server. Log in to your modem by entering its username and password, then navigate to Advanced Setup > NAT > Virtual Servers. This tab’s name and location may be different in other router brands. In a Linksys modem you may find Single Port Forwarding page in Applications and Gaming tab with a slightly different configuration options.
-
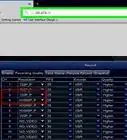
2Perform the port forwarding. Click on Add to have a new record of virtual server added. User Interface is the external interface connected to your ISP and needs a static IP address already set. Click on Custom Service and choose an appropriate name for the supposed camera (e.g. Readleaf_20). Check Enable Loopback box and enter the IP address of your camera in the Server IP Address Field. Fill in the virtual server table as shown below and save the changes.
- The same procedure applies to the second camera, but make sure you apply different Custom service name, Server IP address, External and Internal port numbers.
-
3Navigate to the live video. Open your browser on a computer connected to the internet that you want to watch the stream from the IP camera, and enter the public IP address (i.e. your static IP address) followed by the http port of your IP camera (e.g. 87.117.243.10:8020). When you are logged in, you should be able to see the video of the camera by clicking on the Live tab.
-
4Reset security defaults. After assuring that you can see the video from camera you can revert the security modification applied in Step 5 to its previous values so the security warning will no longer appear.
-Step-8.jpg)
-Step-9.jpg)
-Step-10.jpg)
-Step-11.jpg)