This article was co-authored by wikiHow staff writer, Amber Crain. Amber Crain has been a member of wikiHow’s writing staff for the last six years. She graduated from the University of Houston where she majored in Classical Studies and minored in Painting. Before coming to wikiHow, she worked in a variety of industries including marketing, education, and music journalism. She's been a radio DJ for 10+ years and currently DJs a biweekly music program on the award-winning internet radio station DKFM. Her work at wikiHow supports her lifelong passion for learning and her belief that knowledge belongs to anyone who desires to seek it.
There are 17 references cited in this article, which can be found at the bottom of the page.
The wikiHow Video Team also followed the article's instructions and verified that they work.
This article has been viewed 20,710 times.
Learn more...
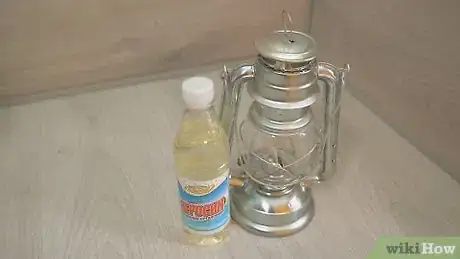
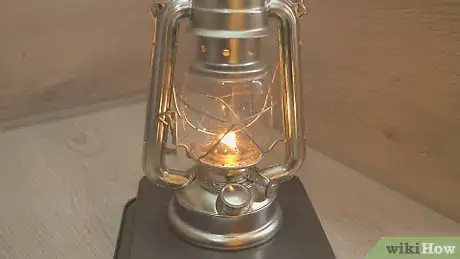
Oil lamps are useful to have around for power outages and camping trips, but they're more than just practical tools! Their warm, intimate glow is perfect for mood lighting and they make stunning decor at weddings and parties. There are tons of styles to choose from, from basic utilitarian storm lamps to ornate glass designs and gorgeous antiques. No matter what kind of oil lamp you have, operating it is really easy! All you need is lamp oil and a flame to light the lamp's wick.
Steps
Filling the Lamp with Oil
-
1Use kerosene or standard lamp oil to fill up most lanterns. Use the oil that the manufacturer recommends for your lantern. In most cases, this is kerosene or standard lamp oil. Always buy a clear, clean-burning oil (the label should say this clearly) for your lamp. Other oils release toxic fumes as they burn, and you definitely want to avoid breathing those in.[1]
-
2Try non-purified kerosene or citronella oil for outdoor lamps. Clear kerosene and lamp oil work great for outdoor lanterns too, but since fumes are less of a concern outside, you have a few more options. Non-purified kerosene and citronella are both safe to use in outdoor lanterns.[4]
- Citronella oil is particularly useful on camping trips since it's an effective mosquito deterrent.
- Paraffin oil is also an option, but it doesn’t burn well or as brightly.
Advertisement -
3Unscrew the fuel cap to get to the oil tank on a spring-loaded outdoor lamp. There are 2 main lamp styles: spring-loaded hurricane lanterns and indoor oil lamps. If yours has a sturdy metal frame with a metal ring on top, it's a spring-loaded lamp. To get to the oil reservoir, just unscrew the small, round cap on the lantern's base.[5]
- Since spring-loaded lamps are sturdy and completely enclosed, they're less likely to spill.
- You can use spring-loaded lamps indoors, too! Just remember to use clear kerosene or lamp oil when you're inside.
- You can’t miss the fuel cap – it looks like a screw-off bottle cap.
-
4Lift the globe and unscrew the collar to add fuel to an indoor lamp. Indoor lamps are usually placed on tabletops or other sturdy surfaces to light a room. These usually don't have metal frames or springs—you just lift the globe right off the top of the lamp. Then, unscrew the metal burner from the base to get to the oil reservoir.[6]
- Indoor lamps aren't as sturdy as the spring-loaded variety. Don't use them for camping or outdoor use unless you have to.
-
5Pour the oil directly into the oil tank until it’s about 2/3 full. For narrow openings, use a funnel to add oil to the reservoir without making a mess. Otherwise, just pour the oil straight in. Don’t fill up the reservoir completely, though! Fill it about 2/3 of the way and then screw the cap back on if you have a spring-loaded lamp. If you have an indoor lamp, screw the metal burner back on.
-
6Wait 10-20 minutes so the wick can soak up the oil. It takes a brand-new wick a few minutes to soak up the oil. Wait until the wick is saturated with oil before lighting it. To check, just touch the end of the wick to make sure it feels wet. If it does, you’re all set! If it feels dry, wait a few more minutes.[9]
- A dry wick creates a lot of smoke and burns unevenly, so it's worth the wait!
Lighting the Wick
-
1Push down the springs to remove the globe on a spring-loaded lantern. To get to the metal burner and wick, push the springs down on the sides of the globe. Then, gently pull straight up on the metal top of the lamp to release and remove the globe.[10]
- The metal top of a spring-loaded oil lamp is called a chimney.
- If you have an indoor lamp, you don't need to do anything. You removed the globe earlier to add the oil. If you happened to put the globe back on, just lift it off again.
-
2Twist the metal dial on the side to expose 1 in (2.5 cm) of the wick. The small metal dial, which looks like a tiny gear, is the wick adjuster. Twisting the dial allows you to adjust the wick up and down. Turn the dial to feed the wick through the metal burner until about 1 in (2.5 cm) of the wick is exposed.[11]
- You can lift the wick up more than this if you need better access to trim it. Just be sure to lower it back to the 1 in (2.5 cm) point before lighting it!
-
3Trim the charred end of the wick off if the lamp was previously used. If the lamp has been used before, the wick will have a charred edge from the previous burn. To get rid of the charred end, just cut straight across the wick's tip with sharp scissors.[12]
- Leaving the charred edge on your wick will create a lot of smoke.
-
4Cut the end of the wick to a point for the brightest light. Most brand-new wicks have flat tips. It's fine to light the flat wick as is, but trimming it changes the brightness of the light. Pointed wicks tend to create the brightest light. Keep in mind the oil will burn a little faster this way, though![13] Other options:
- Flat tip (slower burn, medium brightness)
- Round tip (cleaner burn, medium brightness)
- Double-point tip (very bright)[14]
-
5Light the end of the wick and lower the globe over the flame. For indoor lanterns, just grab a regular lighter, flick it, and hold the flame over the tip of the wick. The wick should catch fire easily. Then, gently put the glass globe back in place to shield the flame.[15]
- If you had to unscrew the globe, be sure to screw it back in firmly.[16]
-
6Put the globe back before lighting the wick on a spring-loaded lantern. Lift the chimney and place the globe over the burner. Let go of the chimney and raise the springs up on each side of the globe. To access the burner assembly, pull down the lever to raise the globe. Hold a match over the burner to light the wick.[17]
- Once the wick is lit, just raise the lever back up to its original position. This lowers the globe into place.
-
7Twist the wick adjuster to adjust the lamp's brightness. Adjust the wick until only the flame is visible, not the wick itself, for a standard amount of light. To increase or decrease the brightness, use the wick adjuster. Raising the wick creates brighter light and lowering it dims the light.[18]
- If the wick is creating black smoke, the flame is too big.
-
8Put the lamp on a stable surface in a low-traffic area to prevent spills. Flat, stable surfaces like tabletops are best, especially indoors. Choose a spot far away from flammable drapes and decorations. Make sure kids and pets can't get close to the lamp to avoid dangerous spills.[19]
- It's safe to hang a spring-loaded lantern from a nail or hook as long as it has a metal ring on top.
-
9Lower the wick until the flame goes out to extinguish the lamp. Never burn your lamp unattended! If you're leaving the area or going to sleep, extinguish the lantern first. Use the wick adjuster to lower the wick all the way until the flame goes out.[20]
- If your lamp is getting low on oil, extinguish the flame before adding more to prevent fire hazards. Never add oil to a lamp with an active flame.[21]
Warnings
- Never top off the oil tank when the lantern is lit. Extinguish the flame first.⧼thumbs_response⧽
- Never leave a burning oil lamp unattended.⧼thumbs_response⧽
- Don't pour gasoline, Coleman fuel, white gas, paint thinner, wood alcohol, diesel, naphtha, turpentine, or any other explosive fuel in your oil lantern.[23]⧼thumbs_response⧽
Things You’ll Need
- Kerosene or lamp oil
- Scissors
- Lighter or matches
References
- ↑ https://www.youtube.com/watch?v=QdAXQypueQg&feature=youtu.be&t=117
- ↑ https://www.antiquelampsupply.com/type-of-oil-used-in-oil-lamps
- ↑ https://www.outdoorlife.com/blogs/survivalist/2012/04/survival-gear-which-fuels-use-and-which-avoid-oil-lamps/
- ↑ https://www.youtube.com/watch?v=QdAXQypueQg&feature=youtu.be&t=124
- ↑ https://www.youtube.com/watch?v=QdAXQypueQg&feature=youtu.be&t=150
- ↑ https://www.youtube.com/watch?v=_K404FtBIsM&feature=youtu.be&t=112
- ↑ https://www.youtube.com/watch?v=QdAXQypueQg&feature=youtu.be&t=158
- ↑ https://lightenel.com/all-you-need-to-know-about-oil-lamps-with-wicks/
- ↑ https://www.youtube.com/watch?v=QdAXQypueQg&feature=youtu.be&t=584
- ↑ https://www.youtube.com/watch?v=QdAXQypueQg&feature=youtu.be&t=345
- ↑ https://theprepperinsider.com/how-to-fill-and-use-an-oil-lamp/
- ↑ https://lightenel.com/all-you-need-to-know-about-oil-lamps-with-wicks/
- ↑ https://www.youtube.com/watch?v=XDHuK6waXWA&feature=youtu.be&t=55
- ↑ https://www.youtube.com/watch?v=_K404FtBIsM&feature=youtu.be&t=536
- ↑ https://www.youtube.com/watch?v=_K404FtBIsM&feature=youtu.be&t=981
- ↑ https://theprepperinsider.com/how-to-fill-and-use-an-oil-lamp/
- ↑ https://www.youtube.com/watch?v=QdAXQypueQg&feature=youtu.be&t=611
- ↑ https://www.youtube.com/watch?v=QdAXQypueQg&feature=youtu.be&t=652
- ↑ https://fireflyfuel.com/holiday-oil-lamp-candle-safety
- ↑ https://www.youtube.com/watch?v=QdAXQypueQg&feature=youtu.be&t=652
- ↑ https://fireflyfuel.com/holiday-oil-lamp-candle-safety
- ↑ https://fireflyfuel.com/holiday-oil-lamp-candle-safety
- ↑ https://www.outdoorlife.com/blogs/survivalist/2012/04/survival-gear-which-fuels-use-and-which-avoid-oil-lamps/

