This article was co-authored by Audra Fordin and by wikiHow staff writer, Eric McClure. Audra Fordin is a Certified Automotive Technician, the Founder of Women Auto Know, and the Owner of Great Bear Auto Repair in Flushing, New York. With more than 38 years of experience, she has intensive knowledge about foreign and domestic auto repairs. Audra has been featured on numerous news and talk shows such as The Today Show, Inside Edition, and Anderson Cooper.
There are 9 references cited in this article, which can be found at the bottom of the page.
This article has been viewed 259,652 times.
A torque wrench is a special tool designed to accurately tighten nuts and bolts to specific levels. It is almost universally used to work on cars and bikes, and it can only be used to tighten something. Torque wrenches are adjusted by hand, so you don’t need any other tools to operate one. To use a torque wrench, adjust the handle and set it to a specific level of torque. Use the tightener on the end of the handle to lock it in place. Then, fit it over the socket, nut, or bolt and turn it clockwise to tighten it. When you’re done, turn the settings on the handle back to 0 and store it somewhere safe. Get your torque wrench calibrated at least once a year to ensure that the hash marks remain accurate.
Steps
Adjusting the Torque Wrench
-
1Loosen the tightener at the end of the wrench’s handle. Look at the end of your wrench’s handle to find the tightener that locks the settings in place. It is usually a plastic or metal cap that is stuck into the end of your wrench. Often, it is a different color than the rest of your wrench as well. Twist it counterclockwise by hand to loosen the piece so that you can change the wrench’s settings.[1]
- You don’t need to take it off of your wrench, just loosen it until you don’t feel a ton of resistance.
-
2Find and identify the torque measurements on your wrench. Inspect the area near your handle to find the hash marks for the torque setting. There will be 1 set of larger numbers on the body of the wrench and 1 set of smaller numbers on the handle. The smaller numbers are the smaller digits, while the larger numbers are the larger units.[2]
- Torque is measured in foot-pounds or meter-kilograms (ft-lb or m-kg). Your torque wrench will list 2 sets of numbers on the wrench’s hash marks. The lower number is the measurement in foot-pounds. The larger number is the measurement in meter-kilograms.
- The vertical location of the edge of the handle determines the baseline while the rotation of the handle determines the smaller digits. There is a center line on the wrench to show where the handle is set.
- For example, if the edge of the handle is on the hash mark for 100, and the smaller number on the handle itself is turned to 5, the torque setting for the wrench is 105 ft-lb (1397 m-kg).
Advertisement -
3Turn the dial to raise or lower the torque setting on the wrench. With the tightener loosened, brace the body of the wrench with your nondominant hand. Turn the handle clockwise to raise it, or counterclockwise to lower it. Once you reach the desired hash mark, stop turning the handle.[3]
- If you need to reach a specific number, raise the handle to the hash mark that is within 5 ft-lb (200 m-kg) of your number. So if you know you need to reach 140 ft-lb (1860 m-kg), raise the handle to the hash mark between 135-145 ft-lb (1795-1928 m-kg).
- Some torque wrench handles are slide up and down instead of twisting into place.
Tip: Refer to your car or bike’s manual to determine how much torque a nut or bolt requires to be safely set. There are no universal rules for torque settings on vehicles.
-
4Twist the dial on the handle to make minor adjustments. Once you’re close to the desired number, turn your attention from the height of the handle to the dial itself.[4] Follow the readings as you turn the handle slowly. As you turn clockwise, the number goes up. As you turn counterclockwise, the number goes down.[5]
- There are a few negative numbers after 0 so that you can move down a little as well.
- On some wrenches, the dial moves independently of the handle and you can twist it by turning the dial, not the handle.
-
5Add the smaller digit on the handle to the number on the larger hash mark to determine total torque. Once you’ve adjusted the handle’s height and twisted the dial, calculate your total torque to ensure that it’s accurately adjusted by adding the numbers together. Take the hash mark on your handle and add the number marked on the dial to get your torque. So if the dial reads 4, and the handle reads 50, your total torque is 54 ft-lb (718 m-kg).[6]
- You add the negative numbers as well. For example, if your hash mark is 120 and the dial is -2, you add 120 to -2 to get 118 ft-lb (1569 m-kg).
-
6Screw the tightener back into the end of the wrench by hand to lock it. To lock a torque setting into the wrench, flip it back over to the handle. Brace the wrench in your nondominant hand to keep it still. Twist the tightener clockwise by hand until it won’t move any more. This will lock the handle in place.[7]
- Once you lock the tightener, you cannot adjust your torque setting.


Tightening Nuts and Bolts
-
1Put your socket on the head of your wrench. To use your torque wrench, start by sliding a socket that matches your nut or bolt into the head of your torque wrench. If you have an extender or adaptor that you’re using, you can slide that into the opening at the head instead.[8]
- Torque wrenches come in different sizes, but the sockets are almost always interchangeable. Torque wrenches are expensive, so they rarely come in a single size.
-
2Turn the nut or bolt by hand until it catches the threading on the screw. Take the nut or bolt that you’re going to tighten and place it over the threading for the screw or opening on your vehicle by hand. Turn the vehicle’s nut or bolt clockwise with your fingers until the threading catches the threading on the screw. Turn the nut or bolt until it won’t turn by hand anymore.[9]
Warning: You should not use a torque wrench to make the threads initially catch. Torque wrenches provide a lot of power and if your nut or bolt isn’t perfectly aligned with the screw you could destroy the threading on both of them.
-
3Fit the socket on top of the nut or bolt that you’re tightening. With the nut or bolt set on the threading, hold the handle of the torque wrench in your nondominant hand. Use your dominant hand to guide the socket, adaptor, or extender on to the nut or bolt. Slide the wrench over the nut or bolt until the 2 pieces are flush.[10]
-
4Turn the handle clockwise to tighten the nut or bolt. Rotate the handle clockwise to begin tightening the nut or bolt. Almost all torque wrenches have automatic return functions so you don’t need to reposition them on the nut or bolt. For this type of wrench, simply move it counterclockwise to reset it. If you have a manual wrench, reposition it on the nut or bolt to continue torquing it down.[11]
- If you hear a clicking or switching noise when you return the handle counterclockwise, you have an automatically-returning torque wrench.
-
5Stop turning the wrench when it starts clicking or stops moving. If your automatic wrench clicks when you’re returning it, keep tightening the nut or bolt. If it starts clicking when you turn it clockwise though, stop tightening the nut or bolt. The clicking noise while tightening indicates that you have reached your desired torque level. On a manual wrench, stop turning it when you feel the wrench resisting.[12]
- So if you have the handle adjusted to 100 ft-lb (1330 m-kg) of torque, the bolt is tightened to that level the moment it starts clicking when you try to tighten it.
- Manual wrenches will simply stop moving after the nut or bolt has been turned to the intended level of torque.[13]


Maintaining Your Wrench
-
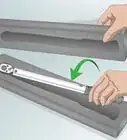
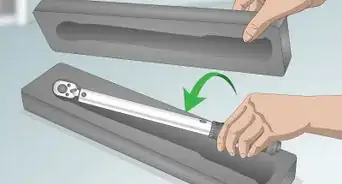
1Dial the wrench back to zero when you’re done using it. When you’re done using the wrench, turn both dial settings on the handle back to 0. Leaving the dial turned to a torque setting higher than 0 can throw the calibration off over time.[14]
- Turning the wrench to negative numbers is equally as bad for your wrench.
-
2Clean dirty or rusty nuts or bolts before loosening them. One of the easiest ways to damage your wrench is to allow rust and grime buildup inside your sockets. This makes it harder for your torque wrench to get an adequate grip on the socket and can cause a lot of problems over time. Clean each bolt or nut that you plan on tightening with a towel or rag before attaching your wrench.[15]
- Torque wrenches aren’t meant to be lubricated. Get any grease or lubricant off of your bolt or nut by using a degreaser before attaching a socket.
-
3Get your wrench calibrated at least once a year. Unless you have years of experience working on cars, it’s best to have a mechanic or torque wrench specialist calibrate your torque wrench for you. When using your torque wrench, a discrepancy will naturally develop between the measurements on your handle and the actual torque of the wrench. Fix this problem and prevent dangerous scenarios by getting your wrench calibrated once a year.[16]
- Calibration usually costs between $25-75 USD.
Tip: The rule of the thumb is that you need a calibration once a year or once per 50,000 clicks. If you work on cars or bikes every single day, you probably reach 50,000 clicks after 8-10 months. If you’re a DIY enthusiast though, you’re unlikely to hit 50,000 clicks before the year is up.


Community Q&A
-
QuestionHow do I pull out the bits from the torque wrench?
 wikiHow Staff EditorThis answer was written by one of our trained team of researchers who validated it for accuracy and comprehensiveness.
Staff AnswerwikiHow Staff EditorStaff AnswerYou should be able to simply pull it out by hand. If you can't, try twisting the bit counterclockwise to see if it loosens. If it doesn't, you may need to use a wrench or channel locks to get the bit off. -
QuestionI am interested in a torque wrench of 2' for tightening the thread size of M90X 2.6. Will this work?wikiHow Staff EditorThis answer was written by one of our trained team of researchers who validated it for accuracy and comprehensiveness.
Staff AnswerwikiHow Staff EditorStaff AnswerThe size of your wrench refers to the size of the socket at the end. This is totally independent from the threading on the nut or bolt that you're screwing in. To make sure threading matches, you need to check the threading on the inside of the nut or bolt. To do this, measure the distance between 2 threads with a ruler or measuring tape. This can be kind of hard to do, so you may need to use a magnifying glass. -
QuestionWhat is the torque for lug nuts on 2018 Honda CRV?wikiHow Staff EditorThis answer was written by one of our trained team of researchers who validated it for accuracy and comprehensiveness.
Staff AnswerwikiHow Staff EditorStaff AnswerThe torque for the lug nuts should be 80 pound-feet. Adjust your handle by turning the small dial to 0 and the handle itself to 80.
Warnings
- Dropping your wrench can throw the calibration off. Carry it with both hands when you’re walking around the garage to ensure that you don’t drop it.⧼thumbs_response⧽


References
- ↑ https://youtu.be/Nk_KSRCSokc?t=17
- ↑ https://youtu.be/Nk_KSRCSokc?t=30
- ↑ https://youtu.be/Nk_KSRCSokc?t=30
- ↑ Audra Fordin. Certified Automotive Technician. Expert Interview. 13 January 2022.
- ↑ https://youtu.be/Nk_KSRCSokc?t=49
- ↑ https://youtu.be/Nk_KSRCSokc?t=54
- ↑ https://youtu.be/Nk_KSRCSokc?t=72
- ↑ https://www.popularmechanics.com/cars/how-to/a6613/torque-wrench-101-how-to-get-the-right-amount-of-force/
- ↑ https://www.popularmechanics.com/cars/how-to/a6613/torque-wrench-101-how-to-get-the-right-amount-of-force/
- ↑ https://www.popularmechanics.com/cars/how-to/a6613/torque-wrench-101-how-to-get-the-right-amount-of-force/
- ↑ https://www.popularmechanics.com/cars/how-to/a6613/torque-wrench-101-how-to-get-the-right-amount-of-force/
- ↑ https://www.popularmechanics.com/cars/how-to/a6613/torque-wrench-101-how-to-get-the-right-amount-of-force/
- ↑ Audra Fordin. Certified Automotive Technician. Expert Interview. 13 January 2022.
- ↑ https://www.familyhandyman.com/tools/automotive-tools/how-to-use-a-torque-wrench/
- ↑ https://www.familyhandyman.com/tools/automotive-tools/how-to-use-a-torque-wrench/
- ↑ https://youtu.be/3v3hLvuO_KU?t=329
About This Article

A torque wrench is a unique tool that can be adjusted to tighten nuts and bolts to a specific torque level, which is measured in foot-pounds or meters per kilogram. To adjust your torque wrench, loosen the cap on the bottom of the handle by turning it counterclockwise. Once it’s loose, slide the handle up or down the wrench until the tip of the handle rests on the horizontal hash mark closest to your desired setting. The horizontal hash marks on the wrench are in multiples of 10 and are used to measure larger changes in the torque. Next, make minor adjustments by twisting the handle clockwise to increase the torque, or counterclockwise to lower the torque. The vertical hash marks on the handle itself are labeled with single digits and are used to make minor changes. For example, to reach 202 foot pounds (2,660 meters per kilogram), slide the handle up to the 200 hash mark, then twist the handle itself until the 2 is lined up with the hash marks on the handle. Screw the cap on the bottom of the handle clockwise to tighten it and lock your torque setting in at its current level. Keep in mind that a torque wrench can only be used to tighten nuts or bolts. You'll need to use a different tool to loosen them back up in the future. To learn how to use a dial torque wrench, read on!