This article was co-authored by wikiHow Staff. Our trained team of editors and researchers validate articles for accuracy and comprehensiveness. wikiHow's Content Management Team carefully monitors the work from our editorial staff to ensure that each article is backed by trusted research and meets our high quality standards.
This article has been viewed 14,830 times.
Learn more...
Never Take It Off (NTIO) bracelets are a popular accessory that can also help you to keep a promise to yourself. The idea is to choose a vow that you will make to yourself when you tie on the bracelet and then to remember that vow every time you look at your bracelet.[1] It is easy to learn how to tie an NTIO bracelet, but it helps to have a friend to help you.
Steps
Wrapping Your NTIO Bracelet
-
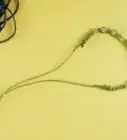
1Gather your materials. Before you begin wrapping your NTIO bracelet, make sure that you have everything that you will need. Some items are optional. You will need:[2]
- Bracelet
- Scissors
- Clear nail polish (optional, for making the knot more permanent)
- Separator rings (optional, for separating multiple NTIO bracelets)
-
2Ask a friend to help you. Tying on an NTIO bracelet is not something you can easily do on your own. You will need a friend to help you. It can also be helpful to have someone there to hear your vow. However, you can also say your vow in your head if you want to keep it a secret. Ask someone you trust to help you put on the bracelet.[3]Advertisement
-
3Identify your vow. Each NTIO bracelet comes with a list of suggested vows, but you can also choose your own vow. Make sure that the vow is something that is meaningful to you and that you think will help you in your daily life. Each time you look at your NTIO bracelet, you will be reminded of this vow. Some vows you might consider include:[4]
- Be kind to yourself
- Be courageous
- Be creative
- Do something that matters to you
- Laugh at yourself
- Think outside the box
- Be your own hero
-
4
-
5
-
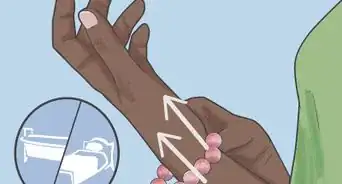
6Insert a pinky finger under the strings and tie them together. Inserting a pinky finger will help to ensure that the bracelet is not too tight. Stick your pinky finger under the strings and wiggle it to help loosen up the strings as needed. When you are happy with the fit of your NTIO bracelet, tie the strings together. However, do not tie them in a knot yet.[9]


Securing the Bracelet
-
1Make your vow. When you are ready to secure the bracelet, take a moment to close your eyes and make your vow. You can either say it out loud or you can say it in your head. Either way, focusing on your vow will help to solidify it. Take a deep breath and make your vow.[10]
- Remember that your vow can be one from the list that was included with your bracelet, or you can choose one of your own.
-
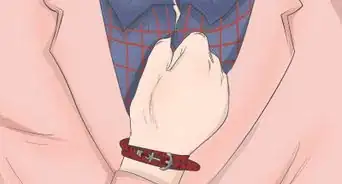
2Tie your first knot. After you have made your vow, you will need to tie your first knot. Take the strings and tie them together over the area where you tied the strings to loosely secure them. Tie the knot and tug the ends of the strings to secure it.[11]
-
3Apply a dot of clear nail polish, if desired. If you want to make extra sure that the bracelet is secured, then you can add a dot of nail polish to the knot you just made. This will help to make the knot even stronger. However, keep in mind that this is optional.[12]
- Make sure that you only apply a very small dab of nail polish to the knot.
-
4Tie your second knot. To finish securing your NTIO bracelet, you will need to tie the strings in one more knot. Tie the strings together and tug the ends to tighten the knot.[13]
-
5Cut the excess string an inch or two from the knot. After you have finished making your second knot, cut the excess string extending from the knot, but do not cut the strings too short. Cut them so that there is still an inch or two of string extending from the knot.[14]
- After you cut the excess string, your NTIO bracelet is tied on! Enjoy wearing it and remember your vow each time you look at it.


References
- ↑ https://never-take-it-off.myshopify.com/pages/our-story
- ↑ https://www.youtube.com/watch?v=PWWskM7bhCk
- ↑ https://www.youtube.com/watch?v=PWWskM7bhCk
- ↑ https://www.youtube.com/watch?v=C3l4gXiH_O8
- ↑ https://www.youtube.com/watch?v=PWWskM7bhCk
- ↑ https://www.youtube.com/watch?v=2ykdtt_-aPE
- ↑ https://www.youtube.com/watch?v=PWWskM7bhCk
- ↑ https://www.youtube.com/watch?v=2ykdtt_-aPE
- ↑ https://www.youtube.com/watch?v=PWWskM7bhCk
About This Article