This article was co-authored by Christine George. Christine George is a Master Hairstylist, Colorist, and Owner of Luxe Parlour, a premier boutique salon based in the Los Angeles, California area. Christine has over 23 years of hair styling and coloring experience. She specializes in customized haircuts, premium color services, balayage expertise, classic highlights, and color correction. She received her cosmetology degree from the Newberry School of Beauty.
This article has been viewed 199,181 times.
You can easily maintain and straighten your hair even if it’s damaged! To start, wash your hair with frizz-preventing and moisturizing shampoo and conditioner. Apply a deep conditioner at least once a week, and use a leave-in conditioner when you get out of the shower. You can section off your hair and straighten 1-2 inch sections at a time until you straighten all of your hair. Then, apply silkening serum or hair spray to finish your look! With the right products and tools, you easily straighten your hair!
Steps
Washing and Preparing Your Hair
-
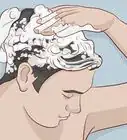
1Use a frizz-preventing shampoo to wash your hair. You can work on hydrating and protecting your hair even before you get out of the shower! Frizz-preventing shampoos help keep your hair smooth and tame before frizz strikes. When you wash your hair, apply shampoo directly to your roots, and massage the shampoo through your scalp. Then, work the shampoo down the ends of your hair. For best results, rinse your hair with cool water.[1] In addition, many beauty supply stores and drugstores sell shampoo, particularly for dry or damaged hair. You can use this as well as frizz-preventing products. Use shampoos with natural oils like Moroccan or argan oil for best results.[2] Rinsing your hair in cool water helps seal the cuticles of your hair, preventing frizz from popping up. It's okay to shampoo in warm water, as long as you rinse with cool water.
-
2Apply a strengthening conditioner after you wash out the shampoo. Luckily, there are countless conditioners on the market to help repair damaged hair. Purchase one from a drugstore or beauty supply store, and apply it to your hair after you shampoo it. Apply your conditioner liberally to all of your hair. It is best to let the conditioner sit on your hair for 2-5 minutes while you shower.[3] When shopping for conditioners, look for products advertised as moisturizing, strengthening, restorative, or made for dry or damaged hair.Advertisement
-
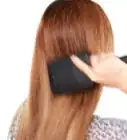
3Brush your hair with a wide-tooth comb after you apply conditioner. While your hair is still saturated in conditioner, comb your hair from root to tip.[4] Your hair is more elastic when wet, and the conditioner helps the comb glide through your hair and untangle any knots. This also results in less hair breakage than brushing your hair when it is dry.[5]
- This is especially beneficial for curly or textured hair.
- In addition, brushing your hair in the shower helps prevent frizz.
-
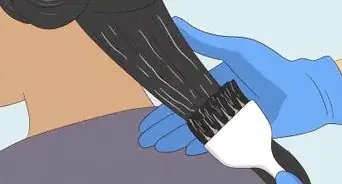
4Use a deep conditioning treatment or reparative mask 1-3 times a week. You can purchase a deep conditioner or reparative mask from a beauty supply store. After you rinse out your conditioner, you can apply deep conditioner generously from the roots of your hair to the tips. Be sure to thoroughly cover the ends of your hair to help repair any damages. Leave the conditioner on for 5-30 minutes, depending on the instructions on the label.[6] Each type of conditioner or mask has different time recommendations regarding how long to let the product sit on your hair. You can leave the product on your hair when you finish washing, or you can get out of the shower, let the product sit, then rinse it out in the sink. If you decide to let it sit, you can wear a shower cap over your head. Look for products using natural ingredients, like coconut oil or jojoba oil. These naturally replenish your hair’s nutrient level, while making your hair smooth and soft!
-
5Apply a leave-in conditioner while your hair is still damp. Leave-in conditioner is helpful for all hair types, especially if your hair is damaged. Squeeze a hefty dollop of conditioner into your palm, and rub it in both hands. Then, run both of your hands through your hair so all of your hair is completely saturated. In particular, make sure the ends of your hair are well covered. Leave-in conditioner helps strengthen, soften, and detangle your hair.[7] Alternatively, some leave-in conditioners come in spray varieties. To apply, simply spray it through your hair and run your fingers through your hair to check if you missed a spot. It is best to completely saturate your hair.
-
6Run heat-protectant cream or spray through the ends of your hair. Heat-protectant products have ingredients that reduce the damage caused by using styling tools requiring heat. To use, you can either spray the product directly onto your hair, or squeeze out a quarter-sized dollop onto your palms, rub it in both hands and run your hands through all of your hair. Apply this product after you deep condition your hair when it is still wet. Apply this before you use either a hair dryer or flat iron. Most heat-protectant products will work for temperatures up to 450 °F (232 °C).
-
7Dry your hair thoroughly using a diffuser. Diffusers are blow dryer attachments that disperse air flow evenly and dry large areas of your hair. They dry your hair without disturbing your curl or wave pattern, which prevents frizz. To use, clip the diffuser to the top of your blow dryer, lift up the top layer of your hair, and start drying from underneath. Hold the diffuser 2–3 in (5.1–7.6 cm) from your hair, and continue using the diffuser until all of your hair is dry.[8] Alternatively, you can use a blow dryer without a diffuser on a low or cool heat setting. This will prevent any further damage from styling products using heat.
-
8Select a low heat setting and let your flat iron heat up for 5-10 minutes. Exposing your hair to the constant heat of a flat iron can damage your hair, so it is best to use a low heat setting. Most flat irons have adjustable heat settings. Select the lowest setting, and sit your iron on a heat-resistant surface, like a cooling rack or silicone mat.[9] If the lowest setting does not smooth out your hair, you can adjust it 1-2 settings hotter. The lowest heat setting should be about 300 °F (149 °C). Avoid going above 410 °F (210 °C).


Straightening Your Hair
-
1Clip up the top half of your hair so you can straighten the bottom layer. For best results, section off your hair so you can easily straighten it in smaller chunks. Your flat iron will not be able to straighten a lot of hair at one time. To do this, run your fingers across the top half of your hair, sectioning it from the bottom. Then, twist the hair on top together, and clip it to the crown of your head, leaving the bottom layer down.[10] If you have a lot of hair, you can split your hair into 4 sections. After you’ve divided your hair from top to bottom, separate your hair on the bottom into 2 sections, 1 for the left side and 1 for the right. That way, you can easily straighten the hair on the bottom into manageable sections. Sectioning your hair will save you time. You will not have to go over the same section of hair multiple times if you carefully straighten 1 section at a time.
-
2Straighten your hair in 1–2 in (2.5–5.1 cm) sections at a time. After you’ve separated your hair, you are ready to begin straightening. Pick up a section of hair about 2 in (5.1 cm) wide, and clamp your straightening iron at your roots. Leave your straightener there for 1-3 seconds, then slowly pull the flat iron down to the ends of your hair while it is still clamped shut.[11]
- Gradually straightening your hair removes any curls or waves and smooths over damaged hair, so it looks soft and shiny!
-
3Straighten your hair until the bottom layer is completely smooth. Once you’ve straightened one section of hair, grab another section about 2 in (5.1 cm) wide and smooth it out as well. To do this, slowly move the straightener down to the ends of your hair. Repeat until the bottom section of your hair is completely straight.[12]
- Your hair should easily straighten out since you’ve applied products before you started. This helps soften your hair and prevents further damage from the heat.
-
4Unclip your top layer of hair and straighten it into small sections. Once you finish straightening the bottom, you can move on to the top of your hair. Remove the clip from your hair, and place your flat iron at the root of your hair in a small section. When straightening the top of your hair, it is easier to start from the front and work your way around your head.[13] If you have coarse or thick hair, you will find that straightening the top is much easier than straightening the bottom. Usually, the bottom of your hair is the most coarse. It may be easier to straighten coarse or thick hair if you run a comb through your hair under the hair straightener. The comb will smooth your hair before the straightener passes over it.
-
5Run your hands through your hair to see if you missed a spot. When you are finished, check your hair and feel for any sections that are not smooth and soft. If you find any curly or wavy sections, simply apply your straightener to the section, and move it from the root of your hair to the end.
- You want all of your hair to be straight and smooth!
-
6Apply a silkening serum to your hair if you want to prevent frizz.[14] To keep your hair straight, it is best to use silicone-free products, as they are often water-based. Silkening serums and oils work great for damaged hair because they add shine to dull hair as well as block out any potential moisture. To apply, squeeze a dime-size or quarter-size dollop of product in your hand, rub your hands together, and run it through all of your hair.[15] It is best to let your hair cool down for 2-3 minutes before you apply any styling product. If you need to apply more serum, simply squeeze out some more and reapply. Try not to apply the product to the same area twice to avoid looking greasy.
- Water-based products will reverse the straightening process.
-
7Spray a light layer of hairspray over your hair if you want a secure hold. Hairspray is another option to use as a finishing product. After your hair is cool, simply spray a light dusting of hairspray over all of your hair. You can hold up the top layers of hair to spray underneath as well. Hairspray controls frizz and adds shine to all hair types![16] In addition, you can comb your hairspray through your hair using a wide-tooth comb. This prevents your hair from getting sticky and evenly spreads the product through your hair.


Expert Q&A
Did you know you can get expert answers for this article?
Unlock expert answers by supporting wikiHow
-
QuestionCan you damage your hair by straightening it?
 Laura MartinLaura Martin is a Licensed Cosmetologist in Georgia. She has been a hair stylist since 2007 and a cosmetology teacher since 2013.
Licensed CosmetologistYes, straighteners can be very damaging to the hair. To minimize this, use them on the lowest heat setting possible and always apply a thermal protectant before straightening.
Support wikiHow by unlocking this expert answer.
-
QuestionCan using a hair straightener cause hair loss?Laura MartinLaura Martin is a Licensed Cosmetologist in Georgia. She has been a hair stylist since 2007 and a cosmetology teacher since 2013.
Licensed CosmetologistHair loss can't be caused by any styling technique unless you are using so much pressure that you are ripping hair out from the roots. What is more likely if you notice that straightening is thinning your hair is that it is causing breakage.Support wikiHow by unlocking this expert answer.
-
QuestionCan coconut oil help repair damaged hair?Laura MartinLaura Martin is a Licensed Cosmetologist in Georgia. She has been a hair stylist since 2007 and a cosmetology teacher since 2013.
Licensed CosmetologistCoconut oil can soften your hair and help protect fragile ends from further damage. Unfortunately, nothing can actually heal damaged hair.Support wikiHow by unlocking this expert answer.
Things You’ll Need
- Shampoo
- Conditioner
- Deep conditioner
- Leave-in conditioner
- Silkening serum
- Hair clips
- Diffuser
- Blow dryer
- Flat iron
- Hairspray (optional)
- Wide-tooth comb
Warnings
- Don’t set your flat iron on wooden surfaces. They can burn the wood and result in further damage.⧼thumbs_response⧽
- Avoid straightening your hair on humid days. Extra moisture in the air will make it tough to keep your hair straight.⧼thumbs_response⧽
- Make sure you unplug your flat iron when you are not using it.⧼thumbs_response⧽
- Flat irons get very hot and can burn both your hands and your hair. Do not touch the flat iron when it is turned on, and avoid leaving your hair between the iron for more than 30 seconds or so at a time.⧼thumbs_response⧽


References
- ↑ https://www.racked.com/2015/10/16/9520625/split-ends-repair-damage-hair-care-heat-styling-conditioner
- ↑ Christine George. Master Hair Stylist & Colorist. Expert Interview. 10 January 2020.
- ↑ https://www.racked.com/2015/10/16/9520625/split-ends-repair-damage-hair-care-heat-styling-conditioner
- ↑ Christine George. Master Hair Stylist & Colorist. Expert Interview. 10 January 2020.
- ↑ https://www.racked.com/2015/10/16/9520625/split-ends-repair-damage-hair-care-heat-styling-conditioner
- ↑ https://www.naturallycurly.com/curlreading/kinky-hair-type-4a/the-dos-and-donts-of-deep-conditioning
- ↑ https://www.racked.com/2015/10/16/9520625/split-ends-repair-damage-hair-care-heat-styling-conditioner
- ↑ https://youtu.be/WG9j3U_42zA
- ↑ https://youtu.be/u86dNRkPz4s?t=51s
- ↑ https://www.teenvogue.com/story/top-ten-flat-iron-mistakes
- ↑ https://www.teenvogue.com/story/top-ten-flat-iron-mistakes
- ↑ https://www.teenvogue.com/story/top-ten-flat-iron-mistakes
- ↑ https://www.teenvogue.com/story/top-ten-flat-iron-mistakes
- ↑ Christine George. Master Hair Stylist & Colorist. Expert Interview. 10 January 2020.
- ↑ https://www.teenvogue.com/story/top-ten-flat-iron-mistakes
- ↑ https://www.teenvogue.com/story/top-ten-flat-iron-mistakes
About This Article