This article was co-authored by wikiHow staff writer, Jack Lloyd. Jack Lloyd is a Technology Writer and Editor for wikiHow. He has over two years of experience writing and editing technology-related articles. He is technology enthusiast and an English teacher.
The wikiHow Tech Team also followed the article's instructions and verified that they work.
This article has been viewed 248,856 times.
Learn more...
This wikiHow teaches you how to create a public server in Minecraft on your Windows or Mac computer. While most methods regarding creating a Minecraft server include using the Minecraft server file and port forwarding, this is dangerous if you want to host a public server; instead, you can use free online hosting services to create a server to which others can connect without needing to know your computer's IP address.
Steps
Using Minehut
-
1Open the Minehut website. Go to https://minehut.com/ in your computer's web browser. Minehut is a Minecraft server host which can hold up to 10 players per server for free.
-
2Click Get Started. This is in the middle of the page.Advertisement
-
3Click Don't have an account. It's a link below the bottom-left corner of the login box. Doing so brings up an account creation form.
-
4Create an account. You'll need to make a Minehut account before you can host a server:
- Type your email address into the "Enter your email" text box.
- Check both boxes below the email address field.
- Click Continue.
- Retrieve the five-character verification code from your email inbox and enter it in the "Verify" text box.
- Click Continue
- Enter a password for your account in the "Choose a password" text box.
- Click Continue
-
5Enter a server name. Type your preferred server name into the text field in the middle of the page.
- Your server name must not exceed 10 characters.
- Your server name cannot contain special characters, nor can it contain spaces.
-
6Make sure you're using a Java server. In the "Pick a server type" drop-down box, you should see the word "Java"; if you see "Pocket Edition", click the drop-down box and then click Java in the resulting menu.
- As of June 2018, Minehut cannot support Pocket Edition servers, nor can it run servers for Bedrock Edition versions of Minecraft (e.g., the Windows 10 edition or console editions).
-
7Click Create. It's below the server type. Doing so creates your server.
-
8Click the Dashboard tab. This option is in the top-left side of the page. Your server's dashboard will open.
- You may instead need to refresh the page by clicking ⟳ in your browser's window or pressing F5 on your keyboard.
-
9Click Activate Server. It's a purple button in the middle of the page. This will turn on your server.
-
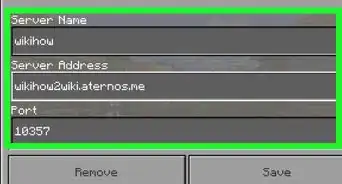
10Determine your server's address. In the "Server Status" window on the right side of the page, look at the address to the right of the "Connect" heading. This is the address you'll plug into the Direct Connect menu in Minecraft.
-
11Change your server's description. If you want to update your server's description for a public audience, click the Server Appearance tab on the left side of the page, then delete the text in the "MOTD" field on the right side of the page and replace it with your own.
-
12Buy more server space if necessary. While 10 players is the default for a free Minehut server, you can add more players by buying credits (click 0 credits in the upper-right corner, select a package, and enter your payment information) and then doing the following:
- Click Server Properties
- Click Max Players
- Select a number of players from the drop-down menu.
- Click Save
-
13Make sure you keep your server dashboard open. This will both ensure that your server doesn't go into hibernation and allow you to make quick server changes while playing online.


Using Server.Pro
-
1Open the Server.Pro website. Go to https://server.pro/ in your computer's web browser.
-
2Click Signup. It's a link in the top-right corner of the page.
-
3Create an account. You'll need to have a Server.Pro account in order to create a server here:
- Type a username into the "Username" text box.
- Type an email address into the "Email" text box.
- Type a password into the "Password" text box.
- Click Signup with Email
-
4Activate your email address. Do the following:
- Open your email address' inbox.
- Click the Server.pro - Welcome email (be sure to check your Spam folder if you don't see this email).
- Click Activate Account in the middle of the email window.
-
5Click GET YOUR SERVER NOW. It's the blue button in the middle of the page.
-
6Click Minecraft. You'll find this in the upper-left side of the page.
- Unfortunately, you can't host a Minecraft Pocket Edition server via Server.Pro even though the option is here.
-
7Enter a host name. In the "Choose Hostname" text box near the top of the page, type in the name you want to use for your server.
- If the name you want to use has already been taken,
-
8Select your server's attributes. Click your preferred region, then select the following options on the left side of the page:
- Click Vanilla
- Scroll down and click 0.5 GB
- Click Hourly
-
9Scroll down and check the "I'm not a robot" box. It's at the very bottom of the page.
-
10Click CREATE SERVER. You'll find this below the "I'm not a robot" box. Doing so takes you to the serve queue.
-
11Wait for your server to become available. Since you're using a free server, you'll have to wait a few minutes for your server to become available, at which point you'll have 60 seconds to confirm that you want to use the server before you'll lose your spot.
-
12Click START SERVER. It's a green button that will appear at the bottom of the page. This will create your server.
- If you don't click this button within 60 seconds of hearing the chime, your server spot will be lost and you'll have to go through the process of creating one again.
-
13Review the server's address. In the "Hostname" text box in the upper-left side of the page, you'll see your server's address. This is what others will need to enter in Minecraft's Direct Connect menu in order to connect to your server.
-
14Renew your server's time. Your server will be deleted if you don't renew it within 60 minutes of starting it:
- Click the green Renew Time box at the top of the page.
- Check the "I'm not a robot" box.
- Click Renew
- Return to your server by clicking My Servers and then clicking Control Panel below your server's name.


Connecting to the Server
-
1Open Minecraft. Double-click the Minecraft app icon, then click PLAY at the bottom of the launcher window when it appears.
-
2Click Multiplayer. It's near the middle of the page.
-
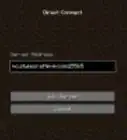
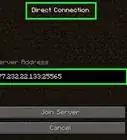
3Click Direct Connect. This option is in the lower-right side of the page.
-
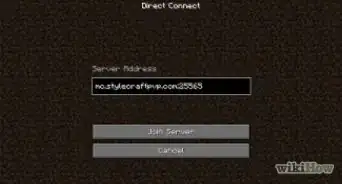
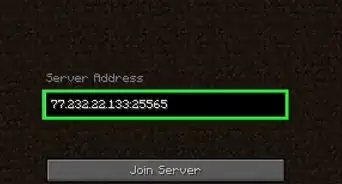
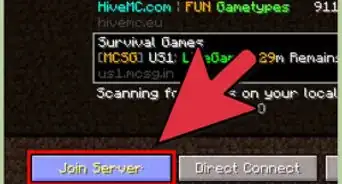
4Enter your server's address. Type the address for the server into the text box in the middle of the page.
- For a Minehut server, this is the "Connect" address from the "Server Status" section; if you're using Server.Pro, you'll type the "Hostname" address in here.
-
5Click Join Server. It's at the bottom of the page. Doing so will connect you to the server and place you in the server's world.


Community Q&A
-
QuestionDo I have to have the server file open so others can play?
 Community AnswerYes. When that file is open, the server is open. If you close the file, your server will shut down until you open the file again.
 -
QuestionIf I start a server without a port on Mac, is it public?
 Community AnswerNo. Port 25565 always has to be forwarded on your router for remote connections to the server.
 -
QuestionHow do I reopen my server?Community AnswerReopen the file. The file's status is the server's status: Open/Closed. So if the file is open, the server is open. Simply launch the file to enable it.