This article was co-authored by wikiHow staff writer, Janice Tieperman. Janice is a professional and creative writer who has worked at wikiHow since 2019. With both a B.A. and M.A. in English from East Stroudsburg University, she has a passion for writing a wide variety of content for anyone and everyone. In her free time, you can find her working on a new crochet pattern, listening to true crime podcasts, or tackling a new creative writing project.
There are 9 references cited in this article, which can be found at the bottom of the page.
This article has been viewed 46,675 times.
Learn more...
Fingerpicking can add a lot of style and personality to your guitar playing, but it can be difficult to get the hang of. Since you’re playing individual notes instead of chords, the tabs might look a little overwhelming at first. If you’re relatively new to playing guitar, it might help to go over the basics of guitar tabs, as well as specific fingerpicking techniques. If you’re ready to dive into some new music, set aside some time each day to practice playing and reading fingerstyle guitar pieces so you can begin to improve!
Steps
Reviewing Tablature Basics
-
1Read guitar tablatures from left to right. Look for individual numbers on the 6 lines of your guitar tab, and start reading them from the left. Keep in mind that more advanced tabs might require you to play multiple notes at once.[1]
- Guitar tabs are written in bars. Once you read 1 bar from left to right, start reading the next bar down, also from left to right.
-
2Look at the 6 tab strings as the 6 strings on your guitar. Pretend that your tab is the surface of your instrument. Remember that the top line represents the higher E string, followed by B, G, D, A, and low E strings, in descending order. Use the different strings as a guide for placing your fingers as you review different fingerstyle tabs.[2]
- For instance, if you see numbers listed on the second string and then the fifth string, you’ll need to pluck the B and A strings, respectively.
Advertisement -
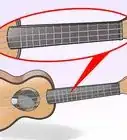
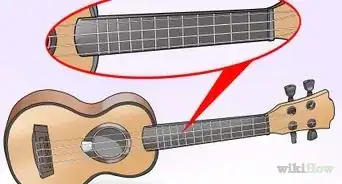
3Associate the numbers on your tab with specific guitar frets. Search along the neck of your guitar for thin metal bars that form different sections, or frets. Label the topmost fret as “1,” the second as “2,” the third as “3,” and so on. If you see “0” listed on your fingerpicking tab, pluck the string without pressing down on any of the frets.[3]
- For example, if you see “0” listed on the A string, then you’d pluck the A string without holding down the string on any fret. If you see “4” listed on the A string, you’d pluck the string with 1 hand while using your opposite to apply pressure on the 4th fret.
-
4Review common time signatures that appear on a lot of tabs. Look for a “4/4” or “3/4” written on the left hand side of the tab. Remember that 4/4 music has 4 single/quarter notes per measure, while 3/4 music only has 3 notes. You may also see 2/4, or more complex time signatures like 5/8 or 7/8, which mean that there are 5 or 7 short/eighth notes in the measure.[4]
- Time signatures may have an impact on the type of picking pattern that’s written in the music.


Fingerpicking Single Notes
-
1Use the PIMA hand formation whenever you fingerpick. Label your thumb, index, middle, and ring finger of your right hand with the letters, P, I, M, and A. Keep these 4 fingers curved whenever you play, as they’re the only fingers you use when you fingerpick. Memorize this acronym so you can read and play fingerpicking tabs more fluidly.[5]
Did you know? You can also label your fingers with the T123 acronym instead of PIMA. With this system, your thumb is “T,” your pointer finger is “1,” your middle finger is “2,” and your ring finger is “3.”[6]
-
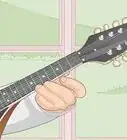
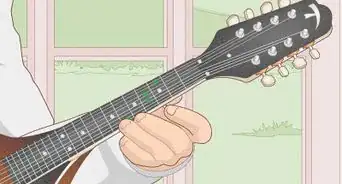
2Arrange the fingers of your left hand on the frets to produce unique notes. Keep your left hand curved but relaxed along the neck of the guitar. Don’t use your thumb when fingering chords on the frets—instead, use your pointer, middle, ring, and pinky fingers. Apply a moderate amount of pressure when you hold down these notes to create a variety of different chords.[7]
- Always keep your thumb on the bottom of the guitar neck, which encourages you to form chords with your fingers.
- For instance, if you were playing an F-major chord in your tablature, you’d want to keep your pointer finger on the C string in the first fret, your middle finger on the A string in the second fret, and your ring finger on the F string in the third fret.
-
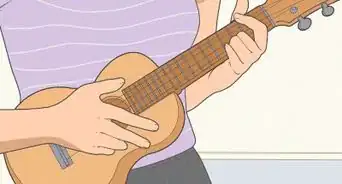
3Pluck a string with your right hand using moderate pressure to play the note. Hold the fingers of your left hand down firmly so you can create definitive notes and chords. Keep in mind that the guitar is a very fluid instrument, so you need to be able to switch chords and fingerings easily. Similarly, the fingers of your right hand need to apply soft pressure to make the string vibrate without tugging the strings super hard.[8]
- You’ll be plucking and holding down different strings when you play from a fingerpicking tablature, so you don’t want to overdo it!
-
4Press on a different note and pluck the strings again to play a new note. Follow the provided shorthand on your tablature, whether it’s written as PIMA or T123. Use these recommendations to pluck the individual notes and work your way through the tab. Apply a moderate amount of pressure as you pluck the strings so you can get a rich sound.[9]
- For instance, if your sheet music lists a series of 4 notes that are labeled in the order of M, 1, 2, and 3, you’d pluck the first note with your thumb, the second note with your index finger, the third note with your middle finger, and the fourth note with your ring finger.
- Fingerings may vary per song. Always look over new guitar tabs ahead of time so you have an idea of what to expect.
-
5Play 1 note at a time at a comfortable pace to get a feel for the tablature. Give yourself time to position your left hand on the neck of the guitar while keeping your right hand over the center of the instrument. Before you start thinking about tempo and rhythm, make sure that you can comfortably play each note in the tablature. Once you get the hang of the notes, you can play them at full speed![10]
- For instance, a tablature could have you play an open A string, then make you switch to the second fret on the D string.


Playing Chord Progressions and Riffs
-
1Figure out the chord that your fingerpicking tab is referring to. Look at each individual line on the fingerpicking tab and place your fingers on the specified frets. Analyze the chord you’ve created with your fingers and see if you can recognize it. You may have an easier time reading a fingerpicking tab if you know which chords and frets are involved ahead of time.[11]
- For instance, if the tab tells you to play the A string on the third fret and the G string on the first fret while keeping the high-E and B strings open, then you’re playing a C chord.
- If you’re new to guitar, you may want to memorize a variety of major and minor chords before you start fingerpicking.
-
2Study each measure to see if there’s a chord progression. Compare the measures to see if the fret fingerings change at all. While some songs and exercises might stay the same over several measures, you might notice a change in some exercises. Continue fingering the fret and comparing the notes to specific guitar chords, which will help you to better understand what you’re playing.[12]
- For instance, a simple fingerpicking exercise might have you play the notes in a G chord for 1 measure and then the notes in a C chord for another.
-
3Use multiple fingers to pick several notes at once. Look for groupings of numbers that are stacked on top one another. When 2 notes are grouped together, use your thumb and pointer finger to pluck the notes. If you see 3 notes grouped together at once, use your thumb, pointer finger, and middle finger to play the tab correctly.[13]


Using Fingerpicking Exercises
-
1Use simple warm-ups to prep your fingers for a practice session. Search online for short, easy tabs that only involve a few fingers. Look for tabs that help you fingerpick using just your pointer and middle fingers, your pointer and ring fingers, and your middle and ring fingers. Play through the exercise tab at a slow pace so you can start associating the tab shorthand with certain fingers.[14]
- For instance, an exercise tab that teaches you to pluck with your pointer and middle fingers would be labeled with alternating Is and Ms.
- Check out this site for some free suggestions: https://mattwarnockguitar.com/fingerstyle.
-
2Try basic chord progression exercises to get the hang of tabs. Look online for tabs that include several different chords, like C and G. Practice switching the position of your fingers on the frets so you can get the hang of more complicated music. Specifically, look for exercises that have you play a series of 6 or 8 notes in fast succession.[15]
- You can find some sample exercises here: https://www.cyberfret.com/fingerstyle-guitar-lessons/guitar-fingerpicking-basics.
- For a bonus challenge, experiment by playing fingerpicking exercises in different time signatures.[16]
-
3Find sheet music for popular songs so you can practice with familiar music. Search for a free music directory online that has a lot of fingerpicking tabs. Download the sheet music to a song you’re familiar with, like Amazing Grace or Auld Lang Syne, and try playing through the tab slowly. Don’t be discouraged if you can’t play actual tabs for awhile—it might take several weeks or months before you feel comfortable and confident reading a fingerpicking tab successfully.[17]


References
- ↑ https://www.simplifyingtheory.com/how-to-read-guitar-tabs/
- ↑ https://www.simplifyingtheory.com/how-to-read-guitar-tabs/
- ↑ https://www.simplifyingtheory.com/how-to-read-guitar-tabs/
- ↑ https://www.cyberfret.com/fingerstyle-guitar-lessons/guitar-fingerpicking-basics/
- ↑ https://www.uberchord.com/blog/fingerstyle-guitar-technique-fingerpicking/
- ↑ https://www.cyberfret.com/fingerstyle-guitar-lessons/guitar-fingerpicking-basics/
- ↑ https://www.uberchord.com/blog/10-tips-technique-how-to-play-the-guitar/
- ↑ https://www.uberchord.com/blog/common-beginner-guitar-mistakes/
- ↑ https://www.cyberfret.com/fingerstyle-guitar-lessons/guitar-fingerpicking-basics/
- ↑ https://www.uberchord.com/blog/fingerstyle-guitar-technique-fingerpicking/
- ↑ https://m.youtube.com/watch?v=2hkCrRpyoWQ&t=5m5s
- ↑ https://www.cyberfret.com/fingerstyle-guitar-lessons/guitar-fingerpicking-basics/
- ↑ https://m.youtube.com/watch?v=2hkCrRpyoWQ&t=5m58s
- ↑ https://mattwarnockguitar.com/fingerstyle/
- ↑ https://www.cyberfret.com/fingerstyle-guitar-lessons/guitar-fingerpicking-basics/
- ↑ https://www.cyberfret.com/fingerstyle-guitar-lessons/guitar-fingerpicking-basics/
- ↑ https://www.guitardownunder.com/fingerstyle.php