This article was co-authored by Lauren Kurtz. Lauren Kurtz is a Naturalist and Horticultural Specialist. Lauren has worked for Aurora, Colorado managing the Water-Wise Garden at Aurora Municipal Center for the Water Conservation Department. She earned a BA in Environmental and Sustainability Studies from Western Michigan University in 2014.
There are 8 references cited in this article, which can be found at the bottom of the page.
This article has been viewed 21,105 times.
Although there are many different vine types to choose from, the foundation for healthy plants is fairly universal. Whether you want to cultivate grape vines for their edible fruits, or grow flowering pink clematis vines to accent your home or garden, you can enjoy the reward of these beautiful, sprawling plants with a bit of knowledge specific to vine growth.
Steps
Establishing Proper Growing Conditions
-
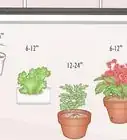
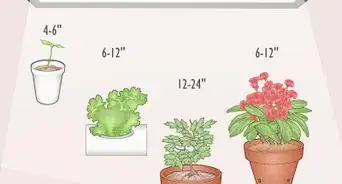
1Locate a planting region with enough sunlight and shade. The textbook definition of full sunlight is 6 or more hours of exposure, which can be continuous or in multiple increments throughout the day. If you notice dry petals, drooping, burnt leaf edges, or a faded or washed out color, your vines are probably not getting enough sun. On the other hand, partial sunlight is between 4 to 6 hours a day, and signs of too much sun exposure are pale, yellowish-green leaves, shriveled dry leaves, or leaves with brown spots.
- Many vines can tolerate both full and partial sunlight, including the Virginia Creeper, Dutchman's Pipe, Trumpet Vine, American Bittersweet, Boston Ivy, Climbing Hydrangea, Honeysuckle, Clematis, and Hops.[1]
- Vines like Gourds, Passion Flower, Hardy Kiwi, Perennial Sweet Pea, and Kentucky Wisteria require full sunlight.[2]
- Both annual and perennial varieties require a specific amount of sunlight.
- The Tri-Color Kiwi English Ivy, English Ivy, and Moonlight require partial sunlight.
-
2Plant your perennials in the proper plant hardiness zone. Perennial vines grow for more than two years and unlike annuals that live for just one growing season, they need an environment suitable for long-term growth. Plant hardiness zones can help you determine which zones provide optimal temperature for growth. For example, passion fruit vines thrive in zones 9b to 11, and sweet autumn clematis thrives in zones 4 to 9.
- Vines with a hardiness range that starts at 4, meaning they can withstand minimum temperatures of −30 to −35 °F (−34 to −37 °C), include: Hardy Kiwi, Tri-Color Kiwi, Duchman's Pipe, Trumpet Vine, English Ivy, and Perennial Sweet Pea.[3]
- Vines with a hardiness range that starts at 3, which means they can withstand minimum temperatures of −40 to −45 °F (−40 to −43 °C), include: American Bittersweet, Virginia Creeper, Boston Ivy, Honeysuckle, Clematis, and Kentucky Wisteria.
- The worldwide USDA plant hardiness zones can be viewed here:
Advertisement -
3Grow your annual vines indoors for 4 to 6 weeks before transplanting. It's best to start annual vines from seeds indoors before moving them into the garden. They are sensitive to frost and colder soil due to their tender nature. When you move them outdoors, always make sure that there is no chance of frost and soil is consistently warm.[4]
- Keep an eye out for brown crispy leaves and a lack of growth, which are signs of frost damage and lower soil temperatures.
-
4Find your species' pH range, if applicable. Although trees generally thrive with pHs between 5.5 and 6.5, some vines require a specific range to thrive. If your vine requires a pH outside of the standard range, you can use sulfur, aluminum sulfite, or limestone to adjust it.[5]
- Sulfur additions decrease pH gradually, although this can vary based on temperature, moisture, and bacterial presence. Alternatively, aluminum sulfate additions decrease pH instantaneously, but are more difficult to control.[6]
- Dolomitic limestone additions raise the pH of soils low in magnesium. Calcitic limestone additions raise the pH of soils high in magnesium.[7]


Setting up Your Vines
-
1Plant your vines between April and June. If you're planting root grapevines, do so in April or May—whenever the soil can be worked easiest. For potted grapevines, plant them when frost has passed in May or June.[8]
- Let each plant's roots soak for 2 to 3 hours prior to planting.
-
2Build a garden trellis for aerial roots. These types of vines need to be trained to grow upward using a support. Trellis' can be created from 8 foot (2.4 m) long boards that are cut down to 2 pieces 6 feet (1.8 m) in length placed parallel and 2 pieces 4 foot (1.2 m) in length on top in the shape of a picture frame. The next 2 pieces are 4 feet (1.2 m) in length and are connected horizontally to the 6 foot (1.8 m) boards, and another 5 pieces 4 feet (1.2 m) in length are layered vertically on top.[9]
- Aerial roots are best grown near stone or brick walls—they can accommodate these sprawling roots without being damaged.
- Trellis' are commonly hung on the side of homes using screws that are long enough to penetrate the trellis and into the wall behind it.
- Proper vine growth, such as by growing along a trellis, reduces the risk of disease and ensures that your plants don't invade crevices and small spaces in your wall, which can lead to cracking and crumbling.
-
3Squeeze the plastic cells holding your vines. Before planting, you need to loosen the grip of the soil and roots to the walls of the cells. This will ensure that the root ball dislodges properly when you pull it out.[10]
- All of the soil within the plastic cells should be moist, and any excess water should be drained away.
- If you're having trouble, water the soil and try gently loosening it with a trowel.
-
4Dig a hole that is twice the size of the root ball for transplanting. Find a region with loose soil that drains well. Afterwards, throw some compost or aged manure into the bottom of the hole and pat it down into a layer on top.[11]
- The hole should always be wider and deeper than the root zone, which is the region of soil and oxygen that surrounds your plant's roots.
-
5Slide the vine out of the pot gently and into the hole. Hold your vines by the primary shoot with one hand and the root ball with the other. Never place it deeper than it was already growing.[12]
- Take care not to ruin the root ball.
-
6Fill the hole back up with backfill. This is the soil that was removed to make the hole. Firmly pat down the soil with your hands and make sure that the graft union is about 3 to 4 inches (7.6 to 10.2 cm) above the soil.[13]
- The graft union is located at the line on the primary shoot that seems to separate 2 different colors, as if 2 different plants were grafted together.
- Do not compact the soil too much—never step on it, as this can break the plant's roots.


Caring for Your Vines
-
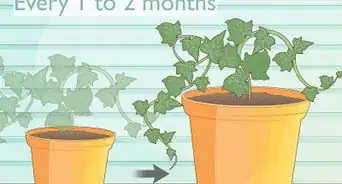
1Water your vines regularly for the first year following planting. Although different soil types have varying water holding capacities, about 1⁄2 to 1 gallon (1.9 to 3.8 L) for each vine every 3 to 5 days is a good guideline. This is especially important if your region gets minimal rainfall. Installing a drip irrigation system or soaker hoses is ideal. Garden hoses and sprinklers also work, but aren't as efficient and economical as other options.[14]
- The only exception to this watering frequency is if your plant is drought-tolerant, meaning it can tolerate less frequent watering.
-
2Attach garden ties to sprawling flowering vines. If your flowering vines are known to sprawl, use garden ties (or stretchable fabric, such as old pantyhose) to contain them. Tie them into the directions that you want them to grow.[15]
- Thorns can be used to hook onto supports, but they should still be tied, as they aren't sufficient to guide growth properly.
-
3Secure shelters to your vines for protection. You can purchase vine shelters from local home and garden stores. You can also use your own, such as 1⁄2 gallon (1.9 L) milk cartons or grow tubes.
- Wrap each shelter around the vines and use nails to attach them to the stake in the direction of desired growth.


Things You'll Need
- Potted vine plants
- pH tester
- Sulfur, aluminum sulfite, or limestone
- 2 pieces of 6 feet (1.8 m) long board
- 9 pieces of 4 feet (1.2 m) long board
- Garden shovel
- Watering bucket
- Garden ties
- Vine shelters


References
- ↑ http://extension.illinois.edu/vines/perennials.cfm
- ↑ http://extension.illinois.edu/vines/annuals.cfm
- ↑ http://extension.illinois.edu/vines/perennials.cfm
- ↑ http://extension.illinois.edu/vines/annuals.cfm
- ↑ http://extension.msstate.edu/content/soil-testing
- ↑ http://www.clemson.edu/extension/hgic/plants/other/soils/hgic1650.html
- ↑ http://extension.msstate.edu/content/soil-testing
- ↑ https://www.extension.umn.edu/garden/yard-garden/fruit/growing-grapes-for-home-use/
- ↑ https://www.youtube.com/watch?v=-jhL0J02pbs
- ↑ http://www.novavine.com/grapevines/planting-and-care/planting-green-vines/
- ↑ http://www.novavine.com/grapevines/planting-and-care/planting-green-vines/
- ↑ http://www.novavine.com/grapevines/planting-and-care/planting-green-vines/
- ↑ http://www.novavine.com/grapevines/planting-and-care/planting-green-vines/
- ↑ http://www.novavine.com/grapevines/planting-and-care/planting-green-vines/
- ↑ http://www.novavine.com/grapevines/planting-and-care/planting-green-vines/
- ↑ https://www.extension.umn.edu/garden/yard-garden/fruit/growing-grapes-for-home-use/
- ↑ https://www.extension.umn.edu/garden/yard-garden/fruit/growing-grapes-for-home-use
About This Article