X
wikiHow is a “wiki,” similar to Wikipedia, which means that many of our articles are co-written by multiple authors. To create this article, 12 people, some anonymous, worked to edit and improve it over time.
This article has been viewed 29,248 times.
Learn more...
Drifting is a popular Motorsport that offers numerous photo opportunities for aspiring race photographers. With a few pointers and tricks, getting started will be much easier.
Steps
-
1Set up your camera. In time, you'll learn all sorts of tricks that will contradict these instructions, such as trap-focusing in manual-focus mode, but to get you started these setting suggestions will help:
- Auto focus: Set this to continuous (C or AF-C on Nikon cameras, SERVO on Canon cameras).
- Frame rate: Faster is not always better! Remember, with your SLR, the faster your frame rate, the greater time is spent with your SLR's mirror in the up position, and consequently, you might have problems tracking the action with your viewfinder blacked out for so much of the time. On the other hand, faster frame rates give you an opportunity to catch the action at exactly the right moment, which is why professional sports photographers love them.
- Image stabilization: Nikon calls this VR (vibration reduction). You probably want this on, even for panning shots (which this article will cover later).
-
Exposure mode: Start out with shutter-priority mode (S on Nikon cameras, Tv on Canon cameras); this mode lets you pick a shutter speed and the camera will pick an aperture to match. It's more likely that you'll need to control your shutter speed than control your depth of field while photographing drifting. Of course, you can just use Program and shift the program to your desired combination of shutter speed and aperture.
Don't use the "Sports" mode on your camera if you have one; this locks out several of your controls and forces fast shutter speeds that result in boring photographs (which will be covered later). - Image quality: Most motor racing photographers shoot raw. Some people prefer shooting JPEGs. This is a religious subject which won't be touched on here; use whatever works for you.
-
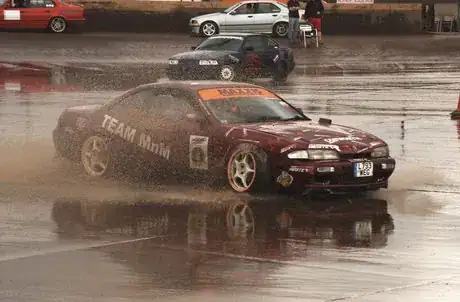
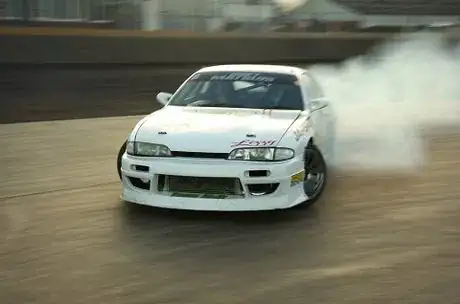
Shot at a shutter speed of 1/800. Notice that the wheels are stationary; the only indication that anything is moving in this shot is the spray coming from the wheels. Beautiful car, but boring photograph!
 2Start with a fast shutter speed, like 1/250 or faster, until you get used to tracking action with your camera. You'll notice that at these fast shutter speeds the photographs will be boring, with little sense of movement. Sometimes you'll need these shutter speeds to get a certain shot, but for now, just shoot at these speeds to get used to shooting your camera.Advertisement
 -
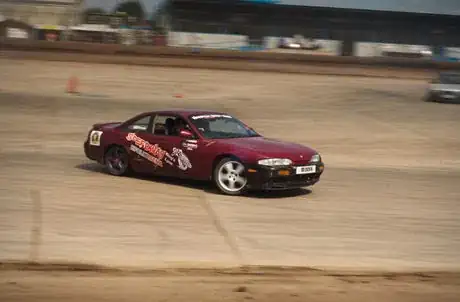
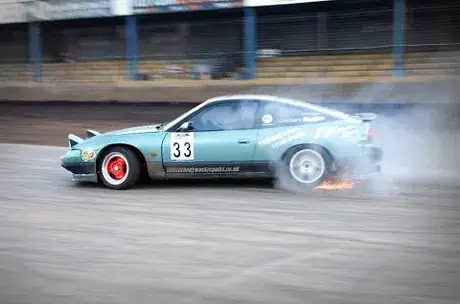
Same track, similar car, same location, but in this shot it's obvious that something was actually moving, because of the slower shutter speed of 1/100. (This was shot with a fixed 50mm lens, not a telephoto; it's better to get as close as track rules will allow and shoot with a wider lens.)
 3Keep using slower and slower shutter speeds. You want to use a speed such that it's obvious wheels are turning, at the least. Slow shutter speeds can't freeze action (more on that in a second), but it'll be more obvious that something is actually moving.
 -
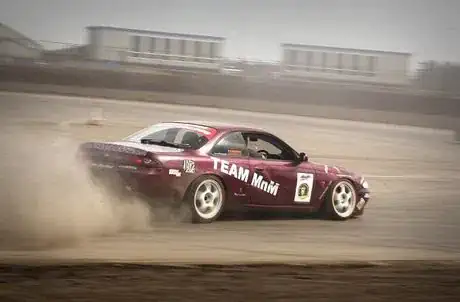
The same car from the boring photograph earlier: this is much better, as the camera is panning with the car at a shutter speed of 1/80, motion-blurring the background but keeping the vehicle sharp (ish).
 4Learn to pan. Panning is a technique where you keep moving the camera with the action, even after the shutter has closed and the mirror is up. In this case, you smoothly move your camera with the car, keeping it in a constant place in the frame; shoot at a slow enough shutter speed and the background will be motion-blurred, while the car will be sharp.
Thom Hogan recommends this: Pan with your subject and take a picture. Your viewfinder (on an SLR) will temporarily black out. If the subject isn't in the same place in the viewfinder when the mirror returns, you are not panning smoothly enough. Try again until you get it right; it takes tons of practice. -
5Keep shooting at slower and slower speeds until you hit the limits of your technique. If you don't have the shooting opportunities to practice, then just shoot between 1/60 to 1/100; it's fast enough that you don't have to be a superhero to hand-hold and pan the shot at moderate focal lengths, but still more than fast enough to give an obvious sense of motion. Nikon's VR and Canon's IS are huge helps here if you have them; it means you can hand-hold lenses at shutter speeds way below the traditional safe speed of 1/focal length. They also help to stabilize the pan, dampening up-and-down camera shake without trying to counter panning.
-
Lewis Mitchell at the Norfolk Arena. Note that the front of the car seems to be acceptably sharp, but even the windscreen is visibly motion blurred. This is a consequence of trigonometry, not depth of field.
 6Learn to time the shot for the perfect moment in the drift. Fast frame rates from high-end SLRs help here, but even if you have one of these you'll learn a lot if you slow your camera down and try firing off one or two, rather than a dozen, shots for each pass.
The easiest way to get a dramatic shot is right as the car has stopped rotating, as it is attempting to recover to turn the other way, and is travelling sideways with front wheels rotated; if you combine this with a slow pan it will make it very obvious that a car is travelling sideways. But there is another perfect moment: if a car is rotating along the axis of its front wheels, you will be able to catch a moment where the rear of the car is visibly motion blurred and the front of the car is not. Remember your high school trigonometry lessons: while both ends of the cars turn by the same degree, if a thing rotates around a certain axis, for certain observers things closer to that axis will appear to have moved less than things further from that axis.Every driver is different; plenty of practice will teach you the perfect moment to shoot a certain driver. -
Phil Cracknell's 200SX caught seconds before a tire exploded; right before they explode, spectacular sparks like these are thrown out as the carcass is worn through.
 7Keep your wits about you and your eyes and ears open. Not only will this keep you safe, but it'll also result in some much better shots. This is another way of saying shoot drifting as much as possible. You'll learn to recognize the sound of tires about to explode, for example; you'll either catch them while they explode or get some spectacular shots (especially in the dark) of sparks spraying from the tire as it wears through the metal carcass.


Advertisement
Warnings
- As far as motor sports go, legal drift racing is rather safe, and serious accidents are extremely rare. However, be aware of what's happening around you. Always follow instructions on signs and from track Marshalls.⧼thumbs_response⧽
Advertisement
Things You'll Need
- A digital camera. A digital SLR, even a cheap one, is almost a necessity; they focus much faster and can track focus much better than compact cameras.
-
A lens. Fast (f/2.8), expensive professional zoom lenses aren't a necessity unless you're shooting at last light or at night (though these will make for stunning shots). Far more important than this is the auto focus speed; some f/2.8 telephotos focus slower than some f/4-5.6 zooms. On the other hand, professional lenses are usually better built, and give you more flexibility in lower light.
You don't need enormous telephoto lenses when you're starting out doing it for fun; you'll get much better results with a mid-range zoom and getting as close to the action as you are allowed. - Plenty of memory. You'll be shooting rapidly and filling up your cards much quicker than you think, especially if you're shooting raw.
- A circular polarizing filter is often very useful to reduce glare.


References
- Racefriv.com, How to Photograph Drifting, http://www.racefriv.com/2012/05/how-to-photograph-drifting.html – research source
About This Article
Advertisement