This article was co-authored by wikiHow staff writer, Hunter Rising. Hunter Rising is a wikiHow Staff Writer based in Los Angeles. He has more than three years of experience writing for and working with wikiHow. Hunter holds a BFA in Entertainment Design from the University of Wisconsin - Stout and a Minor in English Writing.
There are 8 references cited in this article, which can be found at the bottom of the page.
This article has been viewed 54,338 times.
Learn more...
Over time, the plastic trim on the interior and exterior of your car can get scratched and dirty. If you want to freshen up your car’s trim, all you need to do is apply a few coats of paint. Before you apply the paint, remove and clean the trim so the paint will adhere to the plastic. Once you’re finished, the trim on your vehicle will look like it just rolled off the lot!
Steps
Cleaning the Trim
-
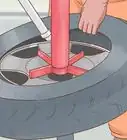
1Remove the plastic trim from your car if you can. Trim is easiest to get an even coat of paint on if it’s taken off of your vehicle. Use a screwdriver and look for the screws holding your trim in place, and slowly remove them so the trim comes loose from your vehicle. Make sure there are no electrical components attached to your trim when you take it off.[1]
- Set the screws in an area where you won’t forget them. If you’re removing all of your trim at once, keep the screws for each part separate from one another so you don’t accidentally mix them.
- Don’t try to paint plastic trim from your car’s interior if it cannot be removed.
-
2Mix soapy water together in your sink or in a bucket. Fill a sink with warm water and pour in 1 US tbsp (15 ml) of liquid dish soap. Thoroughly mix the soap into the water with your hands until it’s sudsy. If you have large pieces of trim or trim pieces you couldn’t remove, such as a bumper, then fill a bucket with soapy water instead of your sink.[2]Advertisement
-
3Clean the trim with the soapy water and a scouring pad. Wet a scouring pad in the soapy water and scrub your car’s trim with a light amount of pressure. This will help remove any dirt or grease that's on your trim as well as create small abrasions that will help the paint stick better. Be sure to rinse all of the soap off your trim after you scrub it.[3]
- You can also use a commercial degreaser to clean the trim on your vehicle.
- As long as you use a scouring pad, you shouldn’t have to sand your trim.
-
4Dry the trim with a lint-free towel before letting it air dry. Shake off any excess water from your trim and then use a lint-free microfiber to dry it. Make sure to dry all of the corners and areas where water could collect or else your paint won’t set in that area. Once you get the trim towel-dry, let it air dry completely for about 1-2 hours so there’s no water on it when you start to paint.[4]
- It may take more or less time for your trim to dry depending on the weather conditions.
Tip: If your trim doesn’t look scuffed after it’s dry, use 200-grit sandpaper and apply light pressure so the paint can adhere.


Setting up Your Work Area
-
1Spread a drop cloth on the ground outdoors. Find a hard flat surface outdoors to put your drop cloth down so you don’t get paint on the ground. Put something heavy on each corner to hold the cloth securely in place. Space the pieces of your car’s trim on the drop cloth so you’re able to paint the sides of each piece.[5]
- You can buy drop cloths at paint supply or hardware stores.
Tip: If you don’t have a drop cloth, you can break down a cardboard box and use that instead.
-
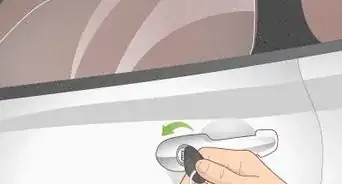
2Tape off the area around your trim if you couldn’t remove it from your car. If you weren’t able to remove the trim from your vehicle, cover the areas near your trim with masking paper so you don’t paint your car. Apply a layer of painter’s tape around the edges of the trim to secure it in place and create a tight seal that paint can’t get through.[6]
- You can buy masking paper and painter’s tape from home improvement stores or online.
- Don’t spray paint any trim inside your car that you can’t take out.
-
3Spray a coat of adhesion promoter on your trim. Shake the can of adhesion promoter to mix it together and hold it about 6 in (15 cm) from your trim. Apply a thin coat of the adhesion promoter, slowly working your way back and forth across the trim. Once you have one side finished, flip it over and spray the other side.[7]
- You can buy adhesion promoter from a painting or hardware store.


Applying the Paint
-
1Apply a coat of spray paint made for plastic for the best adhesion. Hold the can of spray paint about 6 in (15 cm) from your trim, and press the button to apply the paint. Move back and forth across the surface of your trim so you apply a thin and even coat. When you finish spraying from one direction, apply the paint from the other side of the trim.[8]
- You only need to paint the side of the trim that’s visible when it’s on your car. You can paint the back side of the trim if you want.
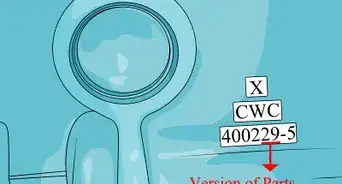
Tip: If you’re painting a hard plastic, such as ABS or PVC, start spraying while the adhesion promoter is still wet. If you’re spraying a flexible plastic, like TPO or PP, wait for the adhesion promoter to dry completely.[9]
-
2Let the first coat dry for 10 minutes before applying a second coat. Leave your first coat of paint for 10 minutes so it has time to set. When you apply your second coat, spray your paint in the opposite direction of your first coat. For example, if you sprayed from left to right for your first coat, spray up and down for your second coat. Make sure the paint evenly coats the trim so you don’t see the plastic underneath.[10]
- If you can still see the plastic underneath your paint after your second pass, then apply a third coat once the trim is dry again.
-
3Allow the trim to dry for 1 hour after all the coats are applied. Once you have all your coats applied, leave for an hour so it has time to completely set. Keep the trim in a well-ventilated area so the paint fumes don’t build up. Test a discrete area of the trim with your finger to see if the paint still feels sticky. If it does, let it dry longer.[11]
- It may take more or less time for the paint to dry depending on your climate.
-
4Apply a clear coat enamel once the trim is dry if you want a glossy finish. Clear coat enamel hardens the surface of your trim to protect against future damage and also adds a glossy finish. Hold the can of clear coat 6 in (15 cm) from the trim and apply a thin coat across the entire surface of your trim. Once you have the clear coat applied, allow it to dry for 2-3 hours.[12]
- You can buy clear coat enamel from paint supply or hardware stores.
- You don’t need to apply a clear coat if you don’t want to.


Warnings
- Be sure to work in a well-ventilated area when applying spray paint.⧼thumbs_response⧽
Things You’ll Need
- Screwdriver
- Dish soap
- Scouring pad
- Lint-free towel
- Drop cloth
- Painter’s tape
- Masking paper
- Adhesion promoter
- Spray paint made for plastic
- Clear coat enamel (optional)


-Beetle-Step-5-Version-3.webp)


References
- ↑ https://youtu.be/-IzkyJfFY28?t=161
- ↑ https://youtu.be/PPa20wwHjHA?t=127
- ↑ https://youtu.be/PPa20wwHjHA?t=127
- ↑ https://youtu.be/PPa20wwHjHA?t=182
- ↑ http://touchupzone.wpengine.com/wp-content/uploads/2015/10/Touch-Up-Zone-Trim-Hard-Plastic-Refinishing-Step-by-Step-Instructions.pdf
- ↑ http://touchupzone.wpengine.com/wp-content/uploads/2015/10/Touch-Up-Zone-Trim-Hard-Plastic-Refinishing-Step-by-Step-Instructions.pdf
- ↑ http://touchupzone.wpengine.com/wp-content/uploads/2015/10/Touch-Up-Zone-Trim-Hard-Plastic-Refinishing-Step-by-Step-Instructions.pdf
- ↑ https://youtu.be/-IzkyJfFY28?t=290
- ↑ http://touchupzone.wpengine.com/wp-content/uploads/2015/10/Touch-Up-Zone-Trim-Hard-Plastic-Refinishing-Step-by-Step-Instructions.pdf
About This Article